It’s taken a while but I’ve finally taken pictures of Cassie wearing the dress I made for her for Christmas! … Continue Reading →
The post village dress, for Cassie appeared first on Handmade by Carolyn.
It’s taken a while but I’ve finally taken pictures of Cassie wearing the dress I made for her for Christmas! … Continue Reading →
The post village dress, for Cassie appeared first on Handmade by Carolyn.
This new dress is the latest step in my current project to add some architectural whimsy to Cassie’s work wardrobe …. and it was barely … Continue Reading →
The post a townhouse dress appeared first on Handmade by Carolyn.
 Hello there. I’m Sally
Well, it’s been a long time since I’ve indulged in making something like a doll and doll’s clothes but omigosh, this was SO MUCH FUN. Honestly I think I’m just about to explode with the exquisite fun-ness of it all! I’m still on a bit of a high. All those cute teeny little bits and pieces. Quick as a snap, with barely any fussy finishing details. My inner child has been squealing fit to burst, here.
 So, my Mum took me to to Calico and Ivy for my belated birthday present; and we chose this book The Making of a Rag Doll, by Jess Brown, and a little stack of fat quarters. I know, right? I’m so lucky: FABULOUS birthday present! This was on Thursday and I finished this lot last night, so obviously I just could not wait to immediately get stuck into making my doll.

LOOK HOW CUTE OMG I CAN’T STAND IT

So I’ve named her Sally, and she has a complete summer and winter wardrobe. I’ve made for her everything from the book, bar the patchwork quilt. I might make the patchwork quilt too, well… everyone needs a little bed on which to rest our weary red head, non?!!! but in the meantime I want to do something else with the leftover pieces of fat quarters and I’ll wait until I’ve finished that before assessing my scraps for the quilt.
WARNING: NSFW, the following picture depicts nudity, do not proceed if a naked body causes offence to your eyes… bwahahahaha! I’ve always wanted to say that in a blog post! gawd so juvenile. *eyeroll at self*

I made my doll as per the book, but did my own face and hair design. I liked the face in the book but Craig reckoned it was a bit creepy … apologies to Jess Brown! Anyway I tried to make a face as sweet as possible, a fairly unsophisticated and simple design. I left her hair until last because I thought it would be the hardest bit and I was a little unsure about how to do it. The book has you just sew a piece of felt along the top, but I knew I wanted really thick woolly hair. As it turned out, doing the hair was lots of fun too, and I enjoyed every minute! I sewed strands of wool, two at a time, all over her scalp, so there is actually complete coverage of her scalp. I know from when I played with dolls as a child, my favourite dolls had complete hair coverage so that I could leave out or put up into pigtails or a pony tail, or do plaits… whatever I wanted. Even though I’m probably past the age of wanting to do my doll’s hair – or maybe NOT?! Anyway I still wanted proper hair. I absolutely love her wild shaggy mane of hair and decided to leave it untrimmed and just as is.
this first picture is the closest match to her actual hair colour


She has:
a summer wardrobe, comprising knickerbockers, a sundress, a pompom necklace, and a newspaper hat,
and; a winter wardrobe, comprising a long sleeved dress, an overcoat and a beanie. She also has an apron, for housework, and a little tote bag. A tote bag! eeeee the cuteness!

This whole project was heaps of fun. I know I keep repeating that, but honestly, the whole time I was playing about with this I just kept thinking “Omigod, so. Much. Fun!” you know, one of those projects where you cannot bear to put it down but you just want to keep doing a little bit more. Then a little bit more. Some, if not most of her clothes took a mere handful of minutes each; SO zippy and super super easy. And fun. Did I mention it was fun?
yup, she’s standing in a soup ladle. She has trouble standing up by herself

My materials; Sally herself is unbleached calico, stuffed with Australian-made Hobby-fill from Spotlight, pom pom for her necklace also from Spotlight. Hair is Morris Empire Superwash merino 4ply, in colour 441, Rust Twist, from my sock wool stash. Fabric for clothing; a bundle of fat quarters from Calico and Ivy, the ribbon for the tote bag handle was cut from the ribbon holding the fat quarters together. Also some scrap ribbons, yarn, embroidery thread, button, and other small bits and bobs from my stash.

My only slight regret is that the ends of the embroidery yarns show up a little bit behind her face… I tried to hide them in the stuffing as I went but evidently my calico is wide-weave and a little see-through, and as I stuffed her head, compressing the stuffing has forced the thread ends forward a bit. Well, we live and learn, I’ll know to be more careful about this next time.
don’t want to wear your beanie, Sally? Just stuff it in your TOTE BAG!
 Quickie review:
The Making of a Rag Doll, Jess Brown
Hardcover book, 136 pages, high quality paper, beautifully photographed and all over a very attractive presentation. Would be equally nice as a coffee table book actually!
The book contains patterns and full instructions for making the 41cm doll, plus clothing and accessories; knickerbockers, a sundress, overcoat, long-sleeved dress, beanie, apron, tote bag, quilt and a newspaper hat.
The patterns are full size, printed on both sides of two sheets of sturdy thick brown paper, kept in a slotted page in the back of the book, and are clear and easy to trace.
Contents; introduction is a nice summary of the author’s journey in doll making, then the next 20 pages or so are devoted to explanation of basic sewing terms and notes on sourcing supplies of fabric, haberdashery and sewing tools. All the explanations are extremely detailed, starting from the absolute basics and aimed at the complete beginner to sewing. As in this could be an excellent first sewing gift for a child. Instructions are exhaustively thorough, well laid out, and most are also accompanied by simple illustrations. All measurements are helpfully given in both imperial and metric.
Summary; excellent for a beginner to sewing, but really anyone could enjoy this book too, I certainly did! I was initially attracted to it because of the cuteness of the doll and her clothes and found it all to be a super easy as well as an incredibly fun project. Highly recommended!
The post world, meet Sally. Sally; world. appeared first on Handmade by Carolyn.
 I’ve made a little black-and-white striped skirt…
  another Vogue 1247. How many is this by now? Okaaaay, just counted and this is version number seven, and that’s not even counting the ones that I made leaving the pockets off. Counting those ones too, this is version number fourteen. Wowza! what a great pattern this has been!
yes to the pockets this time

I bought the striped fabric from Fabulous Fabrics during their end of year sale. It was brand new in the store when I first spotted it and bought this bit, and it must have been popular because on my next visit a couple of weeks later, it had all gone! Don’t remember its composition… often when I buy something spontaneously like this I don’t pay much attention to “what” it actually is… whoops! bad me
However, the fabric is almost like a light upholstery; loosely woven, with slightly coarse, silk-like cords of fibre-dyed threads. Quite stiff and unpliable, and doesn’t hold a crease well.
I’ve been ironing it on the silk setting, and that seems to be about as much heat as it can take.
As usual I added length about 10cm or so to the bottom edge. I didn’t measure exactly, just made it so as finish off with a black stripe at the bottom of the front hem. Since I’d measured so as to have black at the top merging in to the black waistband, it felt balanced to have the black at the bottom too. And this turned out to be a nice length for me too. There’s a little bit of the next white stripe graduating out the bottom of the back but I’m ok with this, it felt a little short when I trialled taking it up so as to eliminate that.
The black waistband is just cut so as to have exactly one full black stripe showing… the seam allowances are both in the white stripe on either side.

The camouflaged waitress pockets on the front of the skirt was the result of some very obsessive measuring during the cutting stage… followed by obsessive pinning, basting, slow sewing, and then some obsessive unpicking and re-sewing. #muchobsessiveness


I used a pale yellow poplin to line the waistband and to bind the seam allowances inside with HongKong seaming…. and I absolutely LOVE how this looks! I don’t always bind my seam allowances, but it always feels so good when I do! aaaaaah, there’s nothing quite so nice and deeply deeply satisfying for the home seamster than to gaze contentedly upon some HongKong bound seaming, yes?

Hmmm, that came out sounding a bit more navel-gazing and pathetic than intended. Clearly I need a life. Or at least to get out a bit more…
Whatever; new skirt, in too-cool-for-school black and white stripe, love it, ultra happy. I think this is going to be a very useful little thing to have in the wardrobe. I’ve already tried it on with a few of my current rotation of tops and it just goes with almost everything… yay! I LOVE it with my warm floral shirtdress, worn underneath here, so much so that I’m seriously considering re-hemming the dress a little shorter, so I can wear this combo more often.
Detail:
Skirt, Vogue 1247; striped silk-like woven, my original review of this pattern here
Shirt; Burdastyle 05/2010;111, silk georgette, details here and my review of this pattern here
Slip (under); the Ruby slip, a free pattern by pattern scissors cloth available here; mine made in ivory crepe, details here
Shoes; bensimon, from seed boutique
horizontal seam? what horizontal seam? *self back pat*

The post zebra crossing appeared first on Handmade by Carolyn.

My new lingerie set is inspired by the red-eyed tree frog. Yes, really! and this is my “thing” for Jungle January, the fun yearly challenge set by Anne of Pretty Greivances.
Deja vu!! because last year I also made underdaks, also froggy-inspired.

photograph credit, Carey James Balboa; source
So, hello there, Agalychnis callidryas. This little cutie is native to the rain forests that extend from Mexico down through Central America to Columbia… and thank YOU, Wikipedia. Also according to Wikipedia, its name callidryas is derived from the Greek for beautiful wood nymph. So while I am wearing it I shall imagine myself as a … bwahaha, I’m joking of course, I cannot even type that with a straight face. Lol.
It’s an exquisite little creature, is it not? the colours are quite magnificent. So bright and vivid and with those eyes; big, round and true scarlet, with a vertically aligned pupil. I positioned my two-hole buttons accordingly, and used black thread on purpose to mimic that.
 Well I reckon it’s the attention to the whimsical detail that becomes the most fun thing about making your own clothes!
Actually this was all a bit fortuitous… I kinda forgot about Jungle January, then Sue posted her dress and I was like doh! Jungle January! aaaaaagh! but as it turned out, I’d only just cut all the lingerie pieces of green jersey, like the night before. I’d managed to squeak these pieces out from the leftovers of a Tshirt… anyway, I looked at the colour and immediately thought “frog!”
So, with the perfect colour fabric (Fabulous Fabrics), plus it was already cut out and ready to go, I already had the blue fold-over elastic, navy blue underband elastic and the red buttons in Le Stash… so I just needed to dash out to Homecraft Textiles for some orange fold-over elastic; bob’s your uncle.
squeezing all details into one picture…
 Patterns; both knickers are the Watson briefs and the bra is my favourite pattern, MakeBra 2610. This is hands down the most wearable of the bra patterns in my collection.


Oh, I mentioned the lingerie set was leftovers from a Tshirt? well, now seems a good enough time as any to blog about that too. Lime green jersey from Fabulous Fabrics, pattern is the Nettie byCloset Case patterns, my go-to Tshirt pattern. It’s actually way too hot for me to really wear it right now, it’s 37C phew! so this is like a 20 second photo shoot happening here. I bought this fabric at the same time as the black-and-white striped fabric for this recent skirt, because I reckoned they’d be kind cool together, Tim Burton-ish, in a good way.

Actually, this project is pretty funny to me; see, the Tshirt was really my primary objective, because I wanted more colour options in my Tshirt department… the lingerie was cut out just as a “oh, what the hey” afterthought because the fabric was already out. In all likelihood the pieces would have got shoved away like the three other unmade lingerie sets I’ve already cut out under the same circumstances…. oops! must make those too… *blush*
Then Jungle January breathed inspiration into those scrappy bits, and I got all excited and super focused and enthused about making the lingerie and it became a much bigger deal in my head… I almost forgot about that Tshirt!
The post set de la tree frog appeared first on Handmade by Carolyn.

The latest instalment in my quest to “fun up” Cassie’s work wardrobe…
I dub thee the Palace skirt. Fabric a soft, heavy, slightly stretch sateen from Fabulous Fabrics. Of course. Pattern; Vogue 8363, my other favourite skirt pattern. Those discreet, yet deep, slanted pockets; so chic and so useful!

I had to buy quite a bit of the fabric in order to get the full printed panel and so as to have it centred on the skirt both front and back, and I only just managed to get the pieces out! Meaning, there was more wastage than I can normally tolerate… oh well, them’s the breaks when you choose an obvious large-scale print like this! The only downside.. notoriously fabric-hungry.  I only have the most awkwardly shaped scraps left. Oh well, it was worth it. I absolutely adore the print and am so damn happy with this skirt, I think it looks just gorgeous on her. I want one too!!

So I’m sending my daughter out into the world with naked men printed on her clothing… It’s art, ok?

 And also, don’t you just hate it when people boast smugly about their perfect pattern matching?
*proceeds to boast smugly about my perfect pattern matching*
Actually, the print placement at the back gave me serious pause, and I’m talking specifically about that door there, ahem. I didn’t want to have the print off, I really wanted all of that magnificent palace room to be there on the skirt as beautifully as it appears on the fabric and just could’t see any way around the door, or any way of eliminating it either, but it just had to be there, right boom in the centre back of the skirt. The best way I could think of doing it was just to have it there, no apologies,and to make sure the print matched up as well as I could.

Pale silver-grey invisible zip from Fabulous Fabrics as well, all raw edges inside are overlocked inside to finish, and I finished all the edges before sewing the seams, so as to get maximum lee-way in matching up the print on the side seams as well. I managed to cut the pockets from the self fabric, only one had to be pieced at the bottom due to the difficulty in cutting out around that print satisfactorily. The pocket lining, pictured above, is silver-grey polyacetate lining fabric, scraps from le Stash.
The final verdict from the recipient…? “I can’t wait to wear it to work on Monday!”
Details:
Skirt; Vogue 8363, stretch sateen, my original review of this pattern here
Tshirt; Cotton on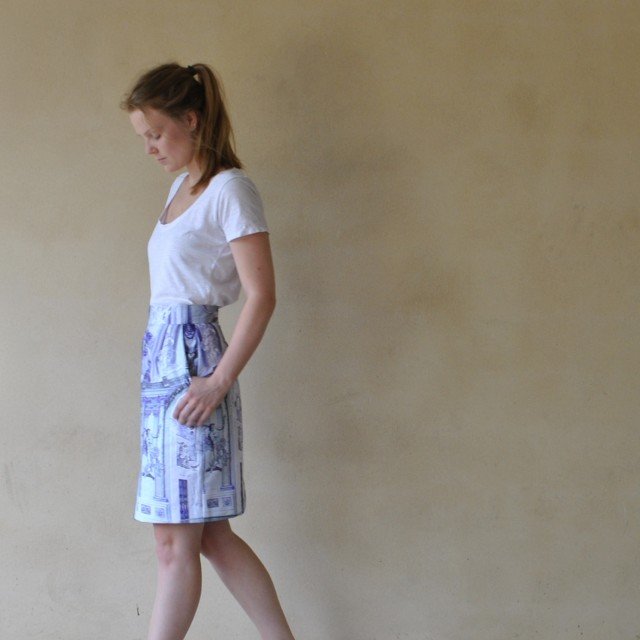
The post a palace skirt appeared first on Handmade by Carolyn.
 Hello!
so here is Cassie modelling her new bikini, previewed on instagram the other day. We both popped on our bathers this morning and headed off to the beach for a quick photo op, and of course a swim! aaaah, it was totally divine, like heaven. The water was crystal cool and clear and it was all just so delightful. Every time we head off to the beach I think “hmmm, should come down here more often…” but then we get busy and a few weeks go by just like that. I guess it wouldn’t feel like such a treat when we do get there, so maybe we’ve got just the right balance!
The colour may look a little familiar… remember when I told how Cassie had given me some lovely brick fabric from Fabulous Fabrics for my birthday, with which I was make my bathers this year? well this is the exact same stuff! Cassie liked it so much she bought some for herself too, to make her own bathers! We must’ve made a kinda funny sight this morning, in a Sound of Music kind of a way.
But anyway, sewing stuff re the bikini…
Cassie designed and made the top herself, basing the wrap-around band design on that of Madalynne’s free sierra bra pattern; except she drafted her own halter neck bodice pieces and gathered them gently underneath the bust into a double layered, turned out band. The band ties at the back in a self-tie, likewise the halter tie. All pieces are self-fabric lined.

I was commissioned to make the bottoms. I used the ClothHabit Watson briefs as a basic starting point, splicing the front piece and gusset together and cutting them together as one piece. I always do this mod every time I make this pattern. To get that tied-together-sides style; the side edges were extended by 2cm each side, and the elastic starts and ends at those extensions. The extensions were then just turned under to make casements, through which I threaded a little self-tie up and down each side. Meaning the bikini is held together at the side edges by this tie.
 That’s it, really!

The post Cassie’s bikini appeared first on Handmade by Carolyn.

My newest knitted creation is a cardigan; in a toasty, tomato-y, fiery, hot-chilli scarlet. Photographed most attractively against the snowy drifts of Hokkaido in Japan where it looks rather stunning, I think! I should come to Japan more often, so photogenic for photography. I’ve styled it tres fashion-y with my KMart snow boots, bought circa 2001, and my hired ski pants. O yea, rockin it fashioneestas!
Sorry to be repeating myself, but yes it is yet another Miette, a free downloadable pattern by Andi Satterlund… my fourth! Knitted up in Debbie Bliss Donegal Luxury Tweed Aran, again!… and this wool is so divine I just can’t stand it eeeeeeeee! The last time I was in Calico and Ivy I couldn’t help going over and fondling the new colours, and it took every bit of self restraint I possessed, which is a pretty pathetic supply in the first place I must admit, NOT to buy another new colour for yet another little cardigan. Honestly, I could easily have something in every colour way. Just adore each and every one, and can’t help thinking they’ll seem to be so very very me! This colour way is 360033, Scarlet.

The buttons are also from Calico and Ivy, and I sewed them on upside down, because the upper side was a little shiny for my taste. The underside has the perfect level of non-shiny matte-ness to suit the slightly lumpy, comfortable, homely look that this yarn has.

Everything else I’m wearing here is made by me, including as hinted on instagram, all the underthingies
In fact, my skiing holiday is an almost exclusively handmade affair… I knew I was taking a bit of a risk in packing nearly all me-made clothes, and most fortunately it has all worked out quite successfully, if I say so myself. The one non me-made thing I packed was a ski jacket. Actually, I’ve been having some thoughts on snow gear and how I reckon a person can make it fit into a handmade ethos… I think it is entirely possible! not that I’m an expert, haha. No West Australian can actually ever lay claim to knowing the ins and outs of snow gear, really! In spite of my snow-noobiness, I’m thinking of writing my thoughts here on the ol’ bloggeroonie soon…
Some knitterly notes mostly for my own alteration purposes…
3 1/4mm needles, size 42, 6 balls of the Donegal Luxury Tweed Aran. Switched the bust dart shaping to the underarm using the same little fix as described here for my previous, navy-blue Miette. Added two pattern repeats to the bottom edge; same as I have done for every one of my four versions of this same pattern. I just like that little bit of extra length, I think this suits me and my figure better than the original design, which is very cropped. This means picking up 78 stitches along each front edge. And 9 buttons too, natch.

Booyeah! done!
Details:
Cardigan; Miette, in Debbie Bliss Donegal Luxury Tweed Aran, colour scarlet 360033
Striped Tshirt; self-drafted, grey and ivory striped cotton jersey, details here
Cowl; own pattern, mustard 8ply merino, details and my pattern for this cowl is here
Armwarmers; own pattern, green 4ply 100% merino, details here and my pattern here
Gloves; from a 1963 Patons pamphlet, charcoal 4ply 100% merino, details here
Beanie; own pattern, cream Patons pure new wool, details here
also wearing socks and leggings made by me
Ski pants; hired
Snow boots; Kmart, circa 2001

The post scarlet Miette appeared first on Handmade by Carolyn.
 When making my shearing jacket I came up to the important matter of buttonholes… what to have? I’d googled and pinned a few shearling jackets when planning the details and features that I wanted to have in my new jacket, but it’s not always easy to make out the finer construction details of the nitty gritty like buttonholes in far-away, full-length pictures on the net. As usual, it came down to knuckling down and working out how to do it myself.
I trialled several different types of buttonholes but am only sharing here the details of my two “finalists”, the two types I eventually decided upon using for my jacket.
Sewing details: I’m using a faux shearling, but this technique would be fine for real shearling too, as well as for thick leather or other thick and bulky, non-frayable fabrics. For real leathers which can be very thick and tough, use a leather needle and sturdy threads like upholstery or topstitching thread.
The first buttonhole, pictured above; is designed to look well-finished and to look identical from both sides of the fabric, meaning, both the suede outside and the woolly inside of the shearling fabric. I used this technique for down the front opening edges of my jacket and on the buttoned wrist bands. It is like the shearling version of a bound buttonhole, if you like.

Mark the buttonholes on the suede right side to be the same length as the buttons; in this case 2.5cm (1″), and cut two rectangular, self-fabric “bindings” per buttonhole, each the same width as the buttonhole – 2.5cm (1″) wide, and 2cm (6/8″) long. Trim away the shearling from the wrong side of the bindings as closely as possible, and cut the buttonhole slit in the fabric between the marking pins. I used a rotary cutter for the middle bit, for straightness and for a clean cut, then clipped into the ends with small sharp scissors.

Trim away the wool from around the buttonhole slit on the wrong side out to a width of 1cm (3/8″) each side
Wrap the bindings around the buttonhole edges and align edges top and underneath as neatly and as evenly as possible; pin. Stitch carefully along the long edge just inside the cut edges. Also, stitch-in-the-ditch along the short edges of the buttonhole also, to strengthen the slit and help prevent it from ripping out. Truth be told, I wouldn’t think ripping is all that likely in a tough fabric like shearling, but not impossible of course, so I reckoned it was better to be safe rather than sorry!


It’s more important for the stitching to be perfectly neat and even on the right side of the jacket than the wrong side, obviously. If the inside shows uneven edges, they can be trimmed off with small, sharp scissors.

And that’s it! pretty simple really. Apart from the fact that it looks almost smart and sorta polished as much as a raw-edged rustic technique can look, the beauty of this buttonhole is also that it looks identical from both right and wrong side of the fabric.. also I think the suede wrapped edges looks quite attractive against the woolly insides too!

The second type of buttonhole I devised is an easier, more workmanlike, “invisible” buttonhole, which is situated on the lapels and collars of my jacket. I wanted this one to be less obtrusive; to still look acceptably nice if seen from the outside of the coat, but more importantly to be as invisible as possible on the wrong, woolly side of the fabric. Reason; I wanted to have the option to wear the coat sometimes with the lapels and collar fully buttoned up, and also sometimes unbuttoned; and when unbuttoned I didn’t want them to show at all.

This one is like a letterbox-on-a-door, with an outside facing to reinforce and strengthen it on the right side. Cut a rectangle of shearling, 4cm (1 1/2″) wide and 1.5cm(5/8″) long, for each buttonhole, and trim away most of the wool from the wrong side. You can trim away the wool as completely as possible if desired, or if you want a frame of wool to fluff out around the edges, leave a slim border untrimmed around the edge. I decided a lightly woolly frame looks pretty cute, and couldn’t resist having it for my buttonholes.
fluffy edges are cute!!!


Pin the trimmed rectangle to the right side of the fabric where the buttonhole will be, and stitch just inside each edge. Remember to use white or ivory thread in the bobbin! Cut the buttonhole through both layers, using a rotary cutter for the middle bit, and snipping out to the edges with small sharp embroidery scissors.

I think it looks nice from the outside, but the best bit is that it is almost completely invisible on the wrong side!
For the button inside the collar, I needed something matching the woolly interior; and found the perfect, ivory tweed, covered button, originally from my grandmother’s stash and, knowing my grandmother, I expect it was salvaged from off of an old coat or skirt or something. Waste not want not! and I’m glad she did because it has finally found the perfect home

I hope my tutorial proves useful to someone… as always if it is helpful then please do leave a comment saying so. Thank you!
The post buttonholes in shearling; a tutorial appeared first on Handmade by Carolyn.

As sneaky-peeked previously; my shearling jacket, and ma
n, I’m so happy with it!! It turned out just exactly how I hoped, and was the most wonderfully cuddliest, comfiest thing to have with me in our recent visit to Japan; I loved bundling up in it each day in Tokyo and used it as a snuggly rug while on the plane… without a doubt the warmest coat I’ve ever made formyself, evah. Like wrapping myself in a fluffy blanket, and I was perfectly snug enough even in the subzero temperatures of Hokkaido.

Obviously, and with my usual attention to weather appropriate sewing ahem, I chose to get started on this super fluffy thing during the most heinously hot heat wave… 42C anyone? phew, try-ons were hideous. Seriously I question my sanity sometimes. Well, lots of times actually  Anyway it was all worth it in the end, since I’m quite chuffed with how it turned out.

What is it about making jackets that is so enormously satisfying and fulfilling? I don’t know exactly why, but I always find jackets, and dresses too, to a slightly lesser extent; to be the projects that give me the biggest of happy warm fuzzy buzzes…
 wrt this one; well I’ve wanted to make a shearling jacket for oh, about ten years now. Ever since the first time I clapped eyes upon one belonging to our friend S; a colleague of my husband’s who is always super suave and cool and has a slightly alternative, very hip and happening taste in clothing. He owns a beautifully thick, oversized shearling jacket that he’s had for years and years and trots it out every winter once or twice. Every single time I see it I’m struck all over again by how awesome it is and have harboured a secret desire for one of my own…

I bought the faux shearling from Spotlight and the burnished, dull metal buttons from Fabulous Fabrics. The pattern is loosely based upon McCalls 5276, a pattern I’ve had for years but only muslined once and not got any further… oops! I pretty much chose the pattern just for the collar alone, since I wanted that big oversized 70’s lapel collar on my jacket, but not much else.
My alterations included;
Body and sleeves slimmed down and lengthened somewhat.
Welt pockets added as described here,
Belt and belt loops added.
I also fine-tuned the front edge and collar to have it so I could happily wear it in a variety of ways… a) open, cardigan style b) buttoned up halfway with the lapels flared, c) buttoned up to the neck with the collar laid down in a peter pan style, and finally d) with the collar turned up and buttoned up right to the very top in a funnel-neck style. Also, having the belt tightened or hanging loose adds to the wearing options too.

Because I was using a shearling obviously I left off all facings and all edges are left raw. When working out how to seam the pieces together, I checked out a pattern for a shearling jacket from one of my Burda magazines… which mentioned overlapping some edges to be joined and top-stitching the overlaps to minimise bulk. So; I overlapped the shoulder seams in this way, and also the collar-to-neckline seam. The other seams; namely the sleeve, side and armscye seams are sewn right sides together in the conventional way.

Even though I used the McCalls collar, I still cut it a bit bigger on the edges – just in case!!- never forget the golden rule of sewing… you can always cut away but you can’t add it back… EVER!!! And then trimmed it here and there to allow it to sit how I wanted it to look, to fit how I was imagining my collar. I’m particularly pleased with how the collar looks when buttoned up to the neck like this..
 I made the sleeves extra long, so I could turn them up and have a woolly “cuff” on the sleeve ends, and also made wrist strips. These are sewn to the sleeve, then wrapped around and buttoned to themselves. The seam allowance of the cuffs are topstitched down for a neat look when they are turned back, and then I stitched-in-the-ditch of the sleeve seam down to the sleeve so the cuffs stay folded up permanently.

 Welt pockets: my tutorial for how to do the welt pockets is here
Buttonholes: I’ve written a separate post detailing how I did the buttonholes here, so as not to clog up this post more than it is already! aaaaaagh! picture overload!!

In summary; I thoroughly enjoyed having and wearing my cosy new jacket in the subzero temperatures of Japan, and now we’re back home…. and it’s 35C… lol! so it’s off to the back of the wardrobe with this fluffy hulk of a thing. See you again next winter, you snuggly bundle of cosiness!
Details:
Jacket; my own design based loosely upon McCalls 5276, faux shearling
Top; the twist top from Pattern Magic by Tomoko Nakamichi, in ivory ponte, and in charcoal ponte
Jeans; Burda 7863 modified to be flares, in ivory cotton denim, and made as regular bootcut in black cotton corduroy
Gloves; hand knit by me in 4ply charcoal merino, details here
Socks; hand knit by me in Noro 4ply, details here
Shoes; Francesco Morichetti, from Zomp shoes

The post a shearling jacket appeared first on Handmade by Carolyn.
 Ever wanted to know how to pack super-minimally for a 2 week winter-time skiing holiday?
Well it’s pretty simple. In a nutshell, only pack one of each thing and wear the same outfit every day. End post.
Hehe, not really, but actually not too far off either…
The above selection was mostly it! I try to pack as efficiently as possible on any given trip anyway, but I think this has been my most streamlined effort so far!
Time away:
13 days
Where to:
Japan; one week in Tokyo, one week in Hokkaido
Season:
the middle of winter… hovering just above zero in Tokyo, like 4-14C; and plummeting well below in Hokkaido, with -13 at the top of the mountain to about-4C on a typical day.
Expected activities:
City walking, shopping and sightseeing in Tokyo; skiing and apres ski in Hokkaido One day wearing a (hired) full traditional kimono on the streets of Tokyo!
Colour scheme:
good ol’ boring functional black and ivory; with splashes of bright warm colour to relieve the drab neutraldom.
 What I packed:
each item is linked to its original construction post…
from top, left to right;
shearling jacket
2 beanies; charcoal and ivory
charcoal gloves
lime-green arm warmers
mustard cowl
rtw ski jacket and goggles
3 tops (just under); charcoal LS twist top, striped Tshirt, ivory LS twist top
middle, from left:
cream knitted jumper
2 jeans; ivory flares, black corduroy
rtw ski mittens
(at right) snow boots
scarlet knitted cardigan
lower row:
gold handbag
grey suede shoes
blue thongs
rust bathers
2 prs knitted socks + socks
khaki leggings, black tights
Not pictured; my summer nightie, toiletries bag, selection of underwear
My daily outfits:
ahem, rather unexciting! but shown here just for funsies…

Hehe, it’s pretty easy to pick my favourite day! obviously the kimono day, out with Yoshimi! I’m currently brewing a separate post with my thoughts on the experience of being dressed in, and wearing, a traditional Japanese kimono…
Thoughts:
My primary aim here was to PARE BACK while still ensuring I would be comfortable and warm. See, I needed suitcase space! Tokyo remains one of the best places for fabric shopping I have ever experienced, in all my years of sewing… and I intended to take full advantage. And I’m pleased to say that I think I was very successful… I went over with barely two thirds of a suitcase and came back with a bulging one; mwahahaha.
So, going Minimal … how did it go? well, fortunately; very well I think. I was a initially a bit worried that I’d gone too far, I’ve got to admit; a few moments of angst, when I had to restrain myself from tossing in just one more top, just one more scarf, just a few more pairs of socks and tights. I’d left myself with very few back ups. Like, what if there were a food disaster?? what if I was too cold?? but I was determined to cut down! and went as lean and mean as I dared. I thought of this as a little experiment, in a way; wanted to see if I even could do it. I knew we’d have washing facilities after the first few days, which helped a bunch!
My snow boots took up the most luggage room, along with my hand knitted woolly cardigan and jumper. My woollies may have been bulky but they are light, and were a fabulous insulative layer for underneath my ski jacket and took away any need for commercial thermals! My 3/4 sleeve cardi was perfect for the less cold days and the cream jumper was a star on two particularly cold days, virtually no wind gets through that thing!
I hired ski pants in Hokkaido, so that was nothing. My shearling jacket is pretty bulky too, but I wore that for each travelling leg so it didn’t get “packed” so to speak.
I allowed myself two pairs of jeans; I wore the black cords a lot, washed them on skiing days when I wore my hired ski pants, and saved my ivory jeans for the leg home. I’ve done this before, keeping something aside just for the trip home. I don’t have a rational explanation for this, but putting on one thing that’s fresh and different just mentally “re-sets” me out of holiday mode, and gives me a good coming-home feeling.
On another note; it’s funny, I hardly ever wear those black jeans, except for when I go away when I choose to take them a lot! I have no idea why I’m not keen on them at home as well…
Only 1 pair each gloves and arm warmers, each worn on a daily basis. 1 pair leggings, 1 pair tights, which I alternated through on skiing days. The tights are from last winter and are practically worn through in the heels, so I’m thinking of chopping off the feet and transforming them to leggings, to keep for thermal purposes. In the past I’ve chucked out a lot of me-made tights that have worn through the heels, but now I’m thinking that was pretty wasteful.
Two pairs of socks. Woollen socks don’t really get “dirty” like cotton or polyblends, but in any case I could wear a pair over tights, and then with the leggings the following day, so they were only against skin for a day at a time. Sorry if that’s splitting hairs, but managing the wash is something this laundry maid thinks about! In the past I’ve packed way more socks and tights than this, but my little 2prs-only experiment has taught me that cutting back can work out just fine.
Sleepwear; I saved space by just taking my light little summer nightie; ‘cos you know what? Japanese buildings are heated so much that I’ve found winter jammies are just not needed… unlike winters here in Australian where you freeze since no one heats their houses. LOL who’d have thunk it?!! For some reason this gives me a lol.
The only things that hardly got worn, as in once only; my bathers and the thongs! but that’s ok, they don’t take up much room
So that’s that! Everything that I took proved useful and was worn, some things every day! and despite my concerns that I could be going too minimal I actually never wished I had more to choose from. This is kinda surprising for me, because I normally get bored with my clothes and need a lot of choice. Although I think it’s a very good sign. Maybe I should do a paring back of my whole wardrobe?! hmmm
The post Japan; a travel wardrobe appeared first on Handmade by Carolyn.

Tokyo is absolutely brilliant for the fabric loving visitor… it even has its own fabric district!!!! how cool is that? very, that’s what. Nippori is the most well-known place in Tokyo to shop for fabric, but this is my third visit to the city so I investigated some more and found a few other great stores well worth a visit as well.
But firstly; Nippori… because it’s awesome. If you only have time to visit one location then this will not disappoint. Setting aside a whole morning, or afternoon, would not be excessive for the truly dedicated fabric lover.
It conveniently has its own train station; called Nippori, on the JR Yamanote line. When you get off the train you really want to find and exit from the East exit, where you will descend a long flight of old stairs and soon will see this sign on the street.
 You just keep on going and you can’t possible miss it, the street is crammed with fabric stores; also, each of those fabric stores is likewise crammed with fabric too. Most stores are situated along the one main road. The map above has so many marked, you can get a feel for the sheer number of options available… and there are bins and bolts of fabric set up in the street all over, you’re just spoilt for where to look next. Prices are mostly low to middling by Australian standards, quality varies, but is overall pretty great with some fabulous bargains to be had. The most exciting thing about it of course is the CHOICE!! You will find selvedge denim, leather, laces, linens, cottons, tartans, knits, sweater knits, mountains of haberdashery and… well probably everything, if you take the time to look.
There is one very important thing to bear in mind when shopping in Nippori, and I cannot stress this too much…
TAKE CASH! because some stores here will not accept credit cards. Also, it can be quite difficult for the foreigner to obtain cash, even in shopping districts. In my experience, 7Eleven convenience stores have ATM’s that accept foreign credit cards so are a handy place to get some Japanese yen out.
In fact, and this is general advice for the foreigner travelling in Tokyo; it’s a very good idea to sear into your memory the location of a 7Eleven nearby your ryokan/hotel and remember to pop in and stock up on yen if you’re getting low… BEFORE you head out shopping/sightseeing for the day!! Reason being, of course while there are 7Elevens dotted about all over, you can’t count on one being there for you in a pinch and the very last thing you want in Tokyo is to be a bit low on cash. Because I can guarantee; you WILL see adorable things everywhere that you WILL want to buy, and then you WILL waste huge amounts of time first searching for that cash and then for that cute little store again.
Unfortunately there is NOT a 7Eleven conveniently close to Nippori Textile town. So make sure you have plenty of money before you head over!


I bought leather and denim in Nippori.

The good news is that all the following stores DO accept credit cards. #shamelessenabler
Mina Perhonen Arkistot

2nd and 3rd floor; 5-13-14 Shirokanedai, Minato-ku.
The nearest train station to this store is Meguro, on the Tokyu-Meguro line or the JR Yamanote line. It’s an easy fifteen minute walk away, but is very unobtrusively tucked away in a side street and you really have to keep a sharp look out for the turnoff. The store’s lower floor is the 2nd floor, and you have to climb up that white spiral staircase pictured above to enter. The fabrics are all located on the floor above that, on the 3rd floor.
Interesting factoid; Mina Perhonen is a Scandinavian name and I’ve always mistakenly thought it was the name of the designer too. However the designer Akira Minagawa is Japanese, and it’s just that his love for Scandinavian design informs much of his own design. The brand’s flagship store is very nearby, on the on the 3rd floor, 5-18-17 Shirokanedai and you can go and browse beautiful and expensive homewares and clothing… however this is a sewing blog so this is all about the fabric only, alright? OK.
Anyway, my discovery that the designer was actually Japanese zoomed a quest for Mina Perhonen textiles right up high on my must-do list. Prices are high, which is kinda to be expected for a designer name brand of this calibre. The small range of fabrics is really gorgeous, and there is also a small sprinkling of very cute and interesting knick-knacks to tempt you; everything beautiful, and exquisitely displayed. The store feels a bit art museum-y, and you’re treated with quiet and charming attention by the staff. I decided upon one metre of printed linen; which was reverentially wrapped up in tissue paper printed with abstract-y sewing pattern pieces and, along with a complementary pattern for a handbag and a small box of incense sticks; popped into a really nice little fabric carry bag then tied up with a mina perhonen ribbon. The lady spent about five minutes tying the most perfect, beautiful little bow with the ribbon. It’s all very very lovely.

Even the sticky tape on my parcel has the mina perhonen butterfly!! #attentiontodetail

The next store I visited was Cocca

1-31-13 Ebisunishi, Shibuya-ku.
The closest train station to this store is Daiken-Yama on the Tokyu-Toyoko line, and the store is short and easy, uphill walk from this station. This shop supports work by local art and textile people, and also has some handmade clothing for sale too. Overall, it had a relaxed and busy vibe almost like a studio, and I swear some of the interesting-looking people who came in and went straight up the staircase to the loft were some of the makers themselves, coming in to do something creative. Fabric-wise, there were lots of interesting “art” prints that were probably unique one-offs, as well as there was a nice selection of more regular fabrics too; some pretty polkadots, stripes and checks. I was more interested in the “art” fabrics though, and it was actually very hard to choose! The prices here were mostly middling; not particularly cheap but not top end either. I eventually bought a length of wool printed? or painted? with a “messy”, brush-stroke-like tree print.

Craig sneakily took this picture below; of me poking about in the store while he was waiting for me to make up my freaking mind.

The last store I visited was Check & Stripe

2-24-13 Midorigaoka, Meguro-ku.
The closest station to this store is Jiyogaoka, on the Tokyu-Toyoko line, or the Tokyu-Oimachi line
If you are planning to visit with an unenthusiastic husband and/or offspring in tow, you will all be pleased to hear that just around the corner from this store is Jiyugaoka Burger, which has huge burgers that are everything your average meat-eater dreams of and more. Also, just near the train station I noticed a store with the very promising name of Sweets Forest. Just saying
Anyway, Check & Stripe is a quietly uber-chic kind of a fabric store, with a beautiful range of checks and stripes obviously, as well as tartans, polkadots and plains. It may sound ordinary and the prints themselves were, but what made the fabrics stand out for me was the exceptional quality. The store also carried a decent range of Liberty fabrics, I think they could have been the Japanese printed Liberties. My husband chose some for a shirt, although now I’m secretly coveting it myself, hehe. Although since I’d requisitioned some of his spare suitcase space for that very heavy roll of factory selvedge denim that I’d bought in Nippori… well I figured I should let him have something. As well as the divine fabrics that were right up my alley, the store had adorable buttons, embroidered labels, and a few eponymous pattern books, filled with simple, very loose and unfitted styles photographed in minimalist, faded-colour settings; that “look” that those of us who have more than one Japanese pattern book are all very familiar with now.
Prices were middling, and I thought excellent value for the quality of the stuff. Hmmm, I bought quite a lot in this place!

In closing, how nice is this little thought printed on my Mina Perhonen carry bag… !

The post Fabric shopping in Tokyo appeared first on Handmade by Carolyn.
 A day wearing kimono!
During our week in Tokyo I met up with Yoshimi, and together with my daughter Cassie and my son’s girlfriend Kelly the four of us were dressed properly in traditional kimono by professional kimono dressers. We even had our hair done and everything! Such a fantastic day out! and I’m so grateful to my dear friend Yoshimi for thinking of such a fun activity and booking us all in. Wearing a kimono is of course intrinsically Japanese, and a huge treat for someone like myself who is, let’s face it, already obsessed with clothes and all things clothing related in the first place. It was an enormously interesting procedure to me, and I was amazed at how very involved it all was…
We rented our kimono from Rental Kosode Kimono Asakusa and you can also see us pictured here on the store website. We all started out with shawls over our shoulders, because the day was COLD!!

But after a while you realise you really are quite nicely snug and warm in your kimono, not to mention the yards and yards of padding… so before too long before we ditched our shawls, because they were covering up our gorgeous kimono… and that would not do!
So, wearing a kimono… what is involved? Yoshimi recommended us to bring leggings and a long sleeved Tshirt, and also a shawl just because well, it was the middle of winter. The very first thing you do is to choose your kimono and obi. Kimono fashion is very colourful and pattern-embracing; and all colours and all patterns are considered mix and matchable, in fact the more the better! So, while in Western fashion we tend to restrict the amount of colour and pattern we use in a particular outfit, in Japanese kimono all colours and all patterns can go together and be a part of a harmonious colourful whole.
So, throwing your pre-conceived Western colour restrictions to the wind, you select a pattern-tastic kimono and obi. There were no sizes.. just “adult”, and you just pick the one you like. No sizes you ask? NO! More on this later…I chose a maroon/pink shaded kimono with pink, white, sage green and dark green flowers, and an obi of deep teal with abstract sea green/turquoise splashes and touches of red across it. I loved it all on first sight, however if you’re undecided the girls will make suggestions to help you, picking out colours and combinations that they think will look nice on you.
 Once the choice is made, it’s time to strip off down to your leggings and thermal top/Tshirt. You’re all in the one same room so be sure you are comfortable with all your kimono-wearing companions for the day! You are given* some Japanese socks; small white socks with a separate bits for your big toe and the other toes, so they can be worn with your Japanese slippers. These are thick, white, ankle socks and have a stiff vinyl non-slip sole. I found them to be quite adequately warm, even in the near-zero temperatures that day. (*I say “given”, but actually they are added to your bill in the end. It’s not very expensive, 600Y at time of writing)
The next thing to go on is the white under-kimono. This is a plain white, roughly shin-length wrap-around kimono; very simple and unadorned in style like a regular Western summer bathrobe might be. This goes on and wraps and ties around your waist. This kimono is like the Japanese version of a slip, and it can be seen in your final ensemble as that neat white “collar” at your throat.
The next stage is quite an unexpected thing for the average Australian who is accustomed to garments that are shaped to show off a waist; your dresser takes; well, basically it is a thick, cotton bath towel, made of real towelling; and folds and wraps it around your waist, and ties it firmly in place with several lengths of cotton tape. This of course immediately transforms your shapely self into a padded rectangular woman, with no waist at all!
Why the padding? well the aim is to create a straight line from shoulder down to hip, which will enable the obi to sit flat and straight on your body, without curving into the waist at all. Yes, as strange as it may seem to our Western sensibilities, the waistless shapeless figure is the key to successfully wearing a kimono! Interesting, no? so very different to what we are used to! The kimono is an almost totally unfitted garment, and then it is tucked and folded to fit you. And the length; kimonos are made extra long and and the extra length is tucked up under the obi to make the kimono the correct length, hitting at about ankle length on the wearer. More length is tucked up for a shorter woman than for a taller woman. Hence, the one-size-fits-all sensibility.
So, we’re putting on the kimono; it hasn’t got any closures. More lengths of cotton tape and rope are tied around your padded waist to hold it closed, and the kimono is pulled up and “bloused” over these makeshift belts to bring it up to ankle length. The blousing too is also tied down with another length of cotton tape. The sleeves of the white kimono are pulled through and arranged to sit smoothly just inside the sleeves of your outer kimono.
Then for the obi. Tying the obi is considered an art form; and the type of knot used is dependent on many things; the obi’s width, length, “formality” and whether or not it is reversible. Factors to consider when tying a woman’s obi appropriately also include the age and marital status of the woman… though I’m not sure how those came into play for us tourists! Apparently there are ten different ways to tie an obi..
My chosen teal obi was very wide. Before putting it on me, and I’m not sure why, but my dresser first selected a smaller, narrower, mustard coloured obi and wrapped and tied this one around my waist, before starting on my teal obi. She tied it in a way so it just peeped out over the top, I think it does look really nice. The wide teal obi was then folded and wrapped around me several times, with a stiff piece of fabric-covered board inserted in between the folds, over my tummy. Yes, yet another piece of armour/padding!! This was to really keep the obi stiff and with zero danger of wrinkling or folding while I was walking around and sitting in it… although tbh I didn’t think there was much risk of that, what with the bath towel in place and all. While tying the obi knot, a small foam pillow about the size of an adult foot, was inserted and incorporated into the knot at the back somehow, I guess to keep it stiff and puffy, to help hold the shape of the knot.
 Also while tying the knot, my dresser took a couple of lengths of decorative satin rope, a little like the sort of rope we use for curtain ties here, and tied these around my obi and joined together at the front.
Honestly, by this point I’d lost count of the number of things tied around my waist. To say you end up feeling like a trussed chicken is not far from the mark!

I think it does look really lovely though, doesn’t it?
The dressers feared that we would be a little cold, so we were urged to take an overcoat. This is really a thin brocade coat, a bit like a Western style “opera”coat. It goes over your obi, hiding it; which was a little bit of a shame we thought. No matter, at lunch we could take off our overcoats and carry them over our arms, and then we could admire each others obis!
those beautiful obi knots…. sigh

The overcoat is tied in the front with a little knot, and tied just so, so that the ends of the string hang pointing down. Very important. One of our party tied it themselves, saving time; and did it so that one end was pointing up, by mistake. Just as we were all ready to go and leaving, a dresser noticed the errant knot and rushed over, tut-tutting with distress and untied and re-tied it correctly. Thank goodness! Close call!
The very last step was to choose a little cloth bag or purse, with which to carry a small number of your belongings. Obviously, we were all full-on floral on floral on floral by now, like a riotous colourful springtime garden. It was utterly fabulous.
OH! No, I’m wrong, the very last step was to put on your slippers! which are not much different from elevated Australian thongs. This is when you appreciate the non-slip sole on the socks. Being an Aussie, I’m very happy and right at home wearing thongs of course! although wearing them with socks was a new experience for me. Anyway, I found them to be very comforable footwear for the day.
feet selfie!!!

It’s a wonderful style of dressing, and I think it all ends up looking very beautiful. SO very feminine and formal, discreet and comfortable And, I have to say there’s something about all the padding and the way you’re all NOT showing your figure in any way that felt very free-ing and reassuring. I also felt very proper, like I was wearing something real, as in not a fad or a fashion; and totally acceptable, that anyone who looked at me would think it was both a wonderful and a beautiful outfit. To be honest, in modern western dress I rarely experience this kind of confidence in how I am dressed. I could get all mystic and suggest it was a feeling of being backed up by a thousand years of tradition, or something. Obviously in my own European roots there are traditional styles of dress too, but it is pretty much totally unacceptable in our modern society for even us Europeans to dress in any of our own traditional styles, apart from when going to a costume party. This makes me a little sad, how European traditions of dressing have been completely lost. It is almost tragic, when you come to think of it. Although of course European traditional dress often involves corsets, and truthfully I have very little desire to wear a corset.
 Anyway! We headed out into Asakusa. I was a little nervous of this part, being obviously not Japanese, dressed conspicuously in a kimono, and we were accompanied by a beautiful Japanese lady, Yoshimi, who clearly belonged in her kimono and looked absolutely perfect! however I was amazed and secretly very relieved! at the general reaction. It was very very positive! and lots and lots of people made complimentary remarks to us. I wondered if it was because of being obviously a tourist, and so people felt more comfortable approaching and speaking to the three foreigners, whereas people maybe wouldn’t feel so comfortable bothering a real Japanese lady to ask her about her kimono, or to disturb her by noticeably taking her picture. Tonnes of people were snapping away, a few were even polite enough to ask first! I think when you’re a tourist people just assume you’re totally up for posing with a complete stranger for a picture.
this lovely lady was very polite and asked.

We visited the temple in Asakusa and Yoshimi patiently explained and demonstrated the process of obtaining a fortune. This one pictured below is mine; Cassie’s was not good! so luckily you have the option of tying a bad fortune to those stands in the last picture and leaving it behind! The rest of us kept ours. We also stood around a kind of pit of smouldering coals and wafted smoke of good fortune over ourselves.

We then toddled, literally! kimonos are not designed for energetic, Western-style striding!… over to Tokyo Skytower and had a delicious and just exquisitely presented traditional Japanese lunch. So typically Japanese to serve so many varied and intricate little morsels… ! the Japanese truly have presentation and attention to detail down to the finest of arts. In food and in everything!
Oishikattadesu! i.e. it was delicious
And I must confess now; we did round off our day with something a little less traditional… cake! In Nippori. Of course
Arigatogozaimashita Yoshimi!

The post on wearing a kimono appeared first on Handmade by Carolyn.

I’ve made a couple of pairs of thongs! They’re pretty basic; I was just kind of mucking about. Each pair took me just a few hours each. Anyway, I actually made them back in December, immediately thought oh god how ridiculous and tossed them in my cupboard, where they’ve been knocking about unworn ever since. I had a second look at them a few days ago and decided they were not irredeemably terrible. Anyway, I’ve just decided to wear them, imperfections and all…

See, I’m working on a plan… Long-term readers might recall, inspired by Natalie Purschwitz’s the makeshift project; 2013 was my year of going all, 100%handmade.
I wore only my own self-made clothing, including all underwear, tights and socks for the year. And did it successfully; although in reality it was actually only nearly 100% since I didn’t count shoes. I hadn’t made any shoes at that stage. I was pleased that I’d succeeded for the clothes side of things, but always had in the back of my mind that it would be good to have a truly 100% me-made year, including shoes.
Anyway, I’m wondering if I should just start right now since the last five days I’ve been wearing 100% self-made including my own self-made shoes and feel pretty good about it so far. Maybe I should just go for it now. Try for a year; right here. Stop procrastinating. I have five pairs of me-made shoes now; my three pairs of slides/clogs and now these two pairs of thongs; enough to get started with at the very least!


Writing a little laundry list of shoe needs for myself… my bare minimum essentials would be :
Hmmm. Need to do more thought….

Anyway, details…
for the black pair; I traced the bases on an old yoga mat that had seen better days, and used scraps from an old, black cotton corduroy shirt to cover the bases and for the straps.

The black straps simply have the long edges folded in and I zig-zagged down the centre to finish them… each strap is 25cm long, although I found it a little easier to manage when I cut them a bit longer when making the white pair. I made a little “tube” to go between my big toe and the other toes, through which the straps go before piercing the base. Underneath the base, the straps are stitched to pieces of fabric to secure them firmly, then these are glued to the underneath of the base. The base is covered in fabric, which is glued in place both top and bottom.
 Underneath the base, I glued a layer of tough rubber floor matting, which is a very tough sturdy base, very hardwearing, which will hopefully keep the thongs going and last me for this summer, even *crosses fingers* next summer too!
For the white pair; I had some thin, worn-down bases from an old pair of thongs that the straps had broken through, and I’d kept the bases just in case #hoardingfinallypaysoff I glued on a piece of thick, cream cotton corduroy underneath the thongs to strengthen the worn through bits. The straps are strips of the same corduroy, sewed together to other scraps of fabric underneath the bottom to secure them, same method as for the black pair above; then I glued a piece of thin cork matting underneath the whole shebang for a new sole. I chose cork for the white pair even though the rubber makes a better sole, because I thought the black rubber would be visually unattractive with these ones.
rubber sole, cork sole

The post black thongs, white thongs appeared first on Handmade by Carolyn.
 Hello! I’ve made some more shoes! floral sneakers.
Now, I have to admit; from a distance I think they look kinda superficially cute, however close up they’re a bit of a fail. I’m considering them a wearable fail though, since they’re all stuck together firm and good, glued up to the hilt and are not going to fall apart in a hurry! So all is not lost and I will wear them for casual knockabout events when it doesn’t matter if your footwear gets dirty or ruined. We all have those events in our lives, right? I’m sure plenty are going to crop up in my Year of Handmade.
I have learnt a lot making these… primarily the optimum order in which one should put together a pair of sneakers…. but first things first…
Fabric; a small leftover scrap of floral upholstery fabric, maybe barkcloth, from my grandmother’s stash, given to me after she passed away. It’s pretty cute fabric though, and I have just enough left to cut out the pieces for another pair of sneakers should I desire to revisit this exact same look. Which I probably shall. Bias binding for the edges and for the strip around the base of the sneakers is unbleached calico.

Design; drafted by me, copying a pair of sneakers I have already. I thought I’d got the design not too far off, but will make some adjustments for the next pair. I’m not even bothering to put laces in these ones. They stay on my feet fine without laces so I can still wear them. I’ll save my bias cut spaghetti strap laces for when I make a good pair
Details; the bases are cut from an old yoga mat, and my first step was to glue those strips of calico along the side edges… this was my big BIG mistake. I would NOT fabric coat the bases so early next time, it made it hellishly difficult when it came time to glue to uppers to the base. Also, the bases turned out to be a little too big for the uppers and the fact I’d “finished” them meant they could not be trimmed down.
Sewed together the uppers, all fine… sewed them to the lining pieces right sides together, turned them right sides out and glued it to the bases. Next time I would sew them together, wrong side of upper to right side of lining and turn the edges under before glueing to the base… I think that could be a better thing. Then, and only then! add the finishing strip to the outside edge of the sneakers. The last step is to add the soles. I used thin cork, cut from an old set of placemats.
Well, we certainly live and learn! All in all, it was a bit of a mess, but I pushed on and finished them because I wanted to see how the fit and design would turn out. I’m actually very happy with the fit, and the design is in my opinion 90% there, I will just make a few minor adjustments for the next pair.
At least I have a pair of don’t-care sneakers that are wearable and not too precious to get out and about in.

The post floral sneakers appeared first on Handmade by Carolyn.
 Woa, crack out the sunnies! So, my second pair of sneakers. Bit bright, eh?!
Pattern, drafted it myself. I’ve written a little tutorial on how I made my pattern, coming soon.
Fabric; cherry red cotton corduroy, bias binding; a red small-print floral. Both these fabrics from my mother’s stash when she did a clean out a while back. Black bias binding that goes around the bottom edge; made from some quilting cotton from my stash. Black eyelets from Spotlight, black shoelaces from Coles. Inners; cut from an old yoga mat, stabiliser cut from thin cork (old placemats), rubber soles (matting from Bunnings). Glue is all-purpose PVA from Bunnings.

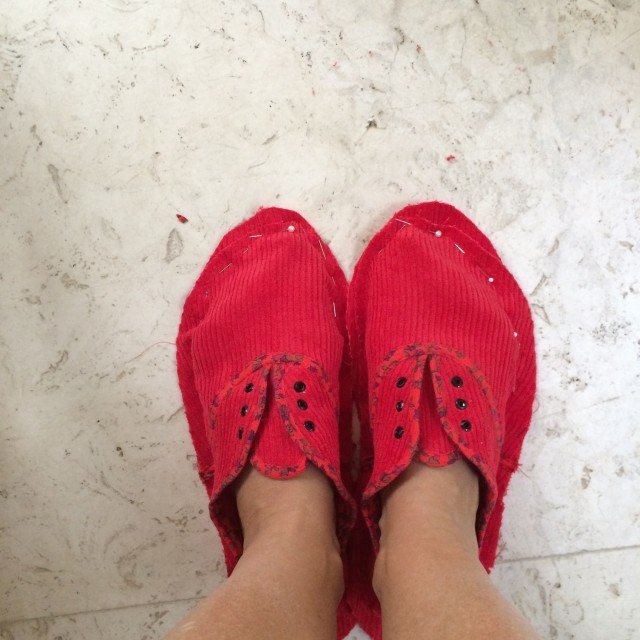
Construction; stitched the uppers together first, stitched them to a corduroy “sole” with a wide border (above). Padding: glued corduroy to bottom of the yoga matting inners cut to fit, trimmed off the edges. Glued the shoe upper to the padding, wrapping the wide border down and under, snipping around corners, glueing it underneath. Glued a thin cork sole cut to fit underneath. Black bias binding, folded and pressed upper edge, left lower edge wide and raw. Glued folded top edge of binding around the bottom edge and folded under, snipping around corners and glued the excess width underneath the cork. Last thing; cut and trimmed the black rubber sole to fit, glued it underneath. (below)

As far as the construction of these ones goes, I’m satisfied. They’re tough, and will hold together just fine, and they work. Meh, *shrug* All in all, they’re ok, and not a fail.
However, my materials; yoga matting is not an ideal inner sole, really. It’s been good to play with, for learning purposes; but I think it’s time I shopped around for something more sturdy and hardwearing. And I’ve discovered it won’t glue properly to anything other than fabric.
Anyway, here’s the thing; I reeeeeeally want to move onto some of my better materials, like my precious small stash of leather, for instance. My ultimate goal is to make leather shoes for winter. These last two pairs of shoes have actually been but mere trials. And tribulations…? debatable!

The post cherry red sneakers appeared first on Handmade by Carolyn.

I thought I’d share my method for making my own shoe pattern, in case it helps anyone else interested in self-cobbling? is that even a word?? This is for if you don’t have access to a last or haven’t bought any special equipment yet but are just experimenting, trying shoe-making on for size, dipping your toes into it so to speak…
It’s the same principle as those custom-fit duct-taped dummies that everyone was making about four years ago (remember those?) except for your feet!
Anyway…
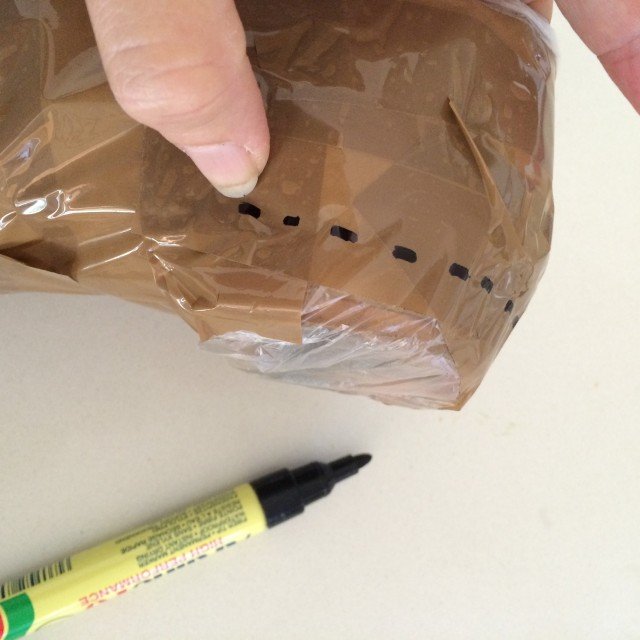
Materials; a thin plastic bag, masking tape, permanent marker, scissors, and a shoe with a fit you really like. And paper for drawing the pattern on.


Put the shoe in the bag, your foot in the shoe, or in the other order! and commence cutting lengths of masking tape and wrapping them tightly around your plastic-bagged, shod foot all the way around to underneath and all over, covering the toe too. You don’t have to have your foot in the shoe of course, but it helps the shoe to keep its shape without collapsing in on itself… you’re trying to tape it up TIGHT! and also I actually found it a tonne easier to do the taping with the shoe on; meant I didn’t have to hold it to keep it steady, for one thing…


Overlap the tape by at least half its width with each “pass”, and cut the tape short and start a new bit rather than having “folds” or uneven bumpy bits. Or at least keep any folds in the tape at a minimum. The important thing is to keep everything as smooth and as flat as possible, and to have total, solid and smooth coverage. A good amount of overlap is to ensure there are no weak bits that could split apart when it’s taken off.
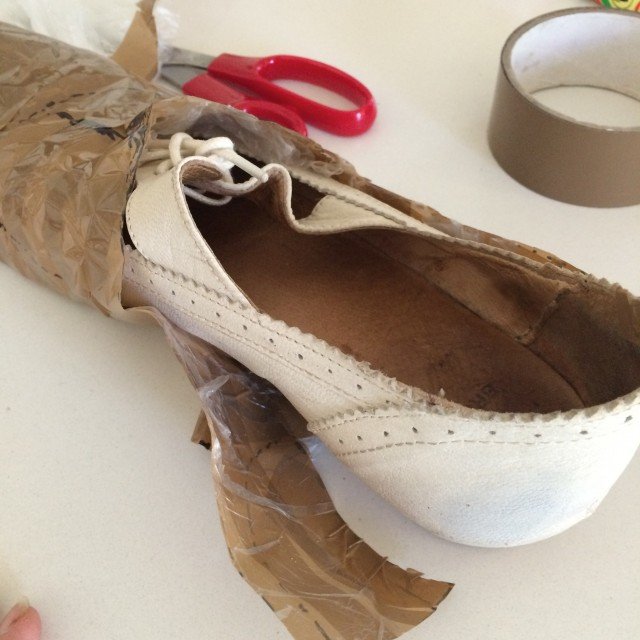
Once you’ve got a firm, smooth, fully taped-up shoe-foot, carefully wriggle off the shoe (not easy) and inspect it for any weak or un-taped bits that you might have missed, like below right. Fix these up now.


With a felt-tip permanent marker, feel around the lower edge of the shoe, determining where the ridge of the sole meets the upper, and mark it in as accurately as possible using small dashes or dots. Also draw in the upper line of the shoe, the centre back seam, and the desired seam lines of your shoes. I spent a pleasant few hours researching different shoe styles and there are many many many varieties of lace-ups alone! so hard to choose just one. I went for an easy style and imitated the seam lines on a pair of Cassie’s Converse which I now know (thank YOU Wikipedia) is actually the classic Oxford shoe design.


Now it’s time to carefully snip the taped “mummy” shoe away from your real shoe. Take great care not to damage your shoe! Snip along the lower line where the upper joins the sole, and separate the two. Once you’ve cut the central back seam of the shoe it should be easier to ease the shoe out of its “mummy” a little, to lessen the danger of scratching it with the scissors.

Cut along all the marked seam lines.

The toe of the shoe is usually a 3D rounded curve, snip into the curve so the piece can be laid flat. When you cut this piece in fabric to make your shoe, the excess will need to be eased into the sole lining.


Lay the tape pattern pieces down and trace around them onto paper and bob’s your uncle!! The tongue is just a simple U-shape, cut to the same length as the lace up section. By the way those two long curved pieces that go on either side of your foot are called the vamp. This pattern has no seam allowances of course, they can be added at this stage or not, a personal choice, just be sure to mark on the pattern pieces whether it is there or not.
I used my right shoe so marked all my pieces with a big R to show which side up they go together as a set. Obviously, the same pieces will be used for my left shoe as well, just that they will all be laid upside down.
And that’s it! pretty simple really. I have to add, this pattern should be thought of as a starting point, and it’s well worth making a mock up pair of shoes in not-very precious fabric to test it out before you launch into cutting into a precious piece of leather or something… you may well find that the shape of it is not exactly what you want for your shoes and shave off a fraction here, add on a slight wedge there. It’s always better to be safe than sorry!
Anyway, I certainly hope this method proves useful to someone else too. Happy self-cobbling!
The post how to make your own shoe pattern appeared first on Handmade by Carolyn.


I’ve made a new little top. And I’m so happy with it in my outfit! far more than I thought I would be
Making the little top was almost a spur of the moment thing… see, I’m going out tonight and a few days ago suddenly started to think seriously; what smart/casual outfit with shoes would fit my Year of Handmade? I’ve got tonnes of lovely dresses but didn’t think any of my current handmade shoes would cut the smart/casual mustard with any of them… aaah first world problems! anyway long story short; bit of brainstorming later and dreamt up this outfit. Had the skirt and the shoes already and just needed the top to pull it all together and be the icing on the cake… or should that be the chocolate topping on the cream? Probably.

The neutral colours with a variety of textures in my outfit are very pleasing to me: the suede-y deep chocolate brown vs. smooth glossy creamy-ivory satin skirt, vs softy fluffy chocolate and ivory felt in my shoes. And smooth pine for the base of my shoes. I feel rather modern and new-age cool. Almost trendy. LOL! Yeah, funny thing; it’s been a long while since I’ve felt this sharp in my handmade clothing!!.
The fabric in my top is faux suede, from the Fabric Store in Melbourne, bought during a trip there with Mum and Cassie. I have loads left too… not a bad thing since it’s kinda gorgeous!

Pattern; Crop Top 127, from Burda magazine 2/2015. It’s quite a cute little design, boxy with lots of straight choppy lines long and dramatic diagonal darts at the front and boxy angular sleeve seams. And then the smooth curve of a high-low hemline to break it up. The bias-finished armholes and neckline are clean and neat. I do like a bias finished edge! I used black cotton for this since I didn’t have any chocolate brown. The top as per the magazine is completely open at the back! instead I chose to seam mine, leaving a slit with a little button and loop closure at the top. I covered my embroidery cotton loop with tightly spaced blanket stitching along its length, so it’s strong and neatly finished.

Adjustments; the pattern is in petite sizes, and in the past I’ve found that the Burda petite bustline sits just a little high on me … I lowered mine very slightly just by making the dart shorter. I also added 6cm in length to the bottom hem all round, because it looked like it was going to be a tad on the too short side. And I’m so glad I did!!! It would have been waaaaaaaaaay too short on me! Even at this lengthened version, I feel in constant danger of exposing the underthings. Have to be careful not to lift my arm up too high! I’m wearing my mocha Sierra bra though, which I think is a good fit for this expose-errific top… why? because it’s brown, and quite a longline bra and also since I made it very very plain it actually reads more like a cropped camisole than a bra, if anyone happened to glimpse it. So I’m glad I’ve got that already too. Honestly, everything in the outfit matches just like they were all made intentionally to go together. I feel very harmonious
Smart casual outfit? that pleases me? fully handmade? Tick, tick, and tick!
Details:
Top; Burda magazine 2/2015; 127, chocolate brown suedette
Skirt; Burda magazine 02/2014; 106; cream satin, details here
Shoes; handmade by me in wool felt and pinewood, details here

The post dark chocolate suedette appeared first on Handmade by Carolyn.

I’ve made another pair of shoes. They’re a bit shonky, dodgy and clutsy, and clearly home-made, particularly those rough n’ ready heels, but y’know what? I LOVE THEM!!!
Pattern; classic Oxford shoe style, drafted by myself; my tutorial for drafting your own shoe pattern is here.
Fabric; black faux leather from Spotlight, lined completely with very dark navy cotton denim from Spotlight, the two layers are lightly glued together with PVA fabric glue. Rubber soles and heels cut from black rubber matting from Bunnings, two layers of cork inner sole linings from an old set of placemats, black eyelets from Spotlight, black shoelaces and foam inner soles from Coles.
Details: I whimsically pinked various pieces of the shoe, not sure if this looks cool or just emphasises the homemade quality, not in a good way, mind you, but meh, it’s done. Actually there’s a little bit of a pinked theme throughout the shoe and the detailing…

Pinked edges to the vamps and upper edges, and below, the little bit of pleather that covers the centre back seam has a pinked edge too.

Inside; pinking to the edges of that half-circle of denim at the back of the shoe… this contains the counters, which are bits of stiffening to keep the back of the shoe stiff and standing up straight. 
Confession time, I cut my counters from milk bottles… yep, household rubbish; whoops! am I going to be booted out of the cobbling club now?! 
Well, our milk bottles here are made of a strong, sturdy plastic that I thought is totally perfect for this purpose… it is stiff, strong, pliable, can be cut very easily, coaxed into a new shape fairly easily and holds the new shape well too. And of course; free! since it’s rubbish. What’s not to love?

I covered the inner soles completely with the same denim so they match and blend in with the interior nicely. The inner soles are removable, ie. not glued down inside of the shoe. Inside the shoe you can see the long nails that I used to secure the shoe to the sole and heel… Not seen, but between shoe and sole there are also three shorter tacks holding the sole to the heel along the straight edge of the heel. I did this because I knew this heel/sole joint would be the weakest point in the shoe most prone to coming apart under pressure. Sizing; they are moulded to my own feet, so obviously the sizing is good on me. They are sized to fit my just-slightly-larger right foot. My feet are a touch wide compared to the average so the shoes look a little wider than most you see in the shop; actually I was so worried about making them too tight I think I overcompensated and made them just a touch loose… ! This is ok though, since I’ll need to fit warm winter socks in there at some point and at least they are very comfy and totally not tight!

How do they go with socks? Phew, they still fit. Yes, I knitted these socks too…

Technique and finish-wise; far far far from perfect but I’m still pretty happy. Actually, all was going swimmingly in the beginning and I was very happy with them, then ran into difficulties and self-doubt, decided they were crap, almost threw them in the bin a few times; realised that, contrary to what it says in my book on shoe-making, that shoe lasts are actually INDISPENSIBLE to shoe-making… then things started to look up and I got a bit optimistic they might even work out ok. Limped in to the finish line in the end, in spite of a little glue splodging mishap on my nice black binding which downgraded my happiness factor considerably. *sad violin* and resulted in a decision to use my “failed” stacked heels rather than my good ones. Those, I’m saving for the next pair.
heels a bit nasty but DON”T CARE!!
 Yes, there is a next pair in the works, sneaky-peeked here on IG; I’ve constructed the uppers already and have found and ordered a pair of shoe lasts. We’re all just in a state of suspended animation, patiently waiting, waiting, waiting; just for those lasts to arrive.
HURRY UP, LASTS!!!
Final thoughts: pretty bad really, but they’re quite tough and totally wearable, even though not pretty. Let’s just say, I’m embracing the homemade look, ok?!
I’m anticipating that these ones will be hardwearing workhorses during winter; everyday things that I can just chuck on for day-to-day everything. I think they could even look quite cute with tights and my little winter mini-skirts, a go-to winter uniform for me
At least I’m starting to get some confidence that I may just actually have a small range of wearable winter shoes for my Year of Handmade. Woot!
The post black Oxford shoes, with pinking appeared first on Handmade by Carolyn.

 I’ve made a softly floaty blouse
of course just as summer is on the way out… o no, wait, actually summer is over! However we’re still getting days of 40C. Not that I’m complaining, mind you. I love the warmth! Only thing is that I’m getting tired of all my summer things thus the decision to make a new summer thing, ha. #seasonallyinappropriatesewingforthewin It’s light and pretty and easily breezy; and delightfully cool. I fully expect the weather to turn cold now.
I’ve made a softly floaty blouse
of course just as summer is on the way out… o no, wait, actually summer is over! However we’re still getting days of 40C. Not that I’m complaining, mind you. I love the warmth! Only thing is that I’m getting tired of all my summer things thus the decision to make a new summer thing, ha. #seasonallyinappropriatesewingforthewin It’s light and pretty and easily breezy; and delightfully cool. I fully expect the weather to turn cold now.

Pattern; based upon dress R from the Stylish Dress Book, by Yoshiko Tsukiori. I’ve always had luck with the patterns from this book. But this time … well the pattern is for a short dress, and it’s quite pouffy too, and in this particular fabric it looked just like a nightie! eeeek! this fabric is far too lovely to be a nightie! So I gave it just a little chop and now it’s a top. Much much better like this… I had also added some rather interesting gathered side pockets to the dress and managed to keep them perfectly intact. I pinned this picture of a gathered pocket a while ago and have been itching to have a go at incorporating it into a design at some time… And I have! with an added drawstring. I decided the drawstring was needed with this embroidered fabric, it felt kind of lacking without it.

Fabric; a rather gorgeous fully embroidered Japanese silk/cotton, bought from the remnants table at Potters Textiles, years’ ago. Probably about four years ago. Fully embroidered with a floral motif, the background is very light and fine, quite sheer actually; so a full and voluminous design is just the ticket. The yoke and bias cut ties on the pockets are ivory crepe from Fabulous Fabrics, cut from the leftovers of my studio faro dress.

Modifications; Shortened to be a blouse. Also the front and back are supposed to be gathered into the yoke… I tend to steer clear of gathering. Instead I folded the excess width into box pleats. There are four at the front, evenly spaced and close to the centre front, and one in the centre of the back. And I added those two gathered pockets at the sides. I love the design of these; interesting and practical, and pretty too without being excessively twee, and they’re a little bit different from your average inseam pocket and patch pocket. I think they add a certain visual “something” to the top that it needed.
I’m thinking of writing a tutorial to show how I made them… coming soon


Details:
Blouse; based upon dress R from the Stylish Dress Book by Yoshiko Tsukiori, embroidered ivory silk/cotton
Shorts; Burda 7723, green cotton gingham, details here and my review of this pattern here
Thongs, made by me, details here

The post light as a cloud appeared first on Handmade by Carolyn.


