Quantcast
Channel: Handmade by Carolyn
Viewing all 820 articles
Browse latest View live

Liberty and crochet set

$
0
0

This is my new lingerie set, made in Wiltshire Liberty tana lawn, colour Cranberry.  I bought the fabric from Tessuti's in Melbourne whilst we were there last year, along with the Maker's Journal Tried & True knickers pattern.  This pattern is also available directly from the designer here.
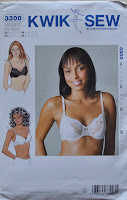
The bra is a slightly modified version of KwikSew 3300; modified to take into account the fact that I've used a non stretchy woven fabric.
I've been dying to have a go making Liberty lingerie ever since I spotted the knickers pattern but have been nervous to adapt my bra pattern, at least until I had a bit more lingerie experience under my belt.
btw, readers might like to know that 60cm of Liberty lawn easily makes one 34A bra plus two pairs of size 10 knickers.  And there are scraps aplenty left over to make adorable little pot pourri pouches and things like that, if like me, you are not the type to throw away even the smallest scraps of fabrics as precious as Liberty.

I'ver written a review of the pattern below... but all you need to know is that I absolutely love these knickers!  They might look a bit bunchy and granny-like when pictured off-the-body, but seriously; these are the very definition of cute when they are on and particularly if you have chosen a fresh pretty print like this.  And, surprisingly for un-stretchy undies; very very comfy.
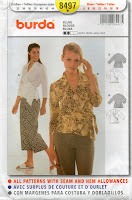
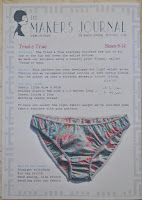
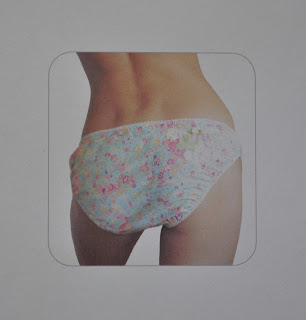
This piccie below is not of me but is the model pictured on the pattern envelope.  But naturally my derriere looks just like this too ...
 ;D
They are super easy to make.
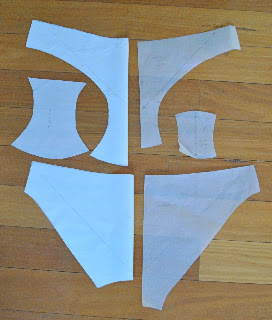
I did make a knickers muslin.  Anyone who knows me will realise how slightly earth-shattering this is... but well. we are talking about Liberty here.  Hello??  This stuff is expensive.  Beautiful, but expensive!  But hey, you're worth it, right?
I made teeny adjustments to the pattern to fine-tune fit.  I also re-drafted the front and the back to have a longer crotch from the front, and accordingly reduced the crotch length in the back.  This allowed me to install a much more substantial panty liner.  That's just a personal preference not necessarily a critique of the pattern.


Above: at left; the amended pattern with altered crotch position and a longer panty liner: at right is the original pattern.  With fair dinkum miniature panty liner.  btw; trace the pattern then flip over to trace the other half to get a full back and full front, I did this for my amended pattern and it is much easier to get an efficient layout on the bias!
The bra:
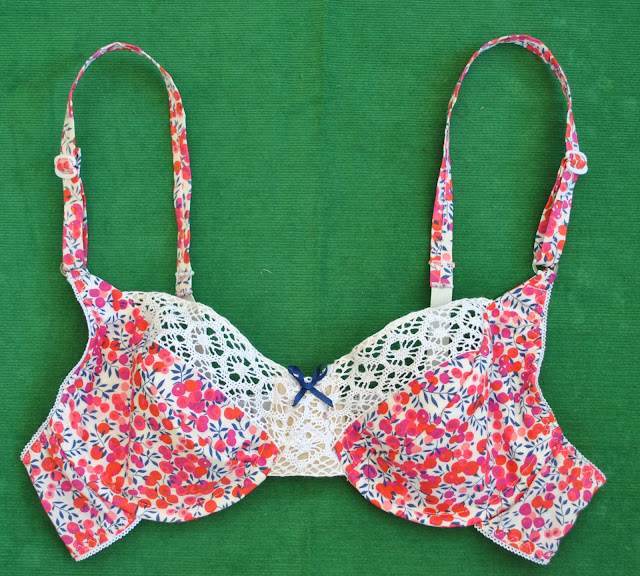
It's actually pretty easy to adapt the KwikSew pattern to work in non-stretch fabrics too!  An underwired, cotton voile muslin worn for an hour about the house taught me that the stretch factor in a bra is best situated nearly all around at the back and only a small proportion of wearing ease is necessary at the front.  I found I like the front of my bras to be quite firm and structural, and using non stretch fabric here works well... but you do need some stretch and wearing ease at the back.  So I made a modified 34A and lengthened the back bands by roughly 4cm each at the centre back; and used the same lengths of lingerie elastic as recommended in the pattern, pinned in quarters, then gently stretched to fit whilst sewing to the lawn.
Above; the lengthened bands with the same lengths of lingerie elastic as stipulated for a stretch band... see, it doesn't look too oddly puckered.  While I am wearing it, the bands have a gently gathered appearance; obviously some gathering is necessary to avoid putting strain on this delicate fabric.
I wanted the fronts to have something white and lacey and not be all solid Liberty, so found some crocheted lace, another long term resident in my lace box.  I backed the lace centre front piece with beige voile leftover from this top, which is kinda invisible against my skin.  The obsessive in me demanded that I construct my underwire casings like so...
so that on the insides of the bra the underwire casing is camouflaged as much as possible
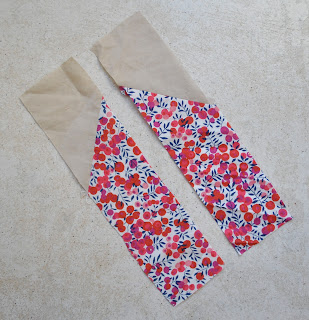
 and there is no bright Liberty peeking through the lace from the right side of the bra whilst it is being worn.
A layer of white cotton jersey knit of a low stretch factor is sandwiched between the Liberty cups and facings; for a small degree of padding.  The edges of the padding pieces are abutted hard up to the stitching lines and hand-basted to the stitching, before machine stitching inside the edge, to the seam allowances.  This ensures the thicker jersey edges abut each other but with no overlapping which would create "ridges", and no gaps which would create a "ditch".
The shoulder straps are stabilised with iron-on interfacing and topstitched down the centre lengthways, and the stretch factor is provided by satin stitching a length of ordinary braided elastic to the back lower ends.
I chose a narrow, navy blue satin ribbon to make little decorative bows for the set.  This picks up the tiny navy blue touches in this very pretty print.
So; the theme for February's stash-busting is Love!  I'm thinking this luvverly, sorta Valentine-y set fits the bill quite well, don't you??

Details:
Bra; KwikSew 3300, Liberty tana lawn and cotton crochet, my review of this pattern here
Knickers; The Maker's Journal Tried & True knickers; Liberty tana lawn


Pattern Description:
This pattern is by The Maker's Journal.
Everyday knickers; cut to sit low on the hip and cover the entire bottom.  This pattern has been developed for lightweight woven fabrics.
Pattern Sizing:
Australian sizes 8-14 (hips 88cm-108cm); I cut the size 10
Did it look like the photo/drawing on the pattern envelope once you had finished sewing it?
Pretty much.
Were the instructions easy to follow?
The instructions are a bit simplistic; if you know how to attach knicker elastic already then you will be fine.
What did you particularly like or dislike about the pattern?
The fact that this pattern is for woven fabrics is marvellous, opening a whole new world of lingerie in Liberty.  I love that they are regular bikini knickers; and do not look baggy like bloomers or boxer shorts.  They look like real knickers.  As well, these are really very very cute!!
The panty liner piece was too tiny for my tastes, and I modified the pattern to allow a more substantial one.
The required lengths of elastic for legs and waist are not provided with the pattern and you have to visit the company blog to find out how to calculate this information.  Basically; it's the measurement of the openings, minus a third.
Kinda oddly, the instructions did contain directions on how to attach a patch pocket onto your knickers.  Yep.  It outlines how to sew a patch pocket to your undies, but nothing on the measurements of knicker elastic, and how to attach the same.  Hmmm, interesting priorities there...
Fabric Used:
Liberty tana lawn, cotton jersey for the gusset
Pattern alterations or any design changes you made:
I lengthened the crotch on the lower front and accordingly shortened the crotch on the back.  This allowed me to install a much more substantial panty liner.
Would you sew it again? Would you recommend it to others?
Definitely, I will be sewing this one again and again and again!  I do recommend this pattern to others.  Just bear in mind that the elastic measurements are not provided and you have to MYO  (measure your own)  
Conclusion:
I love it!!   I will use this pattern over and over again; no doubt about that.  I do love Liberty prints, but the cost of them here is prohibitive.  Being able to run up a pretty lingerie set in this very lovely stuff is the perfect way to add a touch of Liberty prettiness to your life, in a very wearable and useful form; without breaking the bank.  I'm happy!

Paper dolls

$
0
0
8th - 13th February
(if you're new, I've pledged to wear only clothes handmade by me this year and to sketch my daily outfits in my Fashionary.  I'm calling this the paper doll project)

Black Issey Miyake dress, gold stilettos
aqua dress with wave-y welted pockets
blue top, hot pink shorts
purple-brown dress, ecru scarf
blue dress
Japanese print dress

I apologise if it seems like everything is way too repetitive with my paper dolls' daily outfits.  The fact is that I am not a fashion blogger; I'm making all my own clothes and so my wardrobe is really not all that chocka with stuff.  I am going to be repeating myself, on a regular basis.  But y'know what?? I'm absolutely fine with that.  It matters far more to me that I have a small number of garments to suit any particular combination of expected activities and weather conditions and man, it's been hot!!!... and that I love and value each of those garments highly enough to reach for them over and over.

And then, there are the special occasion pieces, which by their very definition are not meant to be frequently worn.
I included above a black Issey Miyake dress that was worn twice during the week, for evening wear.  Firstly, our family went to a swish-o restaurant to celebrate my daughter's birthday on Friday (thank you to the commenters who wished her a happy birthday!), and secondly, we hosted a big party for her at home last Saturday.  The party was formal; rellies* all arrived dressed to the nines, all the girls in gorgeous little cocktail dresses and towering stilettos, all the boys in suits.  Cassie looked lovely in a dress I had made about six years ago and all my boys wore shirts made by me (happiness!)  Of course the hors d'oeuvres wielding, drinks topper-upperering, cake bearer (moi) had to look presentable too... so I frocked up in my serious LBD and gold stilettos, hair up in a chic, messy bun.
The party went like a blast!!  lots of laughter and chatter, cool jazz music and dancing, funny speeches and good food.  The cleanup was fabulously easy.  Our children are at the age where their friends are quite civilised now.   I had to laugh; the following day, Craig said to me; "... and no one threw up so it was a good party"  I was like "ohhh, we have such low expectations!"

*transl. "rellies" = relatives

One Week One Cat

You can leave your hat on...

$
0
0
I've made a hat.
I used Vogue 8844, and the fabric is a soft ivory corduroy, harvested from a pair of Cassie’s old worn-out jeans that has been living in my good sammies pile for the past four or five years.   As evidenced by that half gone leg there, these jeans were also the source of the White parliament, pictured here…
The hat is lined with blue and ivory striped stuff leftover from Sam’s stripe-y shirt, and the inner seam finished with white grosgrain ribbon.  
You know that very stiff, heavyweight, iron-on interfacing? that is useful about once in a blue moon?  I’ve had a huge length sitting untouched in my stash for many many years.  Well, I guess we must have had a blue moon since I managed to use a bit in this project.  The hat pieces are all interfaced with this stuff.

I felt pretty good about getting all of the hat pieces cut out from the jeans.  Most of the pattern pieces were too big to cut out in one piece, on the grain and with the nap of the corduroy (they all are, btw… self pat on the back)  So I had to do a bit of piecing.  You can see some of the seams in this picture, but I’m OK with those seams.  I feel too smugly virtuous about re-using old textiles to feel bad about a few extra seams in a thing!  Eco-smugness; don’t you just hate that biz  ;)

I wondered about the sizes, which is partiallywhy I decided to use a re-cycled textile for my first time making this pattern… not the main reason, I am firmly committed to mindfully re-using old textiles when I can.  But anyway, about the sizing;
My head measurement almost exactly corresponded to the S, so I made this size.  And I couldn’t be more thrilled with the fit, it cups my scone snugly and is neither tight nor loose.  There was a brisk-ish breeze on the beach the day I wore my hat for the first time and photographed it here, and it stayed firmly and comfortably in place.  I never felt it was in danger of flying away!
The sizing in this pattern works, y’all!!!
incidentally there is a just-there dog in the below picture  ;)
Some advice for those wishing to re-purpose those long skinny jeans leg pieces into a new sewing project requiring wider pieces?  I recommend doing all the piecing for each component, using your pattern piece as a rough guide as to where and how much to add on, and leaving at leasta few centimetres leeway around all the edges.  Stick religiously to cutting the joining edges and sewing seams along the grainline of the fabric AND ensure fabric nap is consistent.   After sewing pieces together, lay the patchworked piece down flat and only then accurately cut out the pattern piece.  This way is much easier than accurately cutting out little part-pieces and then trying to join them together to fit the pattern piece.  J

Details:
Hat; Vogue 8844, ivory corduroy
Top; the bamboo shoot top, Pattern Magic by Tomoko Nakamichi, white linen, details here
Shorts; Burda 7723 slightly modified, embroidered yellow cotton, details here

Pattern Description:
Four lined hats, each offered in XS, S, M and L.  A; contrast lining, D; contrast band and bow.
Pattern Sizing:
XS 52cm (20.5 in), S 55cm (21.5 in); M 57cm (22.5 in); L 60cm (23.5 in)  I made the S.
Did it look like the photo/drawing on the pattern envelope once you had finished sewing it?
Yes. I made view C, leaving off the chin straps.
Were the instructions easy to follow?
Yes
What did you particularly like or dislike about the pattern?
It is a nice stylish hat, easy to make.  The slightly shaped top and crown lend a chic, vaguely Indiana Jones-ish air to the hat.
Really, there is absolutely nothing to dislike about this pattern; it’s a hat, and it works!
Fabric Used:
Cotton corduroy
Pattern alterations or any design changes you made:
None.  But if a wider brimmed hat was desired; it would be a cinch to just add a few centimeters on to the outer edge of the brim curve to achieve this.
Would you sew it again? Would you recommend it to others?
I expect so, and yes  :)
Conclusion:
This is a great basic pattern which I think will be very useful. I made mine in ivory corduroy for a summery-looking, wide-brimmed sunhat, but as illustrated on the pattern envelope it would work equally well made up in tweed or a richly coloured velvet or some other winter appropriate fabric to make a smart version for winter.  

let's play spot the dog again

the paper doll project

$
0
0
14th - 19th February
(I've pledged to wear only clothes handmade by me this year and to sketch my daily outfits in my Fashionary.  I'm calling this the paper doll project)

from left:
pink lace dress over pink satin petticoat
border print dress
Bamboo shoot top, embroidered yellow shorts, ivory hat
navy/white check top, green gingham shorts, green knitted hoodie
blue top (worn as pictured in the last look here), white shorts, ivory hat
dress made from an old polo Tshirt

You can see we had a brief but refreshing and energising cool spell.  Sunday felt positively wintery after the last few sweltering weeks we've had, so I actually had a woolly cardigan on hand for early morning and late evening.  Today it's back to 38C.  Craziness.

eta: Thursday was Valentine's Day  :) so I wore my most romantic dress.  I made a picnic of pate and bikkies, prawn and avocado salad, and strawberries, and we took it along with a bottle of champagne down to the river, to sit on the grass and watch the sunset.  Just lovely.

Have you joined "Map the Sewintists"?  A fun and informative initiative by Vicki, of Another Sewing Scientist.  If not then get thee to Google maps posthaste and pin yourself onto your spot!


View
Map the Sewintists in a larger map

Pisces

$
0
0

Look at my little silver tiddler!
So, a few years ago, at the annual Fabulous Fabrics Christmas sale, I was moved by some mad irrational impulse to purchase 2m of silver sequined stretchy fabric.  Exactly why is mystery to me now… since silver sequins are completely unsuited to my colouring and just about everything in my wardrobe.  Must have had a brief “ooh, pretty shiny!!”  moment, compounding the alluring thrill of 50% off euphoria.  But anywho I succumbed, and it has since been sitting in my stash taking up shelf space for too too long.  February’s stashbusting theme is to make something for someone you love.  So I made something for my daughter.
Fortunately she looks utterly fabulous in silver.  I must have unselfishly and subliminally planned it  ;)
Now, I know it seems like I am making a lot for Cassie lately, and not much for any of the boys in my life… well, I tried.  I offered the sparkly silver fabric to each of my boys, really I did.  Inexplicably they did not respond to its sparkly gorgeousness with much enthusiasm.  I only wish I could capture and show here the expression on Sam’s face, when I showed him the fabric and straight-faced said I was planning to make him a silver sequinned hoodie … priceless!!!   You’ll just have to imagine it for yourselves….   still giggling about it....
Anyhow; the only person in my family who leapt upon it with cries of joy was Cassie.  So (shrug) it couldn’t be helped.  I’ll have to make it up to the boys somehow  :)
My lucky daughter has the ideal year ahead for her to make good use of a sparkly silver cocktail dress.  She has masses of 21st's on the horizon.  Word; she goes out a lot anyway, lucky little social butterfly that she is.
I adapted a pattern that is one of my oft-repeated standbys ... Burda 8511.  This is a plain and simple sheath dress pattern, with two bust darts in the front and two long shaped vertical darts in the back.  I’ve found this an excellent style to adapt to individual shapes, just by subtle alteration of the darts and side seams.
For Cassie’s dress; I sewed up the side seams and left off any zip closure… the fabric is stretchy and doesn’t really need a closure.  The dress pulls over her head quite easily, like a fitted Tshirt dress.  It looks tight but it's actually not at all, she really is quite tiny!
At her request, I custom fit the dress to skim her figure closely, and fully lined it with a sewn-in lining.   I redrafted the pattern pieces to eliminate all darts in the lining, and used a soft, stretchy, grey marled jersey knit, leftover from this drape drape dress that I made for myself.  Note how the lining looks completely skewiff???  That marle/stripe in the fabric really is printed on that random slant.  The lining is cut perfectly on grain, I assure you!
The neckline, armscyes and the lower hem are turned under  and hemmed by hand.
Actually, a word on that.  Remember my sparkly gold cardigan, that I stitched entirely by hand??  The thought of doing more of the same was inducing a slightly depressive status, so I consulted with a lady in Fabulous Fabrics who I recalled had made herself a skirt of similar stuff.  She reckoned a denim needle worked fine.  So I tried it out... and hehe, of course it was.  (blushes)   Not that I regret stitching that cardigan by hand ......  much.  No, really; I guess it does me good to slow down and spend loads of unnecessary meditative time on a project every now and again.  Teaches one humility, yo.  
Repeating that like a mantra to retain some shred of self respect.
So, stashbusting, yeah!!  (air fist punch)  Actually, the dress did not take up the entire 2m of the silver fabric… so there might be some more silver sparkliness to appear here, anon.  
'Til next time, lovelies!

Details:
Dress; Burda 8511 modified, silver sequinned stretch fabric
Sandals; Betts

the paper doll project, and a thermal

$
0
0
20th - 25th February
(I've pledged to wear only clothes handmade by me this year and to sketch my daily outfits in my Fashionary.  I'm calling this the paper doll project)

from left:

Hello!
It's been an up and down week, weather wise.  We had tickets to Ballet at the Quarry for Friday night which we look forward to so much every year! because it is outdoors under the stars, very casual sitting on the grass, and you always take a picnic to enjoy before it starts.  The performances tend to the contemporary; raw and athletic, and set against the backdrop of gum trees and stars it is always a mesmerising evening.  And just before starting time the heavens opened, we had a sudden, crazy rainstorm; and the performance had to be postponed!  (gobsmacked)  We simply could not believe it!!!   Of course rain, is always very very welcome here ... since Perth has been as dry as a bone for about four months.  But it had to be right then?
Looking on the bright side, the garden had a good drink and we still have the ballet to look forward to now.  I'll be making another picnic.  :)
I've made a top.  This will be a thermal.  Ha! anyone in Perth reading this will be laughing hysterically that anyone here is even thinking about thermals right now!!  but while the temperatures make it feel like we'll never be cold again, of course we will!  If I am going to get through winter in only my own handmade clothing I am going to need at least a few long underthingies.  Plus the fabric was already sitting out after I had cut out the lining for Cassie's dress so (shrug)
This is a prototype.  There will be one or two more before winter arrives.   The lower hemline when pulled right down sits over my bottom  :) I know, oolala, tres uber sex-ay, non?  Non! but these things are a necessary part of any seasonally well-stocked wardrobe!
The fabric is a thin, clingy, soft, and slightly fluffy jersey knit, the last of the leftovers from this drape drape dress, and the lining from Cassie's Pisces dress.  I used my self-drafted Tshirt pattern.  btw, just a reminder, this pattern started out as Burdastyle 06/2011, pattern 120, but has been fiddled and diddled with it so much there is literally not a single cutting or stitching line remaining that is original.  Which is why I've taken the liberty of giving it self-drafted status.
Anyway, it is now a perfectly custom fitted-to-me Tshirt pattern.
The neckline, sleeve and lower hems are all finished with self-fabric bands, attached as per this tutorial.

In general blog housekeeping, I have made the decision to disable Anonymous commenting.  I feel a bit sad about this, since I do get lots of kind comments from real and genuine people who seem to prefer the anonymous option.  But I'm sorry; the spam was driving me crazy! and I just had to.  Saturday night was the last straw, in just 24 hrs so many new spam comments got through the filter that it wasn't funny.  I had to go through my published comments, and individually "spammed" about 60 NEW comments... I wish I was exaggerating or kidding, but I am not.  It was crazy.  And that is not even counting the comments that had been caught by the spam filter... then I went into the spam box and there were ALSO over 650 new spam comments there.  And I had cleaned it all out only 24 hrs previously!  I usually flick briefly through, to check that no "real" comments have been erroneously marked as spam, and occasionally I get a laugh out of some of the whackier spam comments.  Sadly spammers are getting boringly repetitive and unimaginative in their spam nowadays, and I'm over it.  So, I'm really sorry to my lovely genuine Anonymous's.  Like every other blogger I love genuine comments and feedback, so maybe you could create a google or an open ID, or something?  :)

Pisces II

$
0
0

... the other fish!  Because we all know Pisces has two fish, right?  :)  although I'm afraid the best I could eke out was one and a half fish from the length I had!
I made a skirt for myself from the remains of the sparkly silver sequinned fabric.   I do think that when it comes to the problem of wearing a fabric of a colour and/or texture that you don’t really feel suits you: then having it in the form of a skirt, thus away from your face, is a terrific solution!

Although I am not sure as yet as to the wisdom of drawing attention to my hips, the widest part of my body by dressing them to closely resemble a disco ball, but we shall see...
I used Vogue 8363, and made the skirt to be a single pieced, double darted front, with deep, front slanted pockets, and a two piece, double darted back with a central invisible zip closure.  It is fully lined.  Basically the same as the little black skirt I made for Cassie, except that I made the silhouette a tad more A-line, rather than pencil.
I have another piece of ... er, dressmaking advice? a thought? for this sequinned fabric: I didn't want to blunt my good dressmaking shears on those sequins so I tried using my ordinary, cheap household scissors, that I use for paper, sticky tape, cutting open plastic food packaging and just about anything and everything household-y.  They worked like a charm! And I saved my good scissors :)
The pewter/silver silk dupion I used for the pockets, pocket lining and waistband was a scrap from the bundle of fabrics, given to me by my friend C from her late mother’s stash, and the grey polyacetate lining fabric was a small leftover piece from this maxi skirt; made years ago and long since passed to charity.  btw, I switched back to my good dressmaking shears again for the "proper" fabric  :)
The darts in the lining are not stitched but simply folded at the top, and the fold sewed down in the waistband stitching line.  This is a good idea when sewing skirt linings, it reduces wearing strain on the thin lining fabric.
I even had the right shade and length grey zip and hook and eye closure in my stash too.  So this is a terrific little stash buster skirt, using up a three smallish, different but nicely co-ordinating pieces of fabric which were individually awkward but whose joining together created a harmonious whole arguably more useful than if they had remained a pile of nicely co-ordinating scraps. 
And barely a skerrick of fabric is leftover.
Well, maybe just a skerrick…. ;)

Details:
Shirt; Burda 8497, white cotton, details here
Skirt Vogue 8363 fully lined, silver sequined stretch fabric, with pewter silk dupion pockets, pocket lining and waistband, my review of this pattern here.
Sandals; Misano


the paper doll project

$
0
0
26th February - 3rd March
(I've pledged to wear only clothes handmade by me this year and to sketch my daily outfits in my Fashionary.  I'm calling this the paper doll project)

from left:

Hello  :)
Tuesday night saw us back at the Quarry amphitheatre for take two of our picnic followed by the Ballet, after last week was rained out.  It was a wonderful night, easily my highlight of the week.  The performance was breath-taking.  We decided it was our favourite Ballet at the Quarry, so far.
My maxi dress was pressed into service again.  It was a veeery hot day, but this really is the best thing to wear to a summer evening picnic... you can scramble about on the grass setting up and distributing nibblies with absolutely no danger of flashing anyone!

So.  Le stash-busting, pour le February...
I'm doing OK here; since another old thing from the refashioning pile (Cassie's jeans) was remade into something new and useful (a sunhat)PLUS four more pieces of fabric have winged their way from Le Stash to be transformed into usable and wearable garments during February.  Namely, my piece of Liberty, the silver seqinned fabric, the large leftover piece of grey jersey knit, and a small piece of pewter silk dupion.  And no new pieces of fabric have joined the flock.  Yay!  Obviously, the piece I am most thrilled to have used is the 2m of silver sequinned fabric... not only am I thrilled with the results but it was sure burning a hole in my conscience!
Actually, I'm kinda amazed that any sewing has been done at all, since I don't feel like I've been very productive lately.  More like a sad, wrung out old rag. Thank goodness today is cooler.  I might actually get something done.

Talking of baking bread... oh, we weren't?  Sorry.  But we are now, right?  ;)  Anyway; I discovered this little gem on youtube.  This gave the whole family a real laugh, so I hope you enjoy it.  For the record, my husband does NOT bake bread like this, more's the pity....

Linda Jackson; at the NGV

$
0
0
above: at left; silk chiffon gown; at right, screen printed kimono jacket

I was idly sorting out my phone the other day, and came across some pictures I snapped at the Linda Jackson Bush Couture exhibition, held in the National Gallery of Victoria.  I visited the gallery last September, and viewed the exhibition then.  These pieces are designed and created by the Australian artist and designer Linda Jackson, most of the examples made in the 1970's-1980's.
I'm afraid I no longer have the notes I took on the day, that I scribbled on a scrap of paper while I was studying the pieces, I must have stupidly thrown it out.  But I can still show these pictures to readers who may not be familiar with Linda Jackson and her exuberant aesthetic.
Linda Jackson took her inspiration from nature, and interpreted the Australian landscape into art and fashion by variously exploring screen-printing, applique, quilting, embroidery, patchwork and hand-painted fabrics as well as innovative piecing and regular sewing methods.
I took these photos with my phone, so please excuse any less than stellar image quality.  I did not use a flash but relied on the lighting in the gallery.  And incidentally, I looked for but found no signs forbidding photography, it was an open and free exhibition, and a guard saw me with my phone out in an obviously photo-taking attitude and simply smiled cheerfully at me, so I assumed photos were allowed.  However if they were not, and I am transgressing some copyright then someone please let me know and I will remove them immediately.
However I hope not, since I think some of my readers may not have come across her before, and will be as enthralled as I at her marvellous attention to detail, her eye for fabulous colour and intricate artistic design, and the superb execution in bringing her fantastical visions to life...
You can read a short bio of Linda Jackson here, see a selection of her artworks and clothing here, and other better photographs and examples of her work here

below at left, appliqued jacket and trousers and at right, patchwork ensemble
below; organza and silk dupion gown
below: jacket and trousers hand-knitted in the intarsia method

below: silk dupion gumleaf costume.  I cannot recall if this was screen-printed or applique...
below at left; handpainted coat, trousers and headscarf, at right screen-printed dress and coat
below at left; printed silk dress and headscarf, the print was designed by Linda Jackson I think as part of a collection for Oroton: and at right, a Waratah inspired gown and veil
These three dresses at the left are quite a different aesthetic to her usual bold and vivid style, featuring softer muted colours and more conventional design lines.  I probably would not have picked them as Linda Jackson's if I hadn't seen them here with my own eyes!

below: Sturt desert pea inspired ensemble, applique

below: handpainted silk dupion gown and ?cape?
below: quilted satin gown with veil.  Other gowns in the background that I foolishly did not photograph better.
I hope you enjoyed this look at the works of a prominent Australian designer.

Raspberry cropped jacket; 6 different ways

$
0
0
I first made this raspberry red, bracelet sleeved, silk hessian jacket a couple of years ago, using Vogue 2894 and the squeensiest length of raspberry red silk hessian.  It felt like a miracle I was able to cut out the pattern pieces! but the fabric was obviously meant to become this jacket since it has become a staple piece in my wardrobe.  The jacket was originally posted here as part of another outfit, along with my review of the pattern.
Now in past 6 different ways posts I've delved into my wardrobe to come up with a whole bunch of outfits featuring the item ... but this time I've gone for a retrospective look at some old outfits.  Five of these photos are from various me-made or self-stitched months... and it was quite interesting to look back seeking out old pictures again...

At left, on a freeeezing summer's day in Paris, with black jeans and a soft grey hoodie, in a sorta Full Metal Alchemist get-up.  Yes, of course I watched the entire series, with my children, hehe.  Didn't you?!!  Worth it, my friends.  Worth.  It.  And at right; worn with a white wrap-front blouse and my blue and white patchwork skirt, to a birthday do for my Mum...


At left; brightening up a plain but smart oatmeal dress, and chocolate gloves, tights and boots.  I later took Sam out to lunch for his birthday.  Incidentally, one of the really great things about documenting your outfits each in those me-made months is that you do have an instant mental snapshot of that day, which sure helps my sad old mind in recalling the day and just what I was doing.  Probably I would not remember a single second of this day, if I did not have the photo here....
At right; I never put this photo in my blog for some reason.  Probably decided I did not like the outfit after all or something, too much red and purple together but actually it's not so bad!  I am wearing the jacket with my purple jeansa burgundy scarf, and an orange rtw cardigan.
At left; on a rainy but not too cold day in Paris; I wore the jacket with a navy/white striped Tshirt and a little ivory skirt.  btw, I didn't intentionally put together a French "uniform" that day.  I only realised later on how super-cliched I looked.  Tourists, huh?  So embarrassing....!  At right; the jacket adds a touch of colour to an all--white outfit... here worn with my bamboo shoot top and a long layered lace-y skirt.  
As the cooler weather starts to roll around again, I will be glad to pull this one out of the wardrobe and wear it again.  I've always loved the three quarter length sleeves.  Plus, it's kinda chirpy and cheerful, and instantly adds a zing to any old thing it gets slung over.

Cut-out things

$
0
0
I made this little lace jacket/cardi/top thing many years ago, probably ten years ago! way before I started my blog, but even though it has appeared here a coupla times I've just realised it's never been shown, as it were.  So here it is, up close and personal.
The design is my own, perhaps copied from something I saw in a magazine, I think.  It only took up a very small piece, about 50cm of embroidered cut-out linen from Fabulous Fabrics.  The sleeves are just little caps, extensions of the armholes.  All the raw edges are simply encased in self-made bias binding of white cotton, and at the waist is a drawstring in an inner casing, both also made from bias cut white cotton strips.  The neckline closes with a button and a little ribbon loop.  I used a tiny length of pale lavender satin ribbon for the loop because I didn't have any white at the time, and it's always bugged me that it's not white.  Not so much that I've ever changed it, though!! so I guess it's not that much of an annoyance to me, reeeally.  You can't even see the ribbon when it's buttoned up anyway  :)
It's still going strong, probably because it doesn't get worn a whole bunch!  but I'll never toss it out.  It's nice to have as a hot weather "cardi", for when I want to look smart.  And I've discovered it goes really nicely with these cut-out ballet flats... (woot)


Details:
Top; my own design, embroidered cut-out linen
Dress; Burda 8071, of pale blue silk, details here
Shoes; Misano

hello

$
0
0
4th - 9th March
(I've pledged to wear only clothes handmade by me this year and to sketch my daily outfits in my Fashionary.  I'm calling this the paper doll project)

from left:
blue denim/chambray dress + ecru jersey scarf
white cotton top with self necktie + red floral skirt
powder blue dress + white embroidered cut-out top
blue dress
white drape-y jersey top + lime print skirt
aqua dress with wave-y welted pockets

The last few days have been up and down.    More down than up, I'm afraid.  We are mourning the loss of my grandmother; in a not unexpected, but still very sad conclusion to a long illness.
My grandmother right up until quite an advanced age was just like all or any one of us who love to sew for ourselves and take pride in wearing our own creations.  She was a very accomplished self-seamstress and frequently made a lot of her own clothes.  I inherited a lot of my enthusiasm for sewing from her excellent example.  She favoured an early Jackie O silhouette, and tended to wear simple, solid colour sheath dresses with matching tailored cropped jackets and blazers when the weather permitted.   In winter she lived in straight pencil skirts with solid coloured sweaters and jackets, or plain twinsets.  Her tastes leant towards the unadorned.  My own style is moulded on this look to some extent too... she was a big influence.
She lived a wonderful, fulfiling and very long life, so I'm not writing this here to be sad, but just to give acknowledgement.  It didn't feel right to not mention it at all, like nothing had happened.

On an up note; we've just attended Cassie's graduation ceremony, and proudly watched as she received her Bachelor's degree.  She has kept her job part time and is concurrently continuing with her Master's degree this year, just as planned.

It's funny/strange how life's lows can be juxtaposed against life's highs, side by side like that.  I'm just feeling ... odd.

Knots

$
0
0
I've made a dress, utilising the design on p52 of Pattern Magic, by Tomoko Nakamichi.
This appears to be a fairly plain dress on a casual glance.  But it is not.  It has a "feature":  a feature that like many Pattern Magic features, seems to the casual, non-sewing observer to be a superficially simple thing, like "so? what could possibly be difficult about that??" but in actuality, getting to the nitty gritty of it, is a fair dinkum epic saga to put together seamlessly and successfully.  In this case, the feature is that the bodice explodes out into an incorporated posy of entwined knots that looks sorta like a statement neckpiece, or maybe a 3D sculptural bib.  Prof Nakamichi describes it as "By bringing together several knots that resemble tiny bells I have created a unique garment that evokes the sounds of bells ringing"
This is achieved by the front being six pieces... four of these end in a long strip; which is later tied into knots which you weave together as artistically as you can.  Counting from a shoulder; sections 1 and 6; and sections 3 and 8; are each one piece; comprising two sections joined by a bridge, so these joining bridges have to be knotted before you can sew the top sections to the rest of the front. 
I made my dress using a light stone coloured, linen/silk mix, bought from Fabulous Fabrics about four years ago.  Yes! a long time ago!  This was another length of fabric previously Too Good To Actually Use.
Due to the nature of the design; some of the strips are cut on the bias and some on the half bias.  To save fabric and add stability I cut all the facing strips on the grain.  I faced and turned out each strip separately, and then later sewed on the bodice facings.  When it came to facing that front neckline, I sewed each section at a time and checked each obsessively for a smooth finish before proceeding to the next one; shoulders first and finishing at the centre front.
front bodice facing
The back is four pieces; interestingly in a princess seamed arrangement.  The dress closure is by invisible zip in the centre back seam, and the back neckline is a modest V-line.  I added deep, inseam side pockets, and attached a self skinny belt in the side seams to tie at the back.  This adds a bit of shape to it, and provides some visual interest at the back, which is otherwise rather plain.  The ends of the belt are tied in little knots, a tiny design echo of those knots at the neckline at the front.
This is probably one of the top ten most difficult makes I've ever attempted.  Vogue Advanced/Plus Difficile?? pfff, Pattern Magic farts in your general direction!*
However I am, in inverse proportion to the degree of difficulty involved; stupidly pleased with it.  I think maybe I am a sewing room masochist, deriving a perverse enjoyment from the torture of difficult dressmaking challenges.  What a weirdo, huh?  But I'm thinking of something easy next.
Monty Python of course!

Details:
Dress; adapted from the design on p53 of Pattern Magic 2 by Tomoko Nakamichi, light brown silk/linen
Shoes; new! for autumn!!  from Misano


...


Just a spot of emerald

$
0
0
Top o' the mornin' evenin' to you!!
St Patricks day seemed an appropriate occasion to pull out this length of emerald green corduroy from the stash and make it up into something.  Anything.  I bought this fabric from Spotlight, last year.  Of course it's kinda ludicrous for me to be wearing a corduroy skirt today since it is a warm 31C here in Perth! but here 'tis, all the same.  A corduroy skirt is not so much weather-appropriate right now as it is weather-anticipatory... but I'm sure I'll be grateful for it when more winter-y temperatures kick in.  And hey, isn't Emerald the Colour of the Year, or something??  Woa!  Definitely a good day to be adding a little emerald green to my wardrobe!
I wanted a skirt that was a little boxy, blocky and oversized, rather than the usual, streamlined little A-line/pencil hybrid silhouette that I usually go for... so I started with a favourite basic pattern Vogue 8363 and played with the proportions.  I cut the skirt pieces a lot wider; probably roughly equivalent to a size 18 front/20 back; and  a waistband to be my usual size 10, and folded the excess width in pleats into the waistband; two single pleats at the front and two box pleats at the back.
I put in those fabulously deep, slanted front pockets in the pattern and left off a lining, since I think the oversize factor, or looseness of the skirt will help stave off any tights/skirt static electricity problem.  I'm thinking of making a separate petticoat if the tights adhesion issue does rear its ugly head.
Perusing the zips; usually an invisible zip would be my first choice but all the available colour options looked terrible with this rich emerald green; either too dark or too bright.  Nothing looked right.  The best colour match was this bright green dress zip, and I finally decided I could live with a dress zip in a skirt; sure, it is a casual choice but so is corduroy a casual fabric.  It's been ages since I've put a dress zip in a straight seam without a fly, and I had to stop for a second and think it through again!
I got creative with the insides.  Do brightly contrasting "fun" interior details bother you?  Then look away now!  I'm afraid, without going out and buying new fabric, and I am trying to shop my stash as much as possible this year; the least offensive option was this violet/mauve shot cotton, leftovers from this top that I made for Mum.  I finished all the raw edges with HongKong seaming, and the waistband facing and pocket linings are also cut from this fabric.  The ultra good news: I have barely any scraps at all leftover from these two lengths of fabric now!
I'm very very happy with my boxy new skirt: I think it looks stylish and smart and it feels very easy wearing and comfortable. I think it will look terrific in winter; with my fitted cardigans, with button-up shirts tucked in, and tights and boots underneath.

Details:
Top; top "a" from shape shape (fornerly known as Unique Clothes Any Way You Like) by Natsuno Hiraiwa, white cotton, details here
Skirt; Vogue 8363 modified, emerald green cotton corduroy, my review of this pattern here
Shoes; Misano

apparently necessary...

$
0
0
Follow my blog with Bloglovin


later edit:
And I made a button!!
My first ...
Believe me, I have close to non-existent Photoshop expertise, but I found this great article and used the excellent Glass Button tutorial.  The process is broken down into steps of one syllable, making it reasonably easy for a beginner.  I chose an oceanic, bluey-greeny colour for my button; because blue-green glass is purdy  :) and matched the background to my blog background colour of legal-pad, buff yellow.

...

$
0
0
16th - 20th March
(I've pledged to wear only clothes handmade by me this year and to sketch my daily outfits in my Fashionary.  I'm calling this the paper doll project)

from left:
blue chambray dress + ecru scarf
red silk ballgown
blue Pattern Magic top + hot pink shorts
white top with self necktie + red floral skirt
Japanese print dress
aqua dress with wave-y welted pockets

Definition of "fun":  a old-school glamour-fest ...  we attended a friend's Oscars themed birthday party last weekend.  I frocked up! and so did everyone else.  It was pretty fantastic to have an opportunity to wear one of my ballgowns again, and I just love the rich and royal crimson rustling that comes with this one  :) Makes me feel a bit Downton Abbey or something.
My husband wore his tuxedo.  Oh my: is there any sexier attire for a man than a well-tailored suit?? (fans oneself) I do not think so!!
The temps and humidity is easing off as of today, which is pretty fab.  I'm getting a bit bored with my summer clothes and I'm looking forward to branching out!

Blue-bell sleeves

$
0
0

Hello  :)
I've made a new top.  Actually I made this a little while ago, and I've suddenly came to the glorious realisation that hey! the autumnal weather is here and it's actually beautiful enough to wear it.  I love this time of the year!
This is made using Vogue 1115 with the body lengthened by about 2.5cm, and used a piece of thin blue woven cotton denim-y stuff.  I chose to use the fabric wrong side out, since I preferred the muted, slightly undefined, yellow-y tone of the blue of the wrong side.  The right side is a stronger blue, which I didn't think did wonders for my complexion.
I've written a pattern review below for anyone interested, but there really is one important thing to know about this pattern, it is rated Advanced/Plus Difficile, and yes, that is a well deserved rating.  The undersleeve/side piece when joined together is pretty tricky to insert neatly; and sewing down the seam allowances of said sleeve gusset with a double row of topstitching? ... seriously tricky.
Most of the topstitching I used a deeper blue thread which was painstakingly colour matched to the blue in the fabric weave.  Haha, kidding; actually it is just leftover thread that I already had in my stash  :) the fact that it matched is fortuitous!  I used a lighter shade of blue for the bar tacks.
Installing that invisible zip, another seriously tricky procedure.. since I prefer to insert the zip before sewing up the seam below it; and since the seam allowance has to be finished with a double row of top-stitching to stylistically match all the other seams on the garment; this is an area that needed a bit of nutting out.  I'm pretty pleased with the nice even finish I got in the end  :)
Look at those blissfully deep, welted inner pockets (satisfied sigh)  I made them a smidge deeper and bigger, and the edges are finished with HongKong seaming.
The graceful curve of those pieces in the back is so elegant and stylish.  I just love the seaming lines here!  I also like how the slit at the lower back stylistically matches the slit at the upper front neckline.  imo, it's the little details like this that set the designer patterns apart from the others.
Those wide bell sleeves... I wasn't absolutely certain that I would adore these, but they've grown on me.  They are certainly comfortable and feel nice to wear, no constrictions whatsoever! and I think they look quite designer-y and interesting.  I worried that the size of them would make them annoying, that they would get in the way of my daily activities, but I've worn my new top all day and barely noticed the sleeves.  No worries there!

Details:
Top; Vogue 1115, blue cotton denim
Skirt; based on Vogue 1247, refashioned from another skirt, originally Vogue 8561, details here
Sandals; from Misano

Pattern Description:
Loose-fitting, hip length, pull-over top has wide funnel neckline with slit, front and back armhole gusset seaming, bell sleeves, welt pockets, back  inset, slit, side back zip and flat fell seams.
Pattern Sizing:
American sizes 6-12; I cut the size 10
Did it look like the photo/drawing on the pattern envelope once you had finished sewing it?
Yes.
Were the instructions easy to follow?
In my opinion the instructions are straightforward but this pattern is rated Advanced/Plus Difficile for a reason!
What did you particularly like or dislike about the pattern?
Well I do so love a sewing challenge, and there are a few in this pattern… this is not a top that can be whipped up in one day, no sirreee!  I dug down deep into my reserves of patience and only allowed myself to work on the tricky bits when I was feeling fresh and not tired!  For example: stitching those double rows of topstitching to the undersleeve and side / front and back seams was tricky, and also attaching the neckline facing neatly to the top curved edges of the zip tape quite tricky.
Fortunately, I really love the final product!
Fabric Used:
Lightweight cotton denim
Pattern alterations or any design changes you made:
I lengthened the body pieces by 2.5cm at the hem, and cut the pockets to be 1.5cm deeper…
Step 16, I chose to reinforce underneath the single layer of fabric with a small bias cut square of interfaced cloth before stitching the bar-tacks.
Step 35; I prefer to insert the invisible zip beforesewing together the seam underneath, I think you can get a much neater finish
Step 49; I think it is supposed to read “with right sides together” but in any case I didn’t stitch the welt together like this, just folded it wrong sides together and continued with step 51 with the edges raw and unstitched, and then in step 56, slipped them between the pocket and triangular ends, stitching them in place in the pocket seam, a more elegant and less bulky way of finishing the welt considering the raw edges are bound with HongKong seaming in step 57.
I didn’t do the following, but if I was making this again I would…!
Step 3 and step 20 have you slash the underarm/sleeve between stay-stitching… I recommend instead that you leave the actual slashing until just before step 45, when you pin and attach the undersleeve and side.  There’s no need to make the cuts so early, and if your fabric is subject to fraying then I think it’s best to leave it until the last minute, particularly since you are cutting so close to the stay-stitching and into the armhole corner.
Would you sew it again? Would you recommend it to others?
I do recommend this pattern to the advanced seamster, and I think I will sew this one up again.  And, ahem, I can get the top on and off without having to even use that difficult-to-insert zip as long as I don’t mind my hair getting a bit messy.  Which I don’t.  So, maybe I have a tiny head but looking at the pattern envelope I think the model probably could do the same.  The next time I might not even bother with that zip. 
Conclusion:
I'm very happy with my new top, and I think it is a great designer take on comfortable andchic.  I was a bit worried about those wide bell-sleeves before I started, that they would get in the way of daily activities, and/or look awkward and stand out stiffly in a difficult-to-wear way but I needn’t have been; the sleeves feel great and look quite cool, and are very comfy in this loose floppy fabric.

an Easter Egg tree

$
0
0
So, my offspring might be past the age where seasonal kindergarten crafts hold much allure anymore.  Nonetheless I occasionally indulge in silly decorative flights of fancy.  
Upon first sight Sam straight away asked if he could have one now.  
(thinks) hmf.  Do you not appreciate the artistry and awesome cute-ness of zis masterpiece?  Does it always have to be a case of Must Devour Now?
I snapped, no!  It has to look pretty for at least a few days more.  
Losing interest, Sam slunk away.
To return for the harvest in a few days, no doubt.
PLEASE NOTE: if you have small children around then pins are NOT a good idea!  Maybe a hot glue gun would do the same job  :)
Viewing all 820 articles
Browse latest View live