Quantcast
Channel: Handmade by Carolyn
Viewing all 820 articles
Browse latest View live

olive faux suede top

$
0
0
I've made a new top  :)
Yoshimi and I saw this very realistic faux suede while out shopping together in Tokyo last January and we both bought some to make tops.  Yoshimi made her lovely pale pink top quite quickly.  And now I've finally made mine too; at last!  I'm embarrassed to be so slow!
I used Burda magazine 10/2009, pattern 121, a rather plain and unassuming little pattern that caught my eye from the first; a nothing-to-it kind of a pattern really but with an understated, relaxed, almost sporty chic that is quietly modern and urban.  And sometimes very plain and basic is the best choice, especially when you just want the fabric to speak for itself.  
And obviously, the fabric is everything in this bare-bones design!  I trialled this same pattern recently to make my flannelette PJ top, which is comfy but about as un-chic as you can get!  but hey, flannelette.  This suede is only about a thousand times classier.  When your fabric is really beautiful it's hard to go wrong I reckon, so I was pretty sure it would turn out ok.  
And fortunately, I think it did  :)
The pattern is designed for real suede or leather, so it's quite roomy and easy-fitting to suit a heavier and inflexible fabric like that.  Thus why it works so beautifully as a PJ top, natch.  It has a long centre front split, so you can just slip it over your head, and splits at the bottom edge of each side seam. I sewed it up like I would fabric, not suede except; I left the cut edges of the sleeve and lower hem edges and the neckline edges clean-cut and unfinished, like suede; since my fabric is quite stable and doesn't fray.
I'm very happy with it and think it looks quite nice with my bootleg jeans!  And I still have a little bit leftover, maybe enough for a skirt.  But what should it be like, hmmm.  I'm thinking something asymmetric and off-kilter, with a random feel to it.  Possibly with some hardware.  But too crazy, maybe?  Something to ponder for a while  :)


Details:
Top; Burdastyle magazine 10/2009-121, olive/grey suedette
Jeans, Burda 7863, burnt brown bengaline, details here
Socks, knitted by me, details here
Shoes; Francesco Morichetti, from Zomp shoes

the travelling yellow skirt freak show

$
0
0
Y'ello!  Calling all sunbeamers  :D
I am taking part in the Travelling Yellow Skirt Freak Show!  the brainchild of Melanie aka Miz Bagg at Bag and a Beret; and you can read the story behind the yellow skirt and its journey around the globe here; as well as find out how to sign up to join in the fun.  
Your mission, should you choose to accept it ... *dun! dun! dundundun! dun!* 

I'm a tiny bit embarrassed at my unexciting styling of the skirt particularly when you check out how cool everyone else has done it!  But I'm being true to myself: "pared back"is my thing and when it came down to how I would choose to wear it with no influence or comparing myself to others who have gone before me; then a basic white tee, on a beach, the Indian Ocean lapping at my heels, IS pretty much Me in a nutshell.   The skirt is statement enough!
And I'm in my happy place, this particular beach is my very favourite beach of them all  :)
Like everyone else I've added my own discreet little "I woz 'ere"...

So, I am wearing another new thing here, actually there are two! other new things here made by me recently; the ivory Tshirt is view A of Vogue 8879 made in a soft cotton jersey from Spotlight.  Pattern notes: the sleeves are cut on, making it a bit of a fabric hog.  I might not make it again, or if I do I'll probably modify it to have set-in sleeves, just like any old plain boring tee...  o dear, another example of my boring-ness.
Oh, the second new thing: well, underneath the skirt I am wearing some new jeans, because it was only about 16C on the beach when I took these photos.  Brrr! too cold for just a skirt!  I'll blog about those soon.
Later dudes!

Details:
Tshirt; Vogue 8879, ivory cotton jersey
Skirt; THE TRAVELLING YELLOW SKIRT

cafe au lait bootlegs

$
0
0
New jeans/pants/jeggings/whatevs.
Burda 7863, stretch bengaline from Spotlight.
So.  I guess that's about all I have to say! I've made this pattern what, nine times now, I think.  Speaks volumes.  The colour is softly pretty, a nice and easy and inoffensive pale neutral.  I love it.
Maybe they're a bit boring?  Well, they're basics.  Basics usually are.  I'm sure they'll get lots of use.
Eventually.

The nitty gritty, re my usual alterations and fitting:   
Extra 10cm or so added to the length at the lower hem, just in case.  I always pre-wash my fabric; and make up the pants to the hemming stage, then wash again, then hem.  It really helps guard against leg-length shrinkage.
Another always-addition is to added a bit of length onto the waistband length at CF so as to accommodate a zip placket
And my usual fitting alteration to accommodate my slight sway back is to try them on inside out BEFORE sewing up the CB seam including the waistband, and to pinch it in; as described and pictured here  Works really well for a really good fit, every single time.

Details:
Jeans; Burda 7863, stretch bengaline
Tshirt (under); Vogue 8879, ivory cotton jersey, details here
Jumper; the Hayward, knitted by me in Noro Ayatori, details here

blue ray

$
0
0
Winter is officially over here, so right on target I've finished a wintery little dress.  :) 
I spent some quality time with my dyepot, dyeing bright blue corduroy in four different moody blues for the colour blocking.    This is my second version of Vogue 1316; I've dreamed up several different plans for this great pattern which I want to explore, including this one...  
One of the things about a colourblock design is that I think it's more effective if the fabrics are all the same type and weight etc.  As well as the colours blending in and going together nicely somehow.  And it's hard enough to find great fabric that you love, in great colours that you love too, let alone a single fabric in four great colours that you love, and that go together harmoniously.  Impossible! So I made my own nicely co-ordinating set of coloured corduroys  :)
My originally bright blue cotton corduroy is from Spotlight.
I divided the pattern pieces up into their colour batches and laid them out on my fabric, leaving a good margin around each piece to allow for a little error, just in case, then cut the colour batches apart for dyeing.  Before dyeing them I overlocked all raw edges to decrease the risk of distorting or stretching out the pieces during the dyeing process.  
I labelled each piece and was super careful to keep each label with its piece throughout the process and not get them mixed up!
my tutorial for basic dyeing here
I used iDye in various strengths of Black, Crimson and Chestnut; to get, from left:
-deep inky navy, from a biggish dose of Black, 
-royal purple; from a medium biggish dose of Crimson
-deep teal/aqua; from a medium dose of Chestnut, 
and finally the rightmost batch was soaked overnight in the leftover bath of Chestnut just to take the edge off that brightness, tone it down and dirty it up a bit.  The piece on the right is a small scrap of the original colour saved for comparison.
I took my own advice and put in pockets that sit underneath those long curved hip bands again, as described here.  Yes Vogue, I improved your pattern.
The dress is fully lined with navy blue polyacetate and I used a long, navy blue invisible zip.  As previously, I re-shaped the dress to be a little less boxy and bit more hourglass-y by re-fitting through those long back seams that run almost the full length of the dress.  A useful feature!
I'm so happy with this dress! it's funny; I'm rarely 100% happy with things I've made but this project is pretty close to being completely satisfactory for me.   I've made another highly satisfying thing recently too, which I am yet to photograph and blog about.  The weather needs to warm up a touch first, but I'm so excited about that one too! I have to say, making two things in a row that I'm super happy with, in quick succession, has put me on SUCH a high. Honestly, I wish I could bottle this feeling.

Details:
Dress; Vogue 1316, blue corduroy dyed in 4 different shades using various iDye dyes, my review of this pattern here.
Tights; self-drafted, navy blue stretchy stuff, details here
Boots; Roberto del Carlo, from Zomp shoes

One Week One Pattern

$
0
0
Hello!  I've been taking part in One Week One Pattern again.  Where we wear a representative of one pattern, for every day of a week.  I am completely unable to resist a clothing challenge and particularly one tied up with sewing, so I signed up immediately  :)
Before it started I did a quick recce of my clothes and checked the weather forecast.  I have several contenders for the pattern I could have used but given the winter-y type of week we were expecting I went for the warmest option!  my jeans collection, made using Burda 7863.  At the time of signing up I had six left; two others have been chucked out.  So quick sticks I made another, the last pale coffee pair, so I could get through the week without doubling up.  Not that I'm, um like, weirdly obsessive about things like that or anything  ;)

So, some thoughts;
1. black stretch corduroy: 
probably one of my least favourites, which is kinda ironic given that black jeans are supposed to be such a fabulous wardrobe staple.  I don't know why I'm so ambivalent about these jeans.  They are useful, but I pretty much only wear them when I'm travelling or if I'm in a rare mood for black.
2. burnt orange stretch corduroy
old, very comfy and long term favourites, but if I'm brutally honest these look pretty awful now.  For at home, doing chores, only.  I've come thisclose to making them into a skirt.  This might still happen at some point.
3. burnt brown stretch bengaline;  
my cool new ones and the current favourites.  I'm very much in love with everything about them - the colour! love it so much!!!! - and am really excited about their possibilities with my other autumnally coloured stuff.
4. white stretch denim flares; 
still sort of nice, even though they're not really very fashionable I still like wearing them a lot.  I sorta go in and out of love with them.  It's nice to have some flares to mix things up a bit too.
5. olive/grey stretch gabardine; 
My oldest pair, that have even outlasted my two other Burda 7863's.  I've gone through short periods of hating these too, but I always hang onto them because I absolutely know I'll come around to loving them again.  Actually I would be a bit devastated if they died.  The fabric is really the nicest, classiest, and probably the best quality out of all my jeans, ever.
6. cafe au lait stretch bengaline; 
my newest ones, made up quick so I could have seven representatives for the challenge and not really loved yet.  I'm a bit uninspired by them right now but I'm sure they'll come into their own soon enough.  Maybe when worn with my lighter ivories and whites.  I do like outfits that are a mix of pale neutrals.
To be honest... I'm struggling to like them.  Something terrible happened.  I liked them at first, and then all of a sudden the words "beige slacks" popped into my head.  And the rose-tinted glasses fell away from my eyes and an awful new reality was revealed.  In my group of friends we have a bit of a joke about "beige slacks".  As in, isn't it the most un-stylish thing you can imagine.  Not necessarily the things themselves, sometimes you see pants of this colour looking just gorgeous although, granted, not always.  It's mostly just the words, "beige slacks" that kill the dream, all your hopeful ideas that you might be looking nice today.  I'm trying to tell myself that my jeans are nice, that they are cafe au lait bootlegs, which sounds kinda smart but I might be kidding myself.  I think they might be beige slacks.  Oh, the horror.
7. pale grey non-stretch corduroy;
made into a skirt; and yes these might not look like jeans but they do fit in with the group! originally this skirt was a pair of jeans made using Burda 7863.  The knees got all stretched out and saggy, but the upper bit was fine and the colour is so great so I re-made them into this skirt as described here.  I still love this strange little jeans/skirt, and think I'm within the rules to count them in my Burda 7863 line-up, yes?!
My OWOP14 Flickr set with links to the individual pieces worn each day can be viewed here...

So, obviously I love this pattern so I won't go on about it.  Jeans are comfy and practical and warm, so yay.  But after a whole week of wearing jeans I am really looking forward to getting back to my skirts and dresses.  I was so pleased I could wear a skirt on the last day, today!

"Swedish" dress

$
0
0
I've made my Swedish souvenir    :)
I bought this linen-mix with a Swedish designed print in Stockholm during our Scandinavian holiday.  I fell in love with the bold and yet delicate print in orange, soft greeny-browns and black on a creamy background.  Bold and delicate?! sounds like an oxymoron but I think this design does magically manage to fit into both categories somehow!  The pattern is Vogue 2900 and I "framed" each piece in the design with a skinny strip of black cotton to highlight the piecing in this quietly interesting dress design.  
I chose to do this because I felt the broad sweeps of a bold - yet delicate! - print like this could lose much of its impact upon being cut up into small pieces... I think the black framing successfully highlights the piecing of the pattern as a feature of the dress, while still being subtle enough to allow the print to hold its own and shine equally as a feature of the dress as well.
In its own way, the black framing is a bold and delicate thing, too!
I've long admired all the many beautiful versions of this pattern made by Yoshimi.  Beth recently wrote about the concept of a "pattern whisperer"; and in fact, during Yoshimi's stay with me she recommended this pattern to me, saying that she thought it would suit me.  I have very high regard for Yoshimi's taste and style and so paid careful attention to her "pattern whisper".  And I am glad I did because I love it!  Thanks Yoshimi!
I took my time with this dress, cutting and precision-stitching the bias cut strips of black cotton and lining up all the black corners and edges just exactly right.  All the seams are highlighted in this way, except for the bodice centre front seam; I couldn't see it working in neatly with the edging on the centre front split at the top, and the centre back seam, which again, having the black edging would not have worked successfully with the white invisible zip closure.  All the edges; the armhole edges, neckline edge, pocket edges and the lower edge of the dress, are similarly edged with the same black cotton.
It's funny; I've had a large piece of this black cotton on a big cardboard roll for so many years, and it's come in so very handy for so many little touches to about a zillion projects, to the point where I felt that it was like a never ending supply.  With this project I suddenly realised I'm down to the last half a metre!  Panic!  I'm going to have to buy more!!
I used my own tip to perfectly align those black strips on either side of the invisible zip.

Details:
Dress; Vogue 2900, Swedish print with black cotton edging outlining each piece
Sandals; Zomp, from Zomp shoes

"framing" with an inset strip in a pieced garment

$
0
0
This method gives what could best be described as an inset strip.   It can be used to "frame" individual pieces and will highlight the piecing in a design as an interesting feature.
It is a flat strip set alongside a seam so it looks superficially similar to piping, and has the advantage of being flat, not 3D, as well as being a bit easier to sew than piping imo  :)

These measurements will give a narrow 1/8" inset strip alongside a seam, however the measurements can be easily adjusted accordingly to make a narrow or wider inset as desired.  If desired, you can even make the strips slightly different widths within the one garment to emphasise some seams over others or to give a better balance visually.

Select the side of the seam you wish for the inset strip to sit.  For example, in this bodice I elected for the inset strip to be on the back side of the back/front side seam.  This will be the piece the bias-cut strip will be pinned and stitched to first.

Note: IF you are sewing strips into multiple seams on the garment as I did for my dress in this example, then it is very important to be rigidly consistent throughout here.  Because the inset strip is encroaching on the garment a little bit on one side of the seam the garment will look a little "off" if some strips are sewn to the front and some to the back.   Pick a side and stick to it.

Cut the bias strips to be 1" width.
Pin the bias cut strips with the raw edge 4/8" away from the raw edge of the fabric.
Stitch 6/8" away from the raw edge.  Note: to make a wider inset strip, pin the strip and sew this seam further away from the raw edge.
Press the wide edge of the strip over the stitching, towards the raw edge of the fabric.
Stitch the pattern pieces together, right sides together, in a regular 5/8" seam allowance.  The seam stitching is indicated in this picture, the stitching to the immediate right of that is the previous stitching to secure the bias-cut strip.
Open the pattern pieces out and press the seam allowance away from the inset strip side.
Voila!

pink

$
0
0
I've rejigged these strawberry pink jeans into a skirt.  I made the jeans two years ago using an Au Bonheur des petites mains pattern courtesy of shams, thank you shams!  There's lots of things I liked about the jeans; they were so comfortable and easy to wear, I loved the detailing on the pockets and seams but my little measuring stuff up re the positioning of the knee piece had always kinda bothered me whenever I happened to glance down and notice it.  So I hadn't been wearing them, even though I lurrrve this delicious colour so much.
It's pretty easy making a skirt from jeans, even avoiding like the plague those versions with the J-curve crotch portion of jeans top-stitched down on the front of a skirt and a big triangular insert plonked underneath.  No offence if you love that sort of thing, but I just do not.  I prefer for a skirt to look like a skirt.
I followed the same basic concept I did for my previous jeans to skirt refashion.  I cut out the offending knee patches and discarded them altogether; the 3D-ness of them made them too difficult to incorporate into a skirt, without looking uber-weird.  The front of the skirt is essentially straight from the hips down and the back has two flared sections in the centre lower part to give it a bit of a kick at the back.  And to enable me to stride in a brisk and purposeful manner, unfettered by a tight skirt.  
I like this shape, how the skirt appears very straight up and down from the front but has plenty of leg movement because of those flared bits. And I'm happy it's got a new lease on life.  This colour!  It just screams spring, yes?  Yuuuum!

Details:
Top; from Pattern Magic 3, ivory cotton jersey, details here
Skirt; from au bonheur des petites mains jeans, strawberry cotton denim
Shoes; bensimon, from seed boutique

chunky two tone sandals

$
0
0
I've made my second pair of shoes! suede and vinyl, medium heeled, clog-like sandals.
I really like them stylistically.  In fact dare I say, I even love them a little bit!  My general criteria with my self-made stuff is: would I buy this if I saw it in a shop? and in this case: hmmm,well y'know I think I would be attracted enough to pick them up, at least!  Actually buying? well apart from the definite whiff of eau de homemade about them... ;) My cobbling skills are low to non-existent but so far that doesn't really bother me all that much.  I'm learning by doing.
I actually do love them, they feel solid, modern and somehow honest.  I am really going to enjoy wearing them  :)
The how...
They have a wooden base, made of pine from Bunnings.  I cut and glued two layers together using interior/exterior PVA glue, then cut the basic shape of the shoes rather roughly using a bandsaw.  
Further shaping, fine-tuning and sanding was done on a belt sander using 40, 80 and 120 grit sandpaper.  Once I was happy with the shape and had sanded it all nice and perfectly smooth, I applied three coats of varnish; exterior grade, satin finish.
By the way, I've gone back and added some extra "progress" pictures to my previous shoe-making post just in case that sort of thing is interesting... sewstylist commented that progress pictures would not be boring, and thank you for saying that! so I've put in a few more pictures this time too  :)
The upper is made of caramel-brown suede (from Skindhuset, in Copenhagen) and pale grey vinyl (Spotlight).  The suede is eked out from the leftover scraps from my caramel suede jacket.  I cut backing pieces from old bed sheeting, which is a thick and very strong fabric, and glued the uppers and backing pieces together before topstitching all around the perimeter in matching threads.  These uppers were nailed to the wooden bases using 15 x 1.6mm blued tacks (Bunnings).  I chose these partly because I liked the rustic look of them, also because they were the only nail option in this size, but now the non-uniform appearance of the heads bothers me a bit.  I hammered matching copper-look snaps (Spotlight) to the straps that close around the back of my heel.
For the soles, I cut adhesive cork liner sheets (Spotlight) to size, glued them on and applied five coats of satin varnish to strengthen and harden the surface.  
Things I would do different again: In the future, I would save time and brush-cleaning by applying the cork sole before doing any wood varnishing; and then just apply three coats of varnish to the wooden base and cork sole together.
Bed-sheeting, even though it has very desirable qualities of being very strong and inflexible, is probably not the most wonderful choice for backing the uppers.  It's good but is a bit thin and "fabricky", if that makes any sense.  I was worried that vinyl would be too thick for the job, but in retrospect I think it might work well.
Obviously, I have already started planning the next pair...  :)

a bobbly little top, and some others too

$
0
0
I've made a few new tops...
Top un; a cosy little pom-pommy top, using pattern 111 from Burdastyle magazine 04-2014 in a bobbly stretch fabric the colour of whipped cream from Fabulous Fabrics.  The design has quite an interesting and unusual shape already and I further toyed with the proportions, shortening by about 15cm at the lower hem and lengthening the sleeves by 3cm.  This was only like, the easiest thing in the world to run up and I think it's rather cute too!  The oversized floppy neckline manages to be all of comfortable and even a little dramatically designer-y too.
The design, while a very easy project, still fits happily into the interesting category for those of us who like that sort of thing... The body is a one piece tube with one piecemeal seam down the right side.  The sleeves are have different shaped sleeve caps from each other and their positioning and individual insertion methods creates a slightly skewiff shape to the top when worn.  Cool!  Completed, it reminds me a little of my Pattern Magic twisted top, which is illogical since this one is both boxy and has the oversized cowl and is cut on-grain, and... well, technically speaking is different in just about every respect, really.   OK, forget I ever compared the two.  
And to pre-empt an inevitable concern; yes, the sleeves do feel different to each other but it is not uncomfortable.

Tops deux and trois are the Nettie pattern, by Closet Case Files, my now go-to tshirt pattern. I upsized to an 18 from my usual 12, because a slightly more relaxed fit is desirable in a summertime thing.  The fabric is a fine, off-white jersey knit from Fabulous Fabrics.  
One has short sleeves and a fun little pocket.  The pocket looks like a cute design decision but is actually covering a hole that I had accidentally snipped right in the middle of the fabric oooops!!  Thoughtless, overconfident me, snipping away wildly and with carefree abandon! Iwas in a REALLY awkward, unavoidable spot, so I sewed the hole shut and reinforced it underneath with a bit of scrap, but it still looked way too obvious and ugly.  Rats.   So when cutting out I cunningly managed to finagle it in breast pocket position, plonked the pocket on top, and then had to cut short sleeves for the tee.  Hmmf, but well, at least I managed to get the two tees out of my fabric piece, in spite of the snip.  No one will ever know!
The other is completely unremarkable, apart from that all the seams and hems sit on the outside and are simply overlocked with navy blue thread.   Why did I do this?  *shrug* dunno, something different from my gazillion other white tees.
 Oh, this old thing, tshirt quatre.  I'm taking the opportunity to finally blog this one I made about two years ago.  It's annoying that I never blogged it, because when I'm wearing it in a daily outfit and linking to my blog posts it's not there.  So here 'tis!  It's beige and boring, and therefore incredibly useful.  Made using my own custom fit Tshirt pattern, which apparently I seem to have chucked out at some point.  Double rats.  Yes, I've been doing a lot of careless silly things lately.
So, while stuffing the new creations into my Tshirt drawer last weekend I spontaneously embarked, as you do, upon an epic wardrobe spring clean-out.  As in, I emptied every single one of my drawers and took everything out of my wardrobe.  And went through methodically trying on, sorting, assessing and sifting out only the things I really truly wanted to keep.  Discovering forgotten treasures!  New, cool, outfit combinations!  Tossing hideous things into big rubbish bags!  Purging!!!   It took a few hours but man, it was great.  Felt SO GOOD.
This house, is clean...
OK.  My first, same old conclusion; I have a LOT of clothes.  And I love most of them too. I have very few unloved things and those have been weeded out now.  A few undecided things are going to be worn on a trial basis and assessed over the next few weeks.
Second conclusion, and slightly surprising, to me at least; I do not need to make nor buy basic Tshirts for, like the rest of my life, probably.  Why is this surprising? because after my first and second me-made months four years ago, my biggest conclusion was that I severely lacked basic tops and tees.  Well, obedient little me has diligently been making basic tees ever since and has rectified that lack very adequately now.  Thank you, me!  This is good, because while I don't mind making Tshirts, lets be real, they are bread-and-butter.  Without the butter.  Not the most inspiring things.  Obviously instantly gratifying projects can be fun and fulfilling in their own way.  But my last couple of more in-depth projects have been a hugely more satisfying to me, on every level.  So I'm pleased that a full complement of basics means that I can relax about Dutiful Wardrobe-Building, and just happily spend my time and energy on the kind of more complex, involved, longer term projects that are truly enjoy enjoyable.
So, yay!!
Now on to something more interesting...  :)

a "Norwegian" jacket

$
0
0
I've made up my Norwegian souvenir fabric.
Pining for the fjords? me? well, maybe just a little  ;)
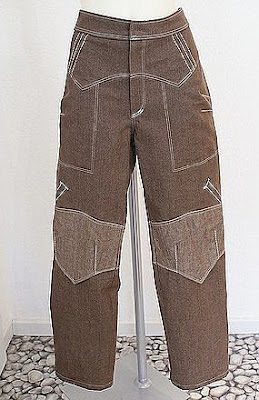
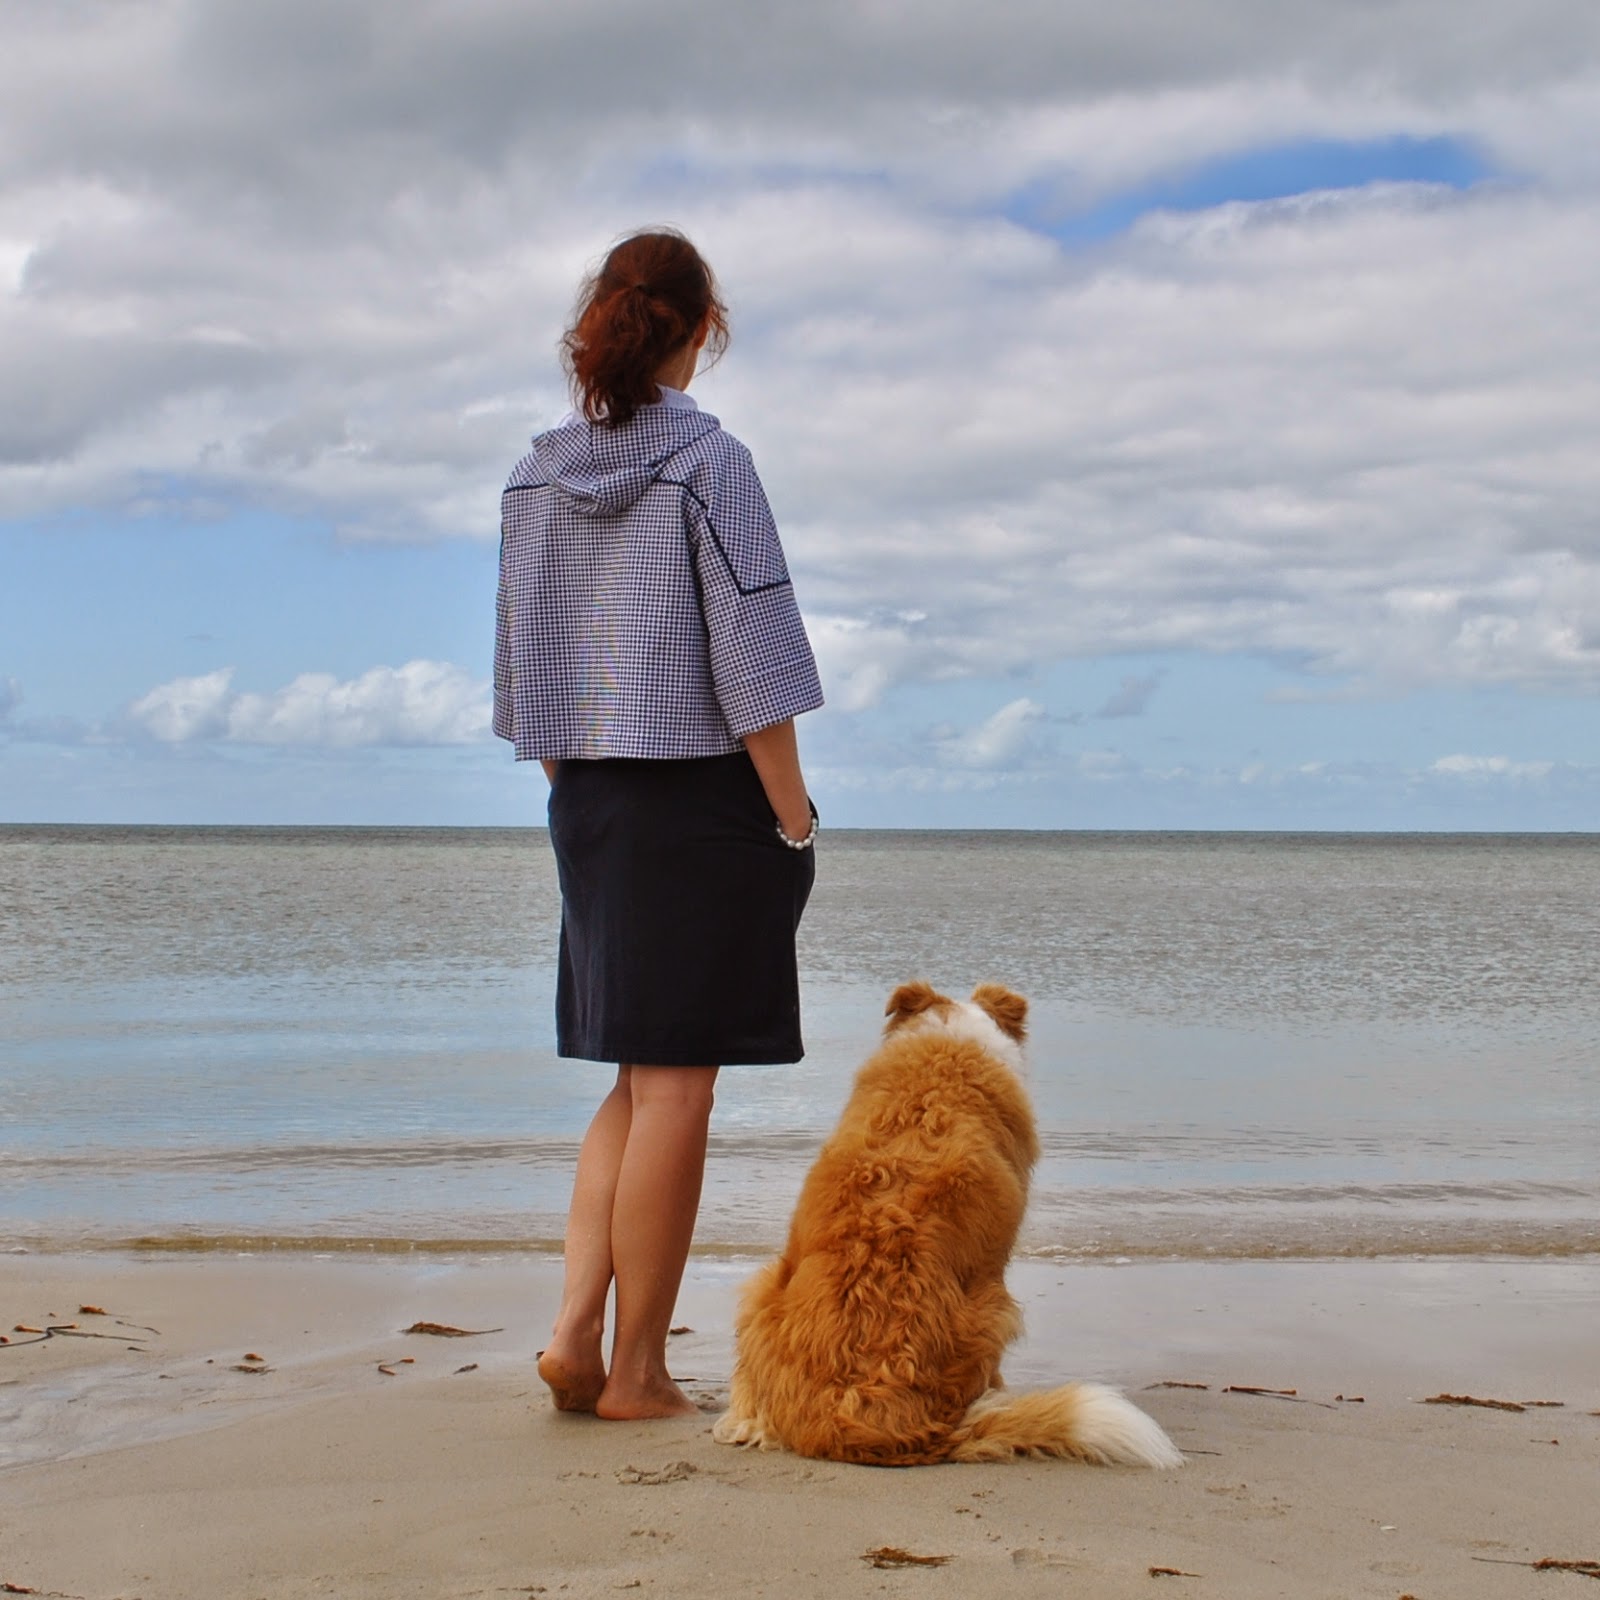
I bought this divinely thick, strong, and sturdy cotton drill in Oslo during our Scandinavian holiday, with dreams of  making a boxy, nautically flavoured little hoodie.
And done, and dusted.   :)
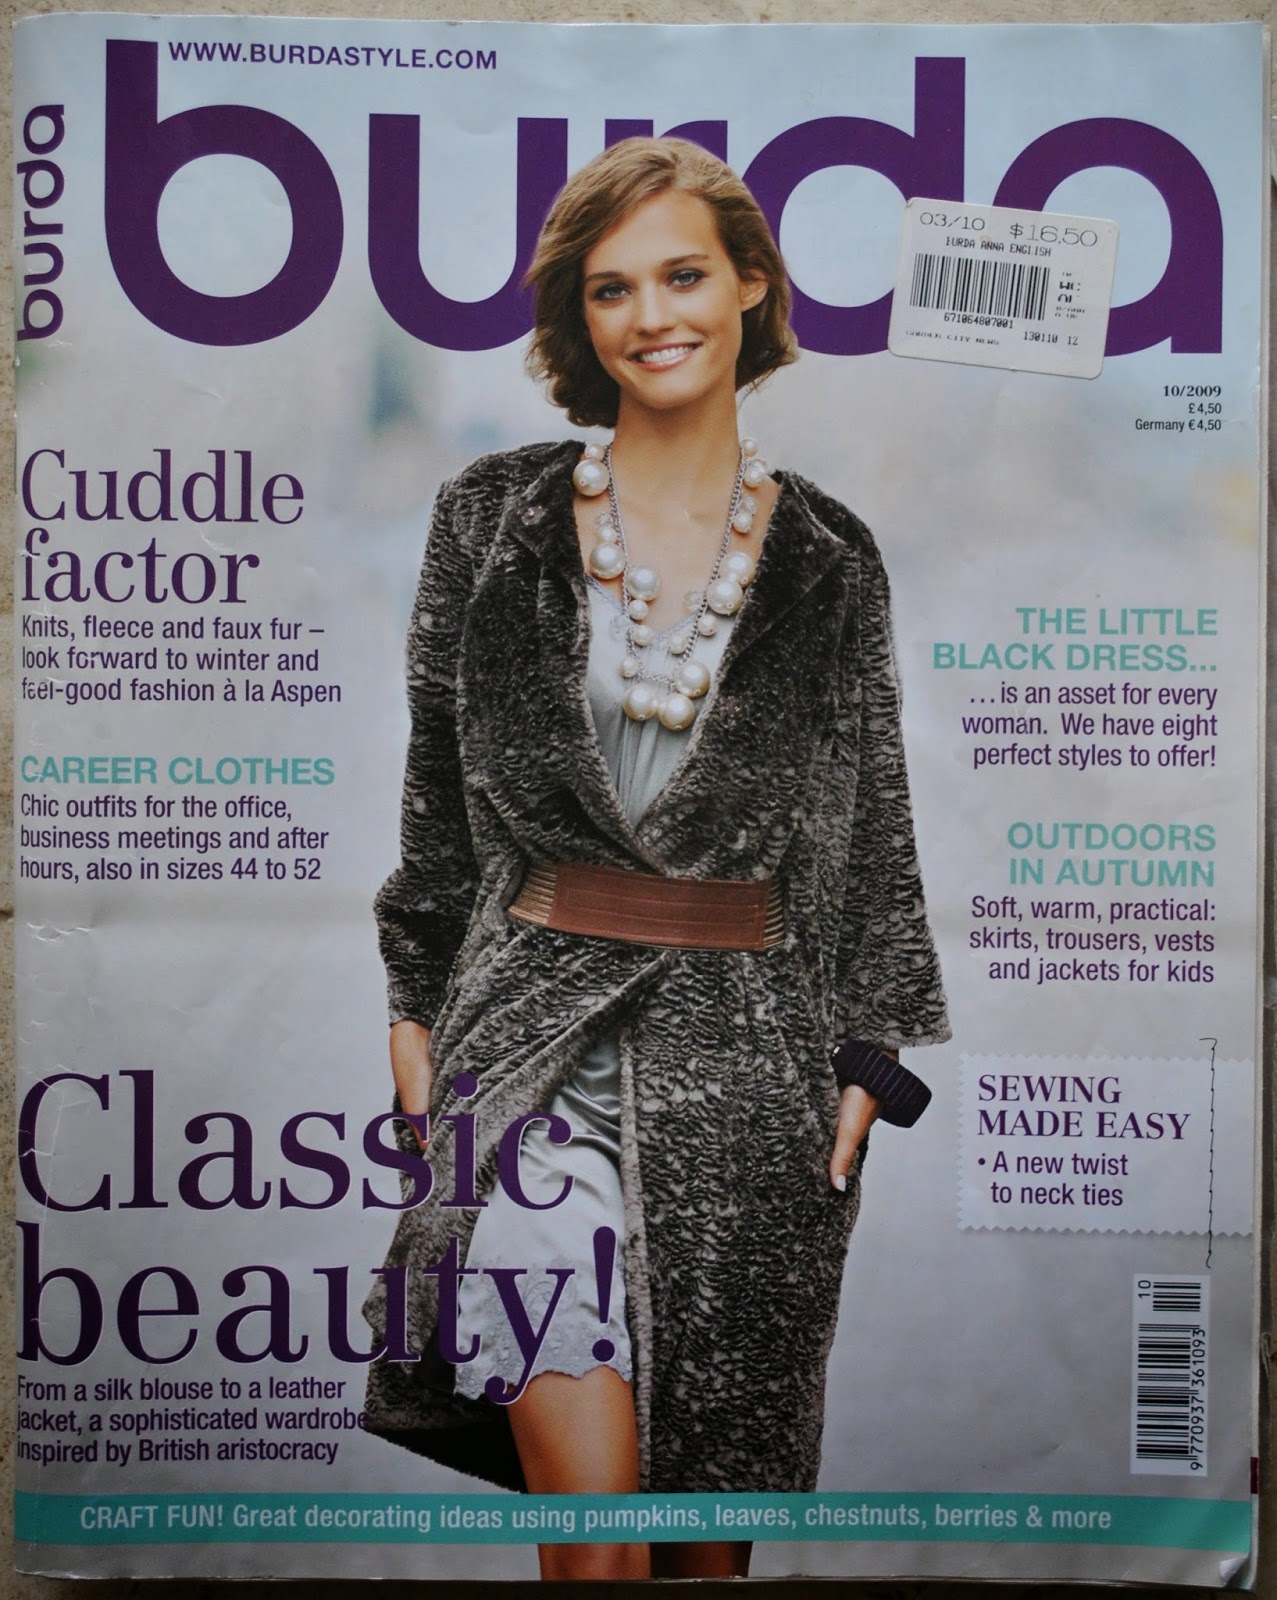
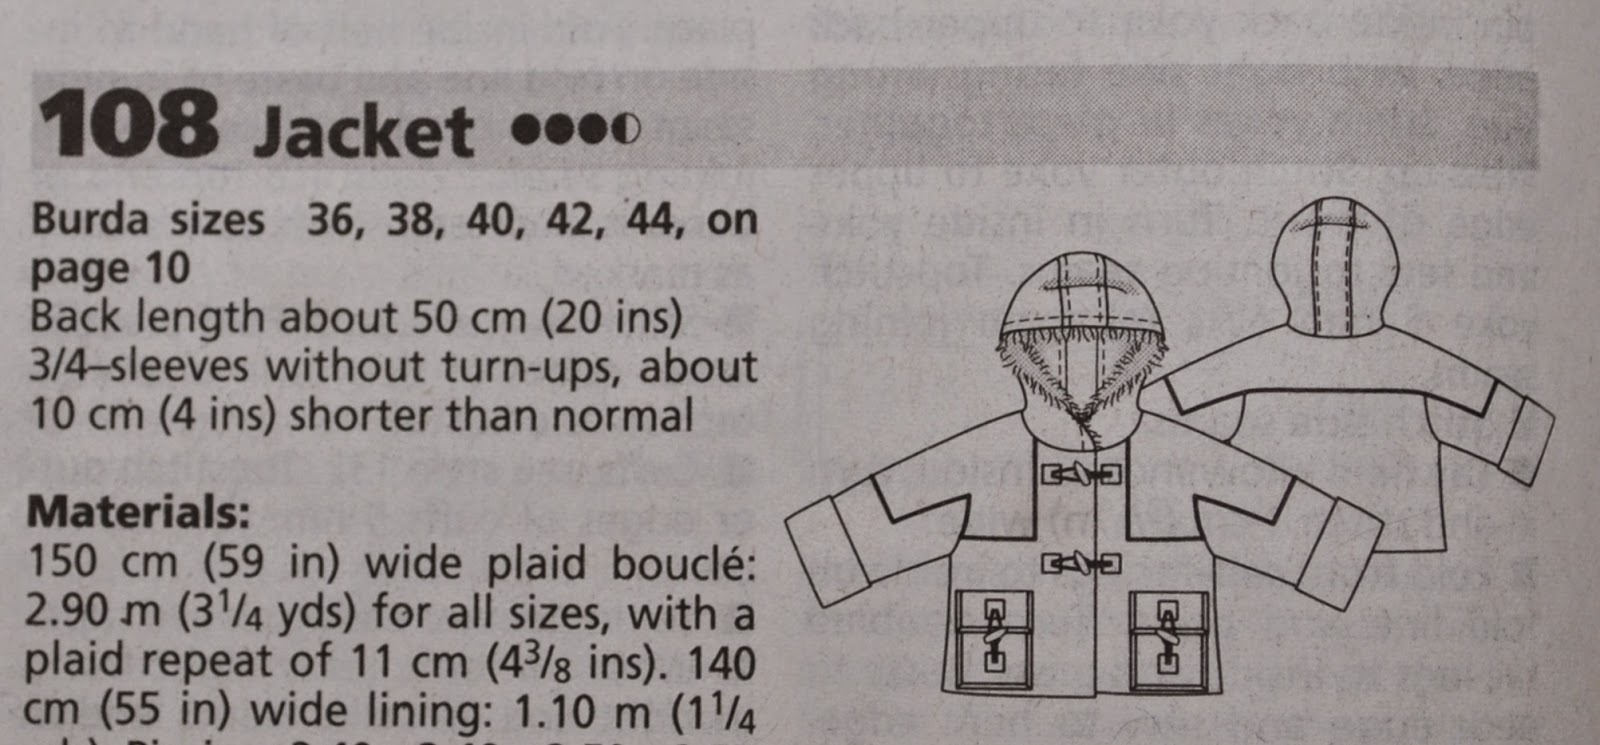
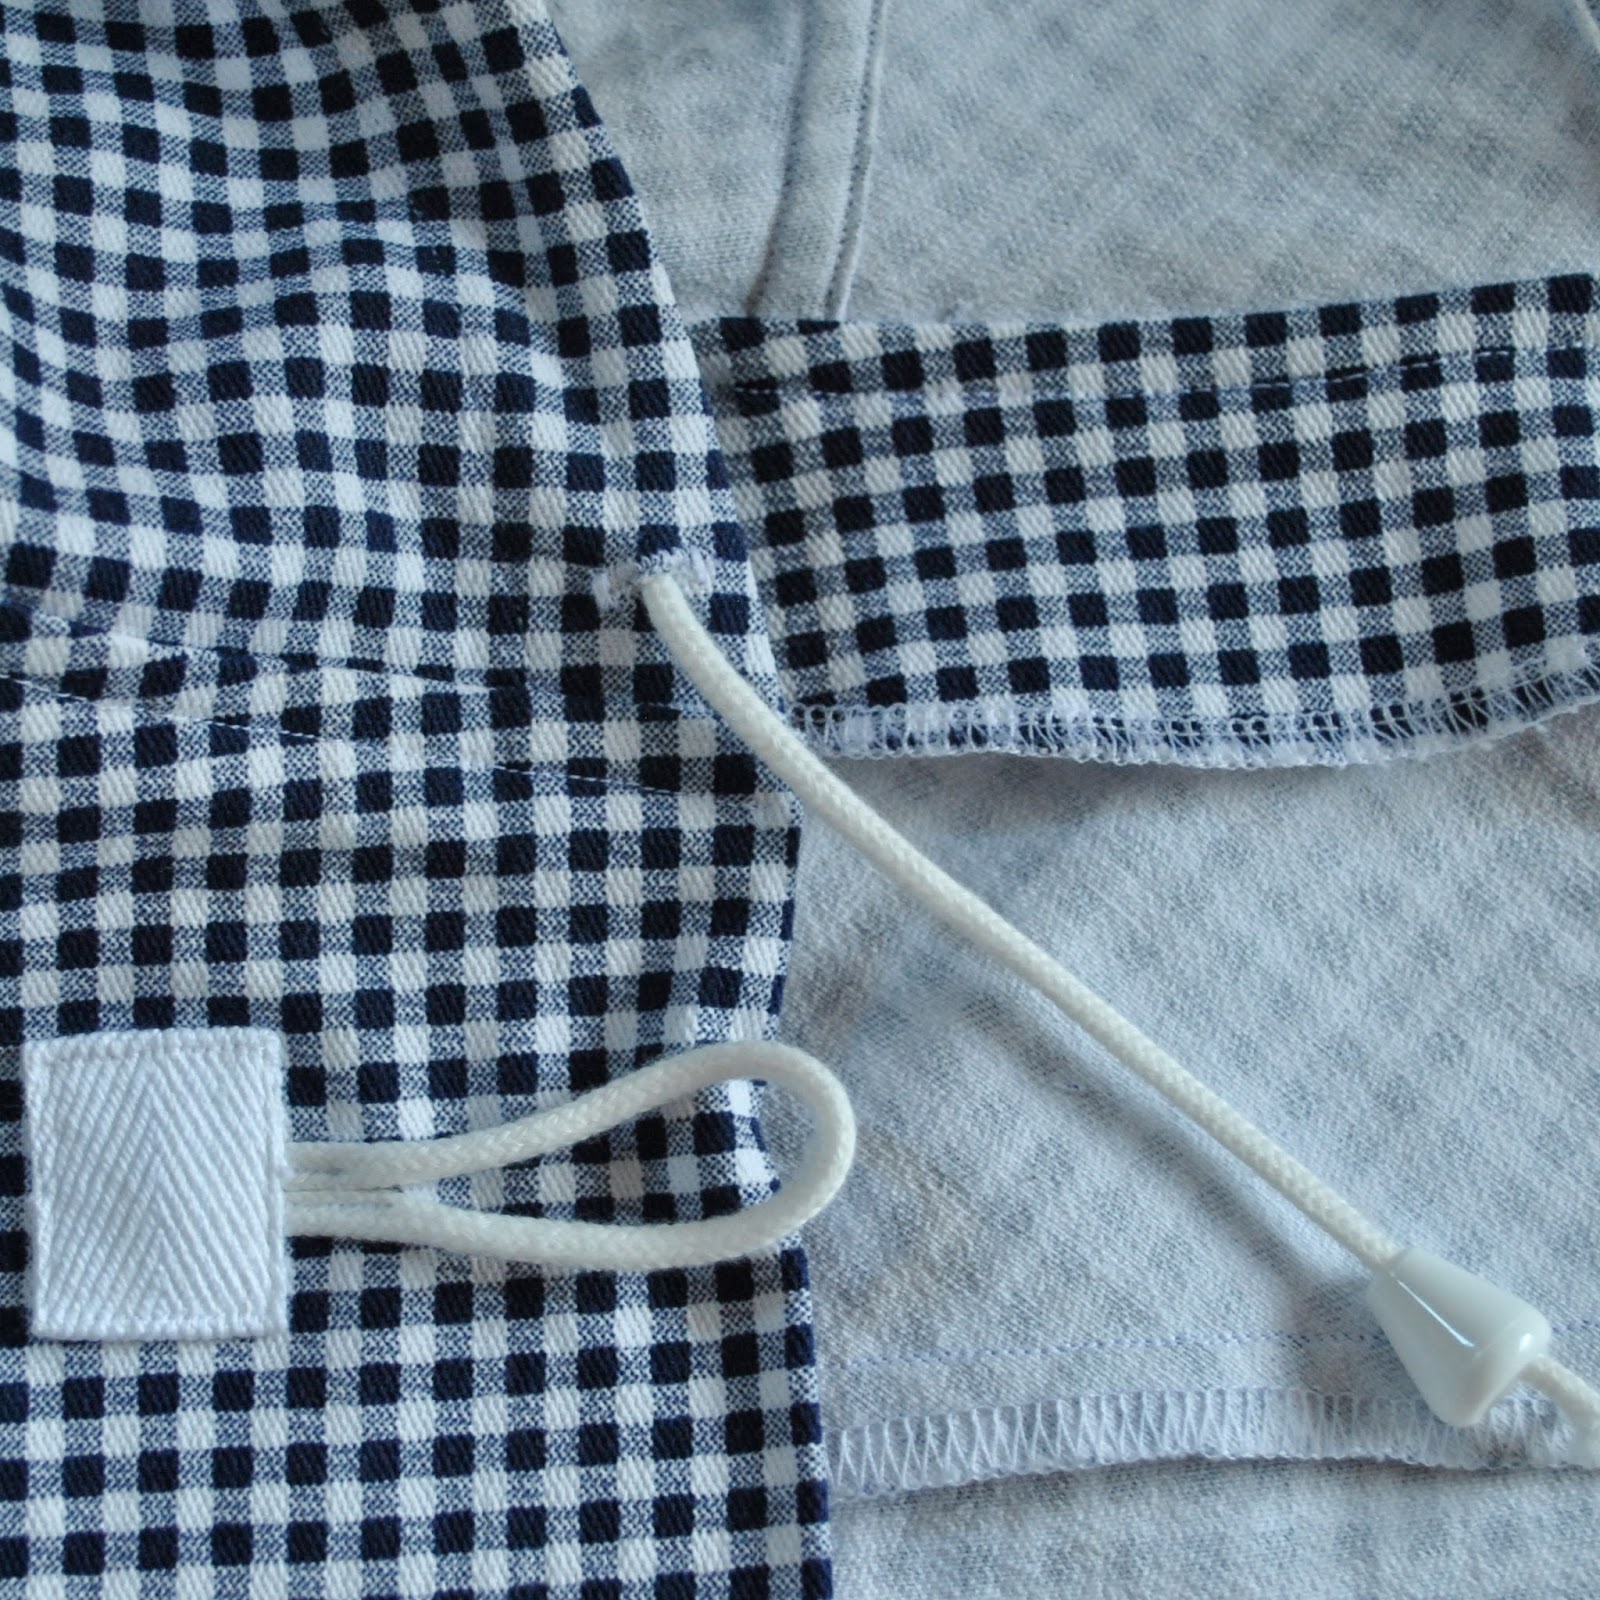
I used pattern 108 from Burdastyle magazine 10/2009.  In the magazine it's made in felted wool, is lined, and has a fur-edged hood.  I fancied it made up as a lighter, warm weather thing, and knew it would work out perfectly ok in that role too.  Mine is unlined and I finished all the raw edges off using my overlocker so it all looks nice and neat inside.  The fabric is beautiful quality, actually quite thick and wind-resistant; so even sans lining it's turned out to be a rather cosy little jacket.  Brisk spring breezes? ha!  I laugh in your general direction!
The pocket, pocket flap edges and the interesting shape of the yoke pieces are all highlighted with navy blue piping, for which I used readymade bias binding.  I've had this in my stash for decades, no kidding, and thought, yay! I'm finally going to use this up!  Obviously, I then did not have quite enough, which meant I had to buy a bit more.  Which meant now I stillhave some in my stash.  Doh!  It's a conspiracy!!!
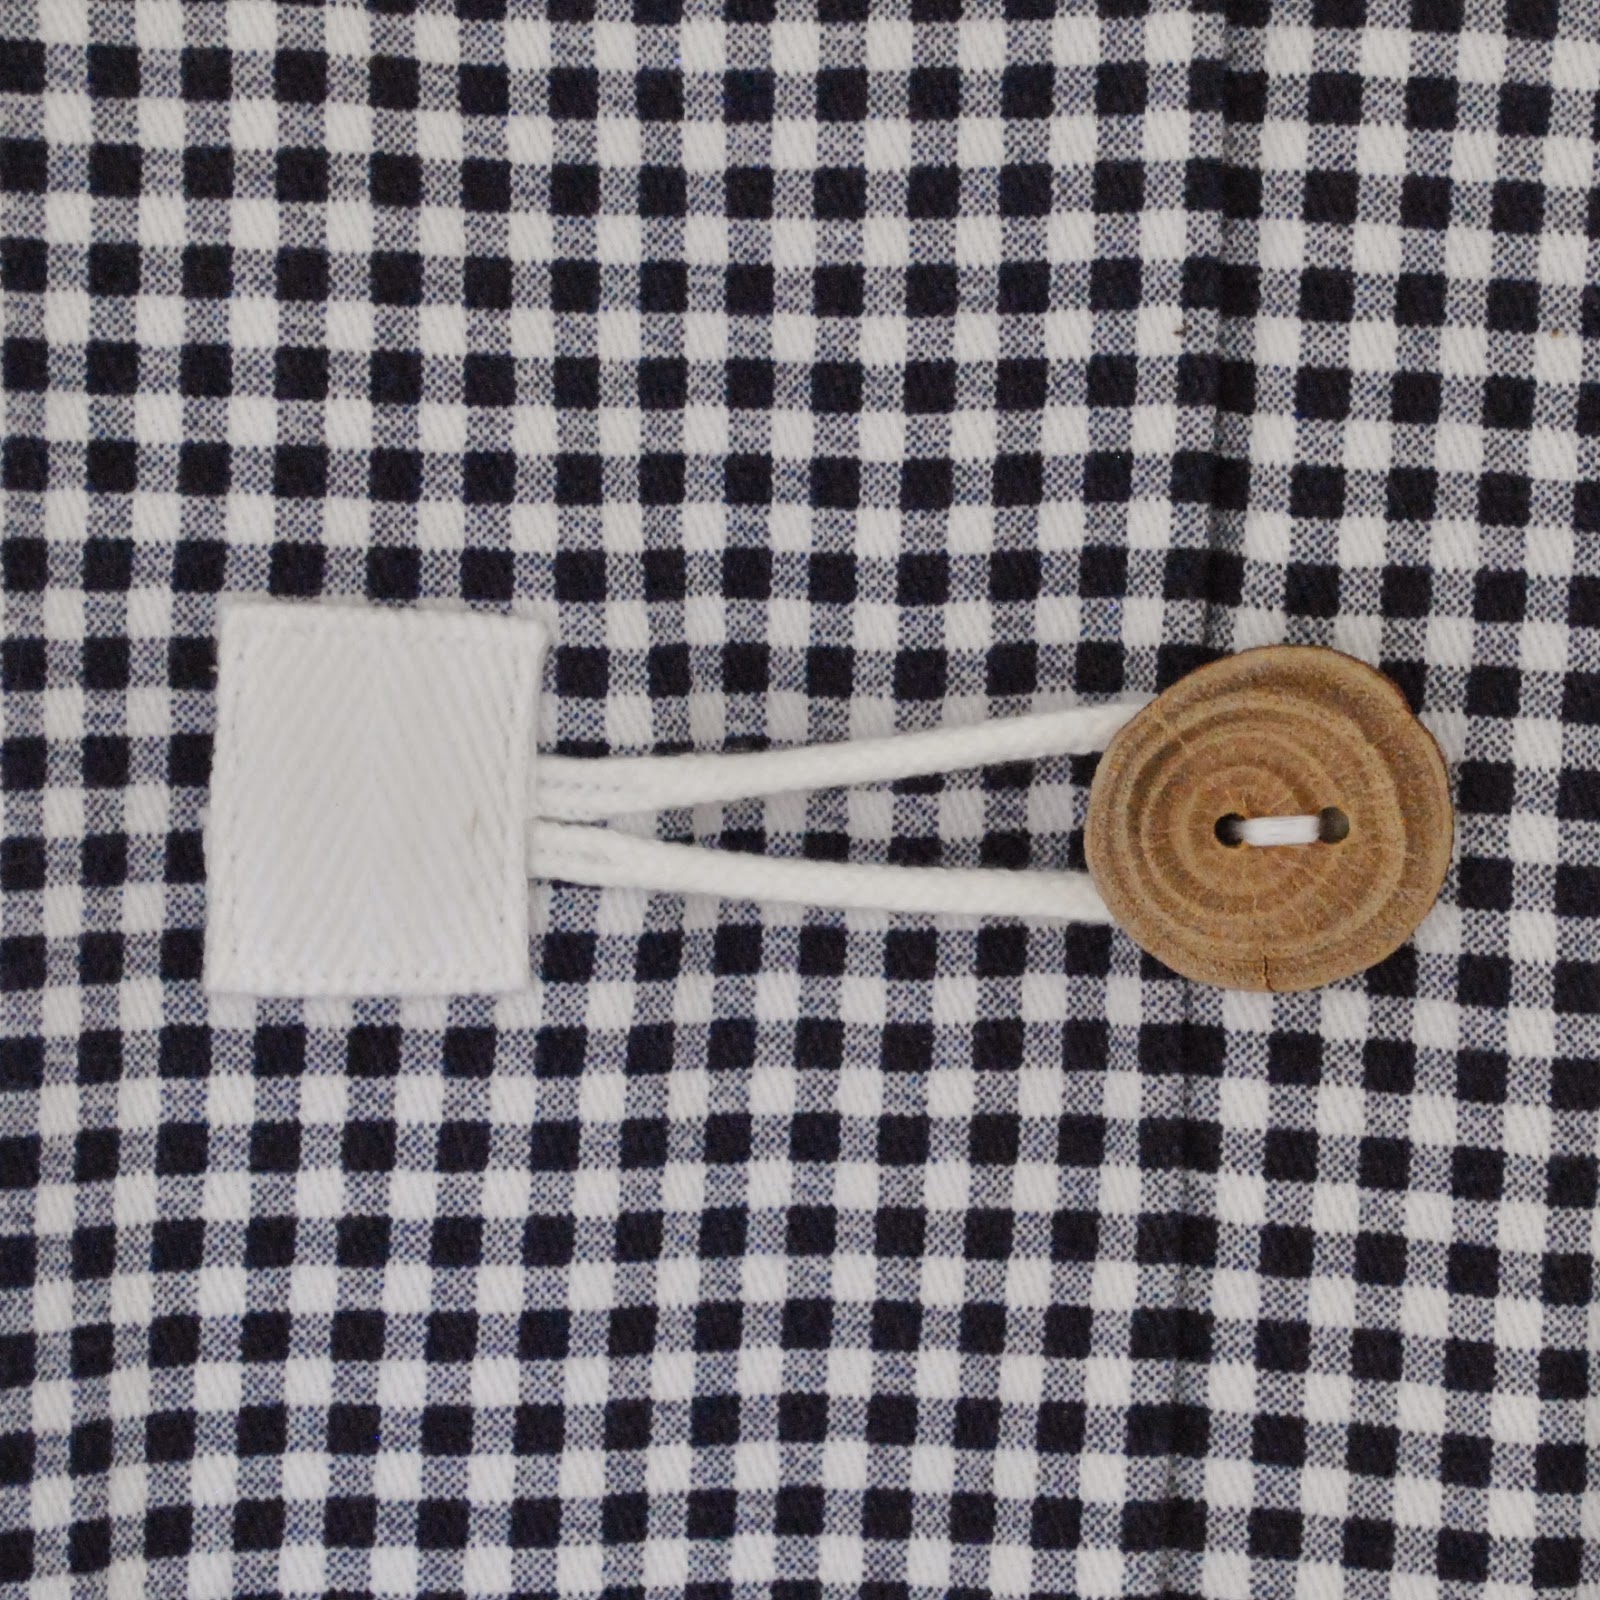
I ummed and ached about the front and pocket closure... first thinking I would put in big white chunky zip, rejected that; then thinking metal dog-bite clips, but the ones I found weighed quite a lot and would've dragged the jacket down.  I wanted something a bit different, but it still had to be lightweight.  The magazine version called for toggles, since it was supposed to be a wintery thing, and finally I thought a summery version of a toggle would be a fun thing to have.  
I made mine using cotton twill tape and cotton rope.   My Dad made the lovely wooden buttons, aren't they beautiful?  Many years ago I asked if he could make me one for my little brown cardigan, and he generously made several so I would have a selection from which to choose.  And I'm thrilled I had enough to finish this little jacket.  Thanks Dad!
I had bought enough of the cotton rope to put in the hood as a drawstring, so I sewed miniature teeny buttonholes in the hood front and inserted the rope in the self-facing casing.  The hood seams are flat-felled.

Doesn’t scream Norway?  Well, I can hear it quietly whispering Norway, in my shell-like ear at least  :) 
I put a lot of time into getting that piping and those toggles positioned just exactly right and I'm very pleased with how it turned out.  I particularly love having Dad's wooden buttons on it!

Details:
Jacket; Burda style magazine 10/2009, 108, cotton drill from Norway
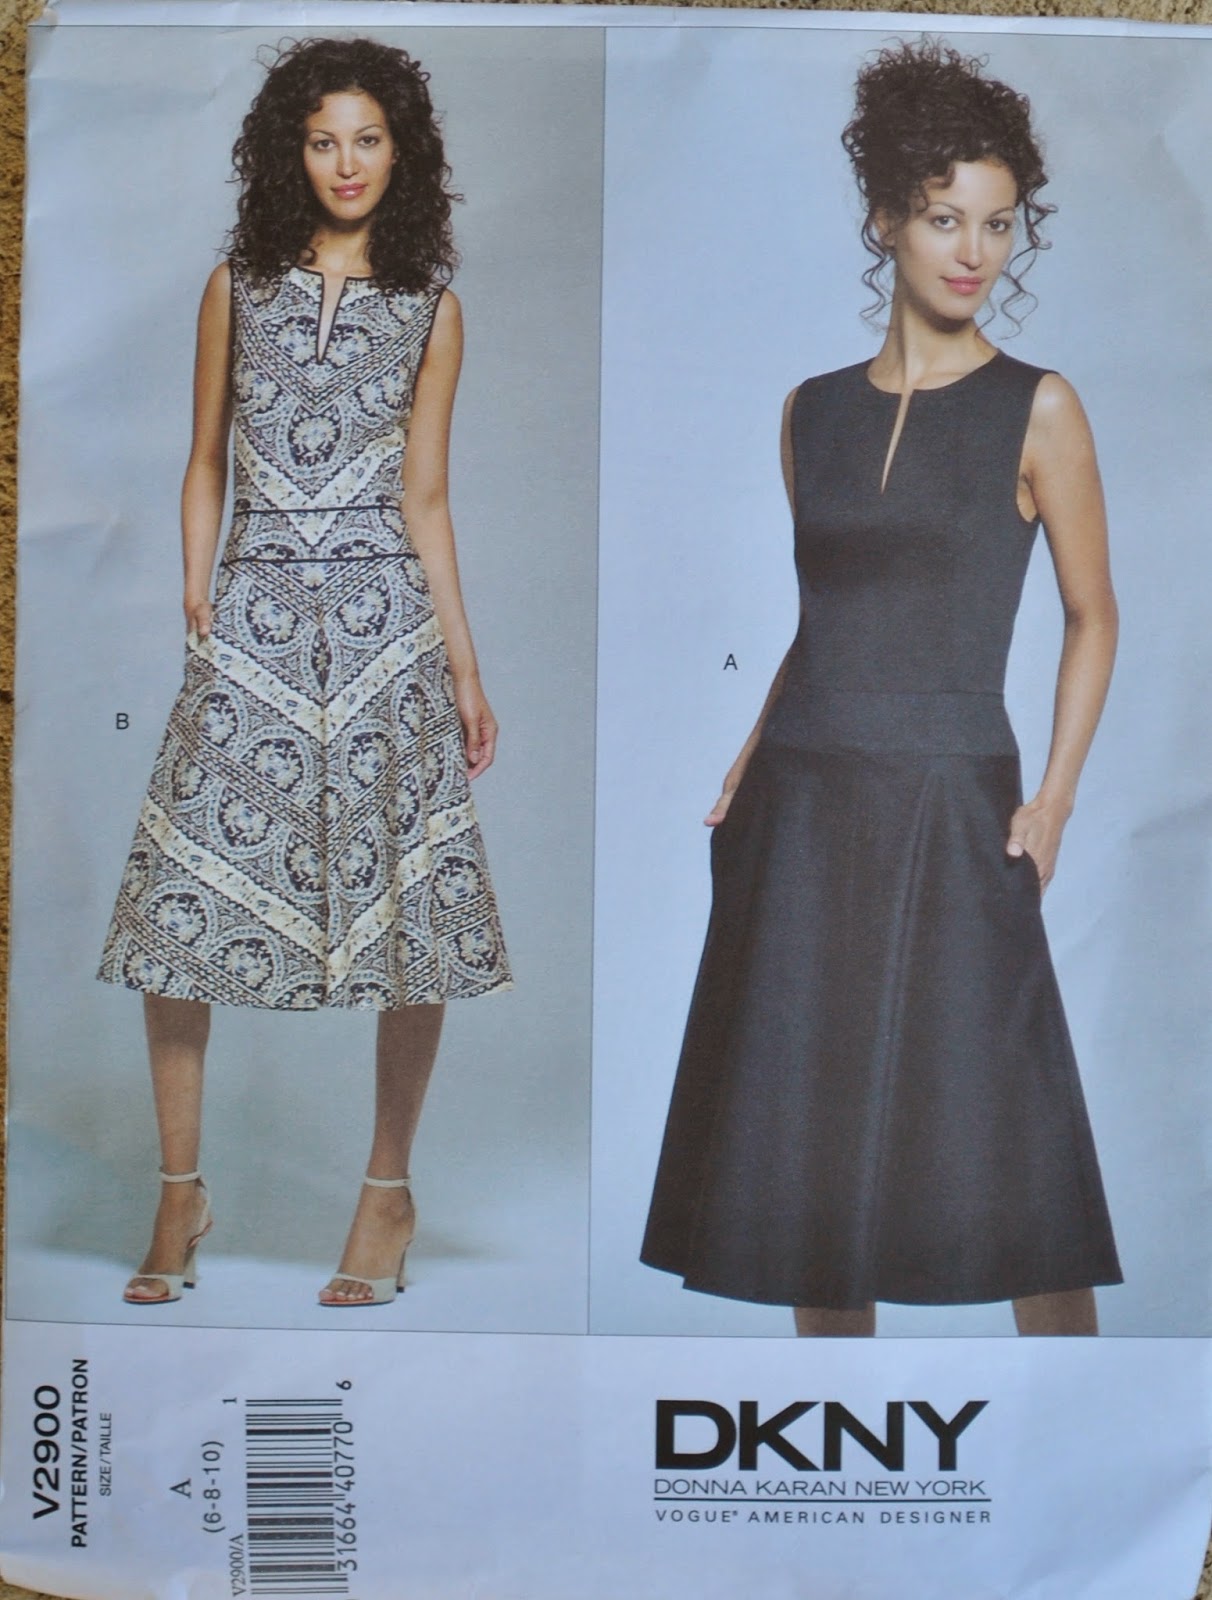
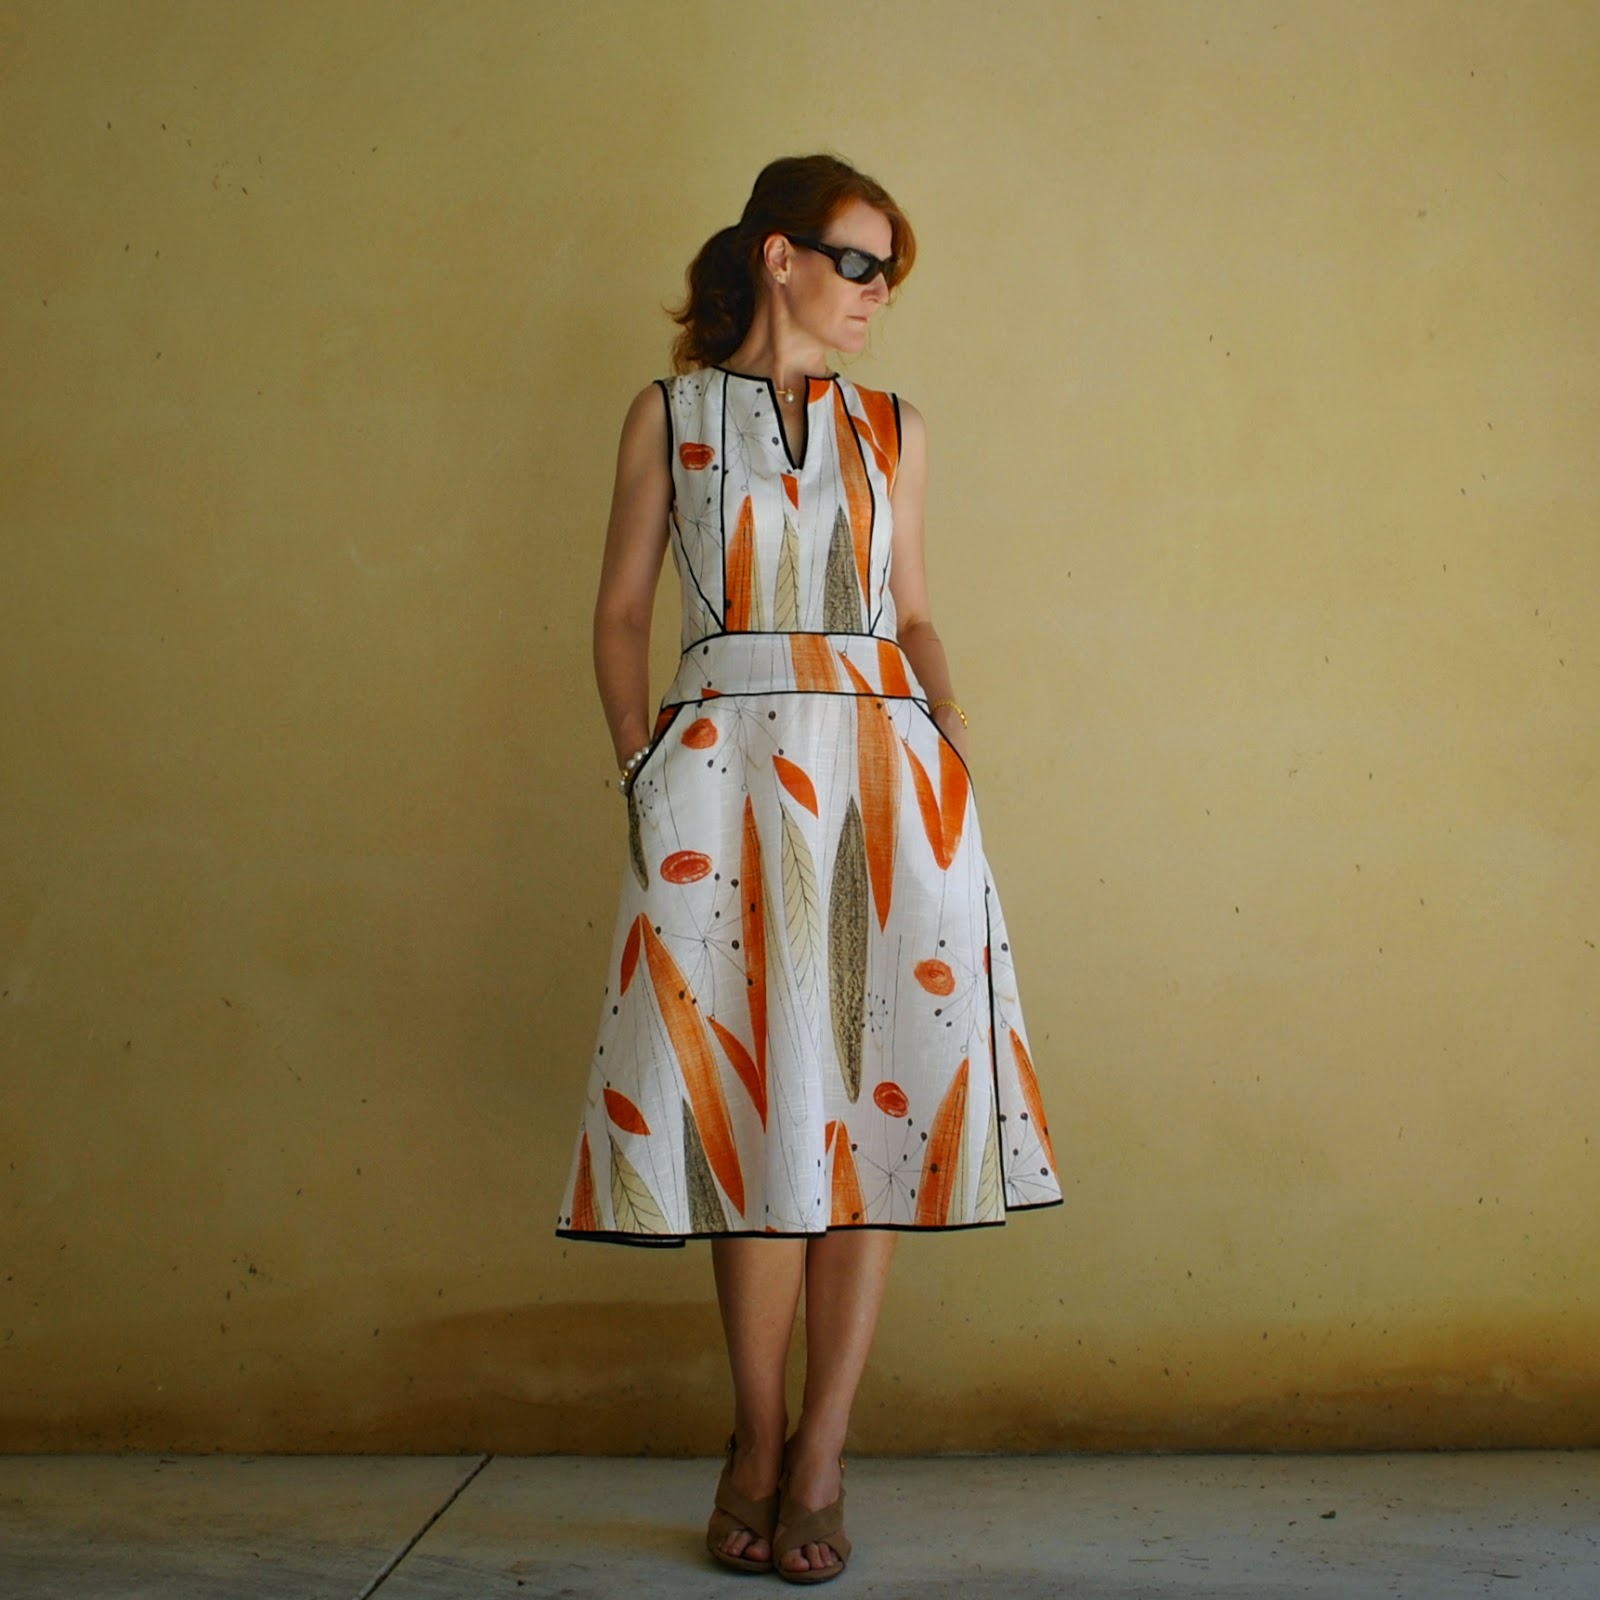
Dress; Burda 8071, made from an old polo Tshirt, details here
also white/navy blue Tshirt underneath, details here

raspberry Alabama Chanin tank dress

$
0
0
I've finished a handmade dress.  It's dyed, printed and stitched together entirely by me.  
This is a fitted tank dress, the pattern is from the book Alabama Studio Sewing + Design, by Natalie Chanin.  I dyed shocking pink linen jersey knit to fortuitously achieve this rather nice, motley, deep raspberry pink, which I loveand the print is the Abbie's Flower design from the same book, enlarged by hand and screen-printed in deep burgundy textile paint, all described here.
So.  I should be pleased with it, but actually I'm teetering on not I'm pleased it's finished, let's put it that way!  
Actually I'm borderline depressed with it.  See, I did have grand plans for further handwork and embroidery.  Those plans came to nought.  
I trialled several different embroidery and even beading ideas but everything I tried just looked awfully heavy-handed   The size of my print is quite petite, and it's also detailed and well defined and more than a bit busy, and so doesn't really lend itself well to the embellished Alabama Chanin look, I think.  Eventually, frustrated, I ceased diddling about, picked everything off, and just sewed it together.  
Defeated. 
So I was pretty over it even before the poor thing got sewn together.  Probably why I shoved it into the cupboard and all but forgot about it until my recent wardrobe spring clean.  Hey, new dress! Guess I should wear this thing, hmmm.
The seams are all stitched and felled by hand, and the simple armhole and neckline binding applied with herringbone stitch by hand.

Also, I'm undecided that the tank dress silhouette is very flattering to me.  It's a funny thing really because I totally adore my long AC skirt and matching tank top worn together, a combination which one might argue could pass at a short distance for a tank dress just exactly like this.  Somehow having the break between top and skirt is a huge improvement to my eye.  As a dress, with a continuous unbroken fall of fabric from shoulder to hem; I dunno, I just don't like it as much.  It's irrational and I can't explain it.
This is why I'm probably always going to wear it with a little cardigan, as above.
It's not out of the question that I'll refashion this into a separate skirt and top one day.  In the meantime I don't mind it worn over my Metalicus petticoat like this.  I'll see how it goes for a while.
Maybe it'll grow on me.

Details:
Dress; fitted tank dress from the book Alabama Studio Sewing + Design by Natalie Chanin, in linen jersey, hand- dyed, printed and stitched by me
Petticoat; Metalicus
Cardigan; Country Road
Thongs; Havaianas

the children's choice

$
0
0
So recently I had a birthday, and my children gave me a perfectly lovely surprise!  fabric of their choice, for a particular pattern also of their choice.  
It's like Sew Bossy all over again!! haha, I jest, of course in all seriousness I'm absolutely thrilled that they thoughtfully gave me something that they know that I really love ie. a sewing project, and also for me, this is a very interesting insight into their vision of me, the kind of thing that they "see" me wearing.
Well, specifically, I suspect Cassie did all the choosing and so this is therefore her vision of, and for, me.  She snuck quietly into the laundry and chose this pattern from my stash, Vogue 1281, and then zipped off and secretly bought the fabric from Fabulous Fabrics.  
An interesting concept  no?   *adopts deep thinking stance*  If others choose your clothing for you without your input,  then does the result say more about you and your style, or about the chooser and their taste?  or maybe it says something about the relationship you have with them?  Food for thought, hmmm... 
The previous, first time I made up this pattern I used old Tshirts and banged it together a bit,  then pretty much tucked the pattern back into the stash; a mental "been there, done that!" ticked off in my head.  For this new version the fabric was a obviously just a wee bit more precious to me, and I took my time, carefully and lovingly getting everything just as right as I could  :)
Some thoughts and technical bizzo:
My original flippant assessment was that this is a very unusual pattern.  Revisiting the pattern has only reinforced this assessment.  This really is a unique design in amongst my very extensive collection of unique patterns.
Firstly; I sized down.  This pattern is LOOSE!
The structure of the dress is all reliant upon the "lining", which is essentially a thing that we call here a "boob tube".  Or if you prefer, a bandeau bikini top.  Basically the whole dress hangs upon that!  The first time I made it, I made it quite differently, NOT going with the separate boob tube but instead joining the dress and lining together totally at the top.   I don't think one way is superior to the other.  Just observing that this dress is constructed as intended, with the boob tube lining kept quite separate.
In my opinion, if you are making it as intended then it is essential that the boob tube lining fits as perfectly as possible, and it is easier to do this if it is made separately.  
My fabrics are all stretchy, so I didn't put a zip in the back but just stitched up that centre back seam.  IF doing this, my recommendation is that the strap be attached to the dress and not to the boob tube lining at all.  I then secured the top of the dress to the boob tube by discreet hand stitching at a few key points; centre back seam, the general underarm area, and underneath the straps at the front.
A fitting tip, with my bodice fabric being quite stretchy, I still had to take in quite a lot of excess width from the bodice.  I did this fitting adjustment all through the centre back seam and modified the placement of the right strap accordingly.

Details:
Dress; Vogue 1281, rayon/poly and bamboo/poly stretch jersey knit.  Thin, liquidy, flowy  cool.  The beige is very fine, soft and matte, the print is a bit thicker and springy.
Sandals; Zomp, from Zomp boutique

Mum. A blog hop. And a thank you.

$
0
0
First things first; I thought I'd open on a note both lovely and interesting, my mother wearing a creation made by her.  Mum knitted her top, the Jo Sharp sideways ribbed top using Jo Sharp Soho Summer DK Cotton in col. Pennant.  The whole top is knitted, or actually I should say ribbed? in one piece.  You cast on one sleeve end, rib the whole thing sideways all the way along to the end of the opposite sleeve.  An interesting and effective design idea!  Thank you so much Mum, for letting me share your gorgeous creation here.

Next; I have been invited by Yoshimi and Sara to join in the blog-writing blog hop.  Thank you very much to Yoshimi and Sara!

1. Why do you write?
I have no idea! since I'm not very good at it.  I got middling marks for writing at school.  In spite of that I still enjoy writing, just quietly and for myself.  I even wrote a novel once.  Don't worry, the world will never ever be subjected to that particular load of nonsense!  It was a detective/murder mystery.  A pretty bad one.
I started keeping a blog to document all my handmade things, when I realised at one point that I had sewn/knitted/whatever, tonnes of things that had been made, loved, worn with pride until they wore out and then got tossed, things that lived in my memory alone, never photographed.  I felt a bit sad about that.  I must have talked about it with my sister-in-law because she mentioned that she planned to give me a photo album for a birthday present, in which I could keep a visual record of my handmade things with a short description.  She was searching for a suitable one, and in the meantime I commenced taking photos of the handmade things I still had.  I can't remember what happened next, I think she couldn't find a good album, then I discovered a few daily outfit fashion blogs which I really enjoyed and decided to start something similar about my sewing and how it related to my personal style.  It was just a quiet and playful thing for me, like a diary, and for ages I barely knew any other sewing blogs existed!  I wrote about many silly trivial things that amused me at the time.  Discovering and joining Wardrobe Refashion was a huge turning point.  I signed up for three months, then six months, then For Life.  That big BIG pledge to never buy ready to wear clothes, ever again.  Hehe, I made that pledge so carefree-ly and lightly and it's taken me a few years to realise how huge it was!  Obviously I then became a lot more serious and intentional in my sewing.
Lately my writing mojo has dropped off a bit.  My sewing mojo and knitting mojo is going as strong as ever but I am struggling to write posts.  It's silly, because I can write quite freely and easily if I know no one is going to read it.  Sometimes I ask my husband and he says to just not write anything if I don't want, and just have the pictures.  I've got to admit, it's tempting.
2. How is your blog different to others of the same genre
I think my blog is quite plain and ordinary, and I am perfectly comfortable with its plainness.  It has nothing that makes it stand out at all.  However maybe it is also unique, in the same sense that everyone's blog is a unique expression of their own particular self?  Stating the obvious, there. 
I don't know.  I do my own thing and don't really follow the pack.  
Ok, I thought of something!  Parentheses are almost non-existent in my blog.  Because excessive and unnecessary use of parentheses is a secret pet hate.
O I know.  Lame.
3. What are you working on right now
Usually I am pretty disciplined about only working on one thing at a time, in an organised manner, finishing and dutifully cleaning up before allowing myself to start on the next thing.  Currently I happen to be working on two things, but one is knitting, one is sewing so that's kind of OK in my mind.  I pick up the knitting and churn out a couple rows in spare moments, whereas the sewing project is a bit more intensive and requires Proper Undivided Attention, ahem.
OK, so.  The knitting project, that is very different and interesting, in my opinion, a patchwork design that I happened upon while knitting the boys' Icelandic jumpers, fell in love, and I just had to get some wool and start on it.  Even though summer is just around the corner.  Hehe.  Totally illogical!
In sewing, well I have recently finished a sundress to be photographed and blogged about very very soon, and am now partway through drafting and muslining a rather challenging and very interesting dress.   When/if I finish it, then I Shall Reveal.  *said with maximum drama*  Of course it may well be so disastrous that I decide to not waste real fabric on it... in which case I will move onto any one of the next few things on my mental list, a pretty summer blouse, this year's bathers, a big pfouffy skirt, or an Issey Miyake ensemble.
4. What is your writing process
Oh dear.   Writing process?  I just sit down and start, usually very awkwardly in some clumsy clunky opening sentence that later gets deleted in self-disgust.  I write a bit more, then a bit more, then loosen up and manage to be slightly less clunky, freely associate, get on a bit of a writing roll.  Writing a tonne of silly nonsense that all gets deleted later.  Actually, upon reflection, I will usually delete and/or re-write maybe 80% of what I have written before hitting "publish".
I proofread for spelling and grammar like a maniac and often will obsessively go back to correct things like a typo, an errant comma or an extra space; after publishing.  
Primarily, I really try to be factual, informative and fair, and for my blog to be something that I would like to read.

Now I am passing the blog hop baton onto Sue, of fadanista, and to Megan of create with wild abandon, two other sewing bloggers also from Perth.  I'm looking forward to reading their answers to the same questions!


Oh, one more thing!  I just want to say, a big Thank You So Much to whoever nominated me for Burda's 50 best blogs list, and also to everyone who voted for me.  
Thank you thank you so very much!  I was totally thrilled to be notified that my blog is on the list.  I'm so happy that people like it, and am so very honoured to have received your votes of confidence!  :)

a blocky sundress

$
0
0
I screen-printed this random murky-coloured block fabric last year, and have finally got around to making it into something.  At last!  The 5-colour print is my own  design; and in fact the dress is my own design too  :)   
Originally I had cut the ivory cotton into vaguely sheath-dress-shaped pieces to help me size and place the print.  Inevitable then, that I would go off the idea of a sheath dress ... and eventually I dreamed up, well; this!  It's a blocky sort of a print, and a blocky sort of a dress in design too, with all straight lines and edges throughout and not a single curve to be found!  The style lines have been marinating in my head for a few months now and so I'm happy it now has corporeal form.
Maybe I should make a pattern for this.  Be a designer.
Bwahaha, kidding! 
The side panels are two piece, with the lower one overlapping the upper one so as to create a simple pocket that extends into the side seams.  The design is fairly unstructured and unfitted, boxy enough that I can just pull it over my head without the need for closure.  Then to give it some shape I made two little arrowhead tabs that can button at the sides to pull in the boxiness and create a bit of shape at the waist.   The domed textured buttons were inherited from my grandmother's stash.
I think it will make quite a good casual knockabout dress.  The fabric is not soft, but quite stiff and thick and crisp and densely woven, so I think it suits this loose but structured boxy style quite well.  In retrospect I think I was quite ambitious with my print.  But y'know? I'm glad I did have a good go at something a bit tricky, and I like it despite the problems and imperfections.  Now I'm thinking I really should get out my screen printing stuff again.  Give it another go!
o hai there, watcha doing?
Details:
Dress; my own design, screen-printed by me as described here, on ivory cotton, stiff, thick, crisp

Ginger jeans

$
0
0
Hello!  I've made some new jeans  :)
These are the Ginger jeans designed by Heather of Closet Case Patterns, and named after Sonya of Ginger makes, and I was so happy that Heather asked me to test the pattern.  Thanks so much for asking me, Heather!  I LOVE trying out new patterns!  
The pattern has two views, I have made view A, a mid-rise bootleg design.  View B is a high-rise skinny leg.
I used a stretchy cotton denim from KnitWit in a very deep blue-black wash, and the topstitching is in ivory/cream-coloured Gutermann's upholstery thread.  The jeans zip, the copper coloured snaps for closure, and the copper coloured rivets are all from KnitWit too.
The pattern is a classic five pocket jeans pattern; and I know Heather has worked very hard to perfect a really good starting-point fit.  Although obviously; everyone, everywhere has completely different bodies, meaning fit is a very personal and individual thing that cannot be easily standardised; so it's terrific that Heather has included in the pattern instructions some very helpful suggestions for trouble-shooting the fitting process.  I learnt several new things!  I did make some adjustments to custom-fit mine to myself, taking in the crotch and side seams, a pinch-in adjustment of the CB seam for a slight swayback.
Just as a comparison, these are pretty much the same adjustments that I generally make for my old tried-and-true jeans pattern, Burda 7863.   
Also, at the cutting out stage I added 7.5cm (3") to the leg length, just in case.  Lengthening the legs is another always adjustment for me; partly a shrinkage insurance policy, and partly in case I fancy wearing a high heel with my jeans and partly because when I'm crouching down or sitting with my knees crossed I prefer for my ankles to stay covered and warm and out of the wind.    I'm of the school of thought that you can always cut it away but you can never add it on afterwards!  And I was glad I did add that little bit of length since I think the legs would have been just a smudge short otherwise.  
During my early fitting trials I realised the rise of view A is quite low, so I decided to sew the upper and lower seams of the waistband with skinny 2/8" seam allowance, instead of the standard 5/8".  Meaning my waistband ended up 6/8" or 2cm wider and thus my jeans have a that-much higher rise than intended.  This higher rise feels a tonne more comfortable for me.
I also like my waistbands to be firm and stable and secure, holding everything in ie. not stretchy!  so instead of on grain I cut the waistband on the cross, where the fabric had zero stretch.  My waistband is interfaced, and the waistband lining and pocket bags are cut from a charcoal/white pinstriped fine-grade linen, the leftovers from Tim's business shirt that I made for him last year
Speaking of learning things... I've put in loads of fly fronts in my time, so sometimes I'm tempted to ignore pattern instructions and just potter along blithely in my own merry way.  But when I'm testing a pattern I follow the instructions given.  Because you're testing and later reviewing the pattern and its instructions, duh.  And hey, you might learn new stuff.  I sure did... the Ginger jeans fly front method is dare I say it? foolproof... Detailed to a fault, meticulously outlined, and it works like an absolute charm!!  I think my new jeans have the best damn fly front I've ever done, ever.  And it went together so easily.
I'm so impressed with those fly front instructions I've printed that bit out and stuck them to the wall behind my sewing machine.  Have I ever done that with a technique before...? Precisely never.  
These instructions are that good.
Thank you so much for another excellent pattern, Heather!

Details:
Jeans; Ginger jeans by Closet Case patterns, navy/black stretch cotton denim
Top; Burda magazine 04/2014, 111, creamy bobbly stretch stuff, details here
Sandals; c/o Misano

Cream dress with unusual pockets

$
0
0
New dress, with interesting pockets.
While browsing Pinterest, as you do, I came across a line drawing of a very elegant dress on and I immediately knew I wanted to have a go at drafting it for myself.  It is the pocket drape dress designed by Anita, of studio faro.  Subsequently I discovered her absolutely fantastic blog well-suited, where she very generously shares her considerable expertise in understanding how designs actually work.    If you're interested in exploring and understanding pattern making then Anita's blog is totally brilliant; sure to inspire and motivate.
I'd previously measured and made a custom-fit darted sheath dress sloper for myself during my early explorations of Pattern Magic and I used this to draft my pattern, following Anita's guidelines pretty closely.  I made a first test version using an old sheet.  It worked, but well, ahem.  I have to admit I looked less than chic in that thing.  I think my drape was a bit of an epic fail.
However I decided I really did love the pocket, so I went with having the pocket on both sides.  Also I fiddled about with the crossover neckline, put in a few random folds and made it asymmetrical.
The deep side pockets have flap openings that are an extension of the bodice side panels.  They are fully functional pockets, but their positioning with the opening sitting up high at the waist makes them not really conducive to shoving your hands in.  So, not as practical as they are decorative.  Well, I could put a few small things in there that I don't need to get out in a hurry.  The pockets are perfectly useable pockets, but just for things, and not hands.  But still...  a very cool design, and I reckon they look really interesting  :)
The pockets are kinda hard to explain... they are inset into the side of the dress and have an extra piece which is part of but also sitting over the pocket, that extends into a flap hanging loose and free past the bottom of the pocket.  
Working out how to construct the pockets was quite an enjoyable puzzle, and I really enjoyed the process of nutting out a way to put it together neatly!  I don't know if my way is the way Anita intended for it to be made, but it worked out OK for me.  I think  :)
I've written my instructions at the end of this post, mostly for myself, if I ever want to make these pockets up again.  Please be warned that they will probably not make sense to anyone not making up the pockets...
the pocket detail; underneath is a fully functional, 2-layer inset pocket
In the muslining stage I found that the pocket sagged down on the inside due to its weight, pulling down on the pocket flap; and so decided it would be better to add a lining to the front and back side panels above the pocket, and to "tether" the top edge of the pocket to the side panel lining, by sewing the panel lining lower SA to the upper SA of the pocket bags.  Having a lining added some much needed hidden support and keeps it all holding up and together, nice and stable.
Subsequently I decided to go the whole hog and properly line the whole dress in the same creamy polyacetate.  I used the same pattern for the lining pieces.
inside view; lining of side panel and inset pocket
The fabric is a rich cream, silk dupion, slightly slubby yet still with a subtly glossy sheen, and a decadently crinkly texture.  I bought it at Fabulous Fabrics forever ago and it's been living quietly in my stash, patiently awaiting its turn.  It had gone slightly yellow but I gave it a good wash and it came up lovely and fresh, seemingly as good as new.
So I like my dress.  Well, it's OK.  It was not easy, ahem! and I've decided my self-drafting skills are kinda rubbish.  And even though I thought my muslin looked dreadful I have a sinking suspicion that maybe it was more interesting that way.  I think maybe I could've stuck with the drape, hmmm.   *sigh*
But I do love how the pockets look and I very much love that I have a nice fresh off-white dress to pop on for summer.  So I will wear it very happily.
And now all I want to do is just leap onto some commercial pattern, already drafted up for me, ready to go, easy peasy, no thought required, neat and tidy like.  Yeah.
The Pocket: feel free to skip this bit if you want.
So, you have the pocket detail, the pocket bag, the pocket bag lining and the pocket flap facing.  Also the back side panel, front side panel and their lining pieces ...
Sew pocket detail and pocket bag R sides tog at top edge, turn, understitch.
Sew pocket bag lining  to pocket bag, R sides tog at bottom edge.
Sew pocket flap facing to pocket bag lining R sides tog, press pocket flap facing up.
Sew back side panel and front side panel R sides tog at side seam, press open, repeat for panel lining pieces.
Sew lower edge of joined panels to pocket flap facing R sides tog, trim, clip side panel pieces into corners, turn pocket flap out, press.
Align and layer 3 pocket pieces together and baste tog at sides, clip into the SA of pocket detail at junction with pocket bag lower edge.

For the side panel lining; and this is where it gets a little more complicated...
the dress pieces need to be assembled except for the shoulder seams and keeping the lower part of the pocket detail free, and the dress lining assembled likewise, leaving out the pocket lining which is attached to the dress already, meaning there is a "hole" in the dress lining where the pocket lining should be.
 Sew the dress to its lining pieces together at the underarm and neckline seams, understitch the lining as far as possible, turn; then the side panel lining pieces can be sewn to the upper pocket bag seam allowances on the inside R sides tog.  Clip into the corners, then the SA around the three remaining sides of the dress lining "hole" can then be stitched to the pocket lining seam allowances inside, between the dress and its lining.
The lower pocket detail edges are turned under and invisibly hemmed by hand.

All that might seem a bit convoluted, but trust me, if you are putting together the pocket it does work!

a ladylike skirt

$
0
0

I have lots of "little" skirts, but it's nice to have some longer, looser, wider skirts too.  To be more refined, relaxed, ladylike and elegant, and less, er, whatever I was before.  This pattern is Burdastyle 02/2014, 106, and delivers the required dose of elegance quite nicely, I think.
Even in an annoyingly brisk breeze that turned up, just at the right time to buffet it about in my pictures here!  The wind tried, but never once did I come anywhere near doing a Marilyn in any of my shots.  Thank goodness for that!  Ladylike personified.  Or, should I say, skirtified?  Yeah, I think maybe I should  ;)
So, yes, it is looking a bit windblasted here, but that's "real" or whatever.   My fabric is a mid-heavyweight, richly creamy-coloured satin remnant from Fabulous Fabrics; I suspect from the bridal section.  Probably if I'd made it up in the suggested brocade it would hang properly smart with the big box pleats standing out nice and stiffly-straight and looking just like the one on the magazine cover, at right, but I think that the luxurious feel of the satin rippling and swishing against my legs is a happy bonus.

The skirt is pretty simple; wide, deeply pleated skirt sections attached to a fitted, curved yoke.  The pattern is super straightforward, all going together very easily and quickly.  I would describe this as fast gratification; a nicely stress-free project.
There are two views to the pattern; the other, illustrated in the line drawing, is a more complex version with a bigger rectangular piece of fabric pleated over the yoke as an over layer.  This feature you can just make out on the magazine cover, above, at right.  I made the simplified version with plain yoke because hello, remnant.
I lined the yoke in ivory polycetate lining fabric, also from Fabulous Fabrics, and used an off-white invisible zip in the CB seam.  I wanted the skirt to be as long as long as I possibly could make it, and managed to cut the skirt pieces to be about 10cm longer than the pattern.  Then hemmed as stingily and as meanly as humanly possibly, by stitching to the lower edge a bias cut strip of pale ivory/yellow cotton voile in a very narrow 2/8" seam.   This enabled me to only turn up a mere 2/8" of my satin but still to have a nice deep hem.  The hem is slip-stitched by hand.


the least windy of the pictures...

Details:
Skirt; Burdastyle 02/2014-106, ivory/cream satin
Cardigan;  Audrey in Unst knitted by me, in 4ply poll dorset bought in Paris while shopping with Donna, details here

um, I'm not sure if or how I'm supposed to do this, but just in case...
Disclaimer; this pattern was given to me by Burdastyle; however I chose it myself from the large range of patterns on offer because I liked it.  All opinions are most definitely my own.  There are no affiliate links on my blog and never will be...  I'm in it because I love sewing  :) 

Oblique mitred corners

$
0
0
I'm taking part in bimble and pimple's Sewvember instagram challenge, and on day two our mission, should we choose to accept it, *Dun Dun dundundun Dun*... was "technique".  I happened to be doing a couple of oblique mitred corners that morning so that's what got insta-ed.
A right-angled mitred corner is an easy and straightforward thing, simply folding the raw edges evenly together and sewing an easily gauged perpendicular line out to the edge from the corner.   
But I find an oblique mitred corner to be not at all intuitive... so anyway, I thought I would take a few more pictures and share my way of doing it here.  This is not necessarily the one and only way, of course.  Just mine  :)
This pattern has been cut with a 4cm hem allowance and a 1cm seam allowance.
Turn up the 4cm hem allowances on both edges and press the layers in place.  
Use a long pin to mark the underneath layer, exactly where the fold of the upper layer sits.  It's also helpful to mark that outer corner fold point with a pin.
Unfold the hem allowances and turn them out right sides together, exactly aligning the upper layer fold at left to the line marked with the long pin.  The corner point pin is a helpful guide to alignment.  Pin.
the point of that corner fold pin can be seen peeping out at the bottom there
Stitch along the pressed fold; starting from 1cm in from the raw edge and ending at the corner point pin.  Trim the corner excess.
Turn out and press.  If all has gone to plan, it should be sitting all nice, smooth and flat!
Aaaand, hem  :)

a creamy little double-fronted top

$
0
0
My new top will come as a very un-surprise to anyone who has been following me in the Sewvember instagram challenge, haha!...
This pattern is Burdastyle 04/2014-115, with modified sleeves  and my fabric is a silk hessian from Spotlight.  It has a very loose weave, a rather pleasing slightly rough and rustic texture.  The rich, almost buttery cream colour apparently suits me.
Now, I have received a handful of patterns of my choice from Burda... however this is NOT one of them.   I had bought this magazine myself already!  and I've already made the asymmetrical turtleneck top from the same collection in the mag.  Ok, honesty here; I actually totally love just about this entire collection.  It's embarrassing to admit how easily I am swayed by colour choices.  Those peacefully harmonious shades of soothing cool non-colours; *sigh* heavenly!
So style-wise, this is a plain design.  And my choice of fabric; quite plain.  But that's ok, a bit of plain is a good thing to have in the wardrobe to set off the more eye-catching elements within.  But as I was doing the sleeves, which are likewise as plain a style as could be, I worried that they were going to tip my blouse over into the territory of Irretrievably Bland.  So I added a little feature; a faced split that has a little button closure on the corners.  I'm very pleased with how this looks; quite primitive, like a vague sort of a nod towards a tailored shirtsleeve button placket.
Construction-wise, this is a nice, quick and simple little pattern and utterly foolproof... . oh, I put the wrong front lapping over.   Haha.  We'll just pretend that I did that on purpose, ok?  Ahem.
Insider biz; the side and shoulder seams are flat-felled, the sleeve seams overlocked.  The neckline is faced with a bias-cut strip of pale yellow/cream cotton voile.

Finally, my usual criteria; if I saw this in a shop would I be tempted to buy?  Heck, yeah!  Plain is my middle name.  Along with all the other middle names I adopt when the mood strikes.  This is going to be worn a tonne  :)


Details:
Top; Burdastyle 04/2014-115 with modified sleeves, cream silk hessian
Skirt; adaption of Vogue 1247, coffee lace with silk charmeuse lining, details here
Thongs; Mountain Designs
Sienna wears her own custom-fit coat
Viewing all 820 articles
Browse latest View live