Quantcast
Channel: Handmade by Carolyn
Viewing all 820 articles
Browse latest View live

simple buttoned cuff

$
0
0
This is an understated little feature to jazz up the end of a plain sleeve.  It's mainly decorative rather than useful, but I think it does look kinda cute  :)
To add this, you will need to cut your sleeves tapered out a little wider at the  lower hem end to allow for the overlap.  Doesn't need to be much, about 1.5cm (5/8") at each side should be sufficient.
Cut a matching facing for each sleeve, with an allowance for the slit facing situated in the centre.  Mine is 6cm (2 3/8") deep for a finished depth of 5cm (2") , and the slit facing is 7cm (2 3/4") wide and 13cm  (5") long for a finished slit length of 9cm (3 1/2").
Interface, finish the outer edge, stitch the short sleeve seam together.
Pin to sleeve edge, right sides together, aligning the seams.
Mark the line of the slit on the wrong side of the facing and pin along its length.
Turn the sleeve so the facing is inside the tube of the sleeve and stitch.  btw, always, but always! stitch in the inside of a tube or closed "circle" of any kind, sleeve, leg, armscye, whatever...  otherwise you are bound to soon be spending quality time with your unpicker when you find you've inadvertently caught the opposite side in there somewhere.   Yeah, we've all been there, right?!
Cut up the middle of the slit stitching, snipping into the corners at the top in a little V shaped snip.
Turn out and understitch the sides of the slip and the sleeve hem as far as possible.  
To help keep the facing tucked up inside the sleeve and not fall out, invisibly slip stitch the outer edge of the facing to the sleeve.  Only scant, widely spaced stitches are really necessary here.
And; buttonhole, button and done!

patchwork Sandpoint top

$
0
0
I've made a new top.  Well, kinda new from old actually, since it's made from 4 old Tshirts cut up and patched together.  My refashioning bag yielded; a light purply-brown from Craig, two pinks from Tim, and a chocolate-y one which is one of my old self-made Tshirts.  They were all old and a tad tatty here and there but still had some good bits left in them.  And I liked these yummy Cherry Ripe colours together.   mm-mmmmm  :)
The pattern is the Sandpoint top designed by Helena of GreyDay patterns.  Mel of the curious kiwi contacted me to ask me to make up the pattern and review it and well, I love trying out new patterns; so ta da!
The Sandpoint is described as "a loose fitting T-shirt with a surprise cowl in the back".  It is a nice little top pattern suitable for a beginner, having separate front pattern pieces for the two neckline options, V-neck and round neck.  I think it's biggest point of difference from other similar designs is a "shoulder band", essentially a strip which is supposed to be worn behind the neck.  I think its purpose is probably to keep the top actually up on your shoulders and not fall off, which is pretty much a given with these necklines.  However I wasn't keen on the shoulder band and decided to leave it off, and sewed lingerie holders inside on the shoulder seams.  I have previously used lingerie holders to keep up the shoulders of my other oversized cowl, drape-y tops, here and here, and have found them to work just fine for the job.  Fortunately they do for this one too  :)
Because I wanted my rather bold patchworked fabric to speak for itself I decided that arm and neckline bands would be a visually distraction, fighting for attention.  So I left these off also and finished these edges by simply overlocking, turning under once and hand slip-stitching a hem in place.  My lower hem is likewise, invisibly hand stitched, and actually my top is 6.5cm longer than the pattern... for no real reason other than my patched-together fabric had the extra length, and who was I to ruthlessly cut it off? after all that careful cutting and patching it together!?  Plus, I just happen to like tops to be a little bit long.
Because I was leaving off the shoulder band, I put my top together quite differently from the instructions... namely: the instructions say to fold the back cowl allowance inside and then stitch the front and back together at the shoulders.  However this would result in a visible end-of-seam at the neck, which in the design is to be covered up by that shoulder band.  So, instead I pinned the front and the back together at the shoulders right sides together, then folded the back cowl facing allowance out to wrap around the front; then stitched the shoulder seam.  This way, when the shoulder seam is turned right side out the shoulder seam is nicely encased and hidden away within the facing, which gives a neat, more polished finish.
Details:
Top; Sandpoint by GreyDay patterns, made using 4 old cotton jersey Tshirts
Skirt; an adaption of Vogue 1247 and Vogue 8561, blue, slightly stretch denim, details here
Shoes; c/o Misano

a natty little nightie

$
0
0
This was a need.  
A very desperate need.
My lovely, fluffy, cosy, snuggly warm winter PJ's are rapidly becoming unbearably so, meaning...
IT'S SUMMER NIGHTIE TIME!!!!  
I wanted the "IT'S CLOBBERING TIME!!" font for that bit there, but Blogger's font selection is lacking in such niceties so all caps will have to do.  We'll just have to imagine it, ok?
Pattern; McCalls 4454, lengthened from a pretty little camisole to nightie length.  With in seam side pockets added, just because.
Fabric; I managed to eke the pieces to the very last scrap from the leftovers of my sew bossy dress, a pretty cotton floral sent to me by reana louise.  Thanks, Reana!  It's such a nice quality fabric.  I didn't have quite enough blue floral for straps, but I found a little piece of pink and white poly gingham that I cut into bias strips to make the straps and to finish the top edge, and also made a short, super skinny spaghetti tube for the little decorative bow on the front.  I originally bought this gingham to make little pinked-edge caps for jars of lemon butter, the year I enthusiastically made jars and jars and jars recurring of the stuff to give away to friends.  Note to self: I MUST do that again next year.  Was hopelessly overrun with lemons this year. Lazy me.
Anyway, now that scrappy little leftover bit of pink gingham has proven itself useful I can smugly pat myself on the back for keeping it all this time.  Ha! that's all I need, more justification for hoarding those awful little bitty scraps!  Merely aiding and abetting the beast, that's what.

nani IRO blouse

$
0
0
I've made a new top.  It is a plain little top, but to my eyes the lovely thing about it is the fabric; a beautifully soft cotton gauze, and the charming hand-painted look to its print.
A short story...
About a month ago I was meeting with some friends, and one friend was a little late.  When she arrived, she explained that on the way she had spotted a cute top in the window of a shop, and just had to screech to a stop and check it out.  She tried it on and then bought it, totally on the spur of the moment.  We all duly admired the top and chatted about the pros and cons of spontaneous vs carefully planned purchases.  Important, life altering stuff, I know!
Anyway, after our get-together, which happened to be in Glyde Street where Calico and Ivy is situated, I popped in to check out the offerings.  Saw the range of nani IRO double gauze, fell hopelessly in love all over again, as I always do when I go in and see it there.  It occurred to me that maybe I could buy myself a little top too.  Except of course that my version of buying a little top is buying a piece of fabric.  Inspired by my friend I just decided to spontaneously go for it. 
And bammo, new top!   Woot!
I wanted the print to be the star so wanted for a very plain, simple and relaxed silhouette.  I used New Look 6483, one of my really old old old tried and trues that I’ve had for many years.  Not exciting, but a real goodie nonetheless.  There are probably tonnes of patterns identical to this one.
This print is called Painting Check.  My very favourite thing of all about it is the way the print fades away towards the selvedge and I wanted to use this feature as a sort of “border print”, although obviously it isn’t actually a border print but the complete opposite.  It’s a reverse border print!
But I like ideas that are turned on their head so it’s definitely my kind of border print.  To keep this feature firmly in focus I left the selvedges unhemmed.  It's an uncommon choice but I think it works really well for this particular fabric, and I really like how it looks!
The two body pieces are cut from one selvedge edge and the two sleeves were cut from the other.  The sleeves still have the fabric ID on them, which I find quite charming.
There was only 1m left on the roll, which wasn’t quite enough for the hip width required for my pattern pieces.  So I cut them as wide as possible and just left the side seams open in a slit from the lower waist down.  
Side, sleeve and shoulder seams are flat-felled, the armscye seam is overlocked and the neckline is finished with a narrow strip of bias cut cotton voile, stitched, understitched and then topstitched.

Details:
Top; New Look 6483, nani IRO double gauze “painting check”
Shorts; Burda 7723, white linen, details and my review of this pattern here
Thongs; Havaianas

floral bathers

$
0
0
Bathers!
Pattern; old fave McCalls 2772, with the halter neck bikini top modified to be a tankini.
Fabric; one-way stretch from Fabulous Fabrics.  I just randomly fancied floral this year. 
I was immediately attracted to the clarity of the print, the realistically drawn, intricately detailed flowers and foliage.  However, despite its obvious gorgeousness and I was pretty sure it would look great as a pair of bathers, I agonised somewhat over the fabric in the store for ages.  Why? well, there is actually something extremely annoying about it.  
See how I have oriented the floral bit so that the flowers stand upright? which to my mind is the only logical orientation for the print...  well, the stretch in the fabric is actually going up and down, parallel with that print; and not across, or perpendicular to it, like you would rightly expect it to. 
I know, right?  Annoying!
You want the direction of most stretch to be going around your body, obviously! and well, who would want the flowers positioned that way??  There is a leeetle bit of stretch the other way, but not very much, so to my mind the way the print was done is just all kinds of wrong.
So I umm-ed and aah-ed for like forever over whether or not to take a chance on it. 
Well, clearly I did in the end.  And put the flowers in going up and down, exactly the way I wanted them.  Sheer pig-headed stubbornness determination told me I could make it work.  
And I did, by putting an invisible zip in the left side seam.  Problem solved!  Swimsuit purists will no doubt be horrified at the zip but look at me, not caring like a boss.  At least it can be put on and taken off with the greatest of ease, which it would absolutely NOT do without that zip.  Don't ask me how I know that.  I may or may not have sewn up that seam first, just to see, and may or may not have then spent a good five minutes struggling to get it on and then another five struggling to get it off again.  Picture Houdini furiously battling with a straitjacket.  Not exactly the epitome of effortless chic, haha.
Some quality time with my seam ripper, whack in a zip, done!  Effortless chic is once again within my grasp, mwahaha.
The bikini bottoms; well, I obeyed the rules here and meekly cut them with the stretch going around my body, like you are supposed to.  Choosing my battles wisely, here.  Since the pieces are all cut from the plainer, all-green outer edges of the print then you can't tell that the print goes the other way.
And I'm now totally ready for summer!  Bring it!

Details:
Bathers; McCalls 2772 bikini modified to be a tankini
Hat; Country Road
Location; Bunkers Bay

Oriental Bird

$
0
0
I was tempted to call this my other Swedish dress, since I bought this fabric in Stockholm as one of my wearable souvenirs from our Scandinavian holiday, but actually the fabric is English!  I bought it in Svenkst Tenn but "Oriental Bird" is an linen upholstery fabric by GP&J Baker, printed in England.
Yes, upholstery.  I am wearing a couch.  *womp womp*
;)
Y'know those upholstery adverts in magazines that showcase upholstery fabrics and even carpets by making "garments" from them and photographing them on a model, like a fashion spread?  Well, I love that kind of thing.  Fabric is fabric and honestly, I cannot see any reason why upholstery fabric cannot be worn just like any other fabric.  I reckon if you like it then just go for it.
And the print is just beautiful.  Just look at these colours!  There are twenty three colours.  Twenty flipping three...  Meaning, twenty three separate screens were required to make the design.  Having done some printing myself, I find that number of colours to be, quite simply, staggering.  Think of the placement!  Honestly, I cannot even comprehend.  Consider my mind officially blown.
I used Burda 8511.  I wanted a dress with minimum joins, seams and darts or any other fussy shaping details that would visually interfere with the large-scale print; and this fulfils all criteria.  It's a terrific little basic shift dress pattern.  I've had mine for years and it is still in print and available today.
Speaking of the pattern...  I'm gunning for Burda's envelope pose here.  


powning it
I shortened it slightly and, because I wanted a nice fit, went to the effort of a minor sway back adjustment.  I also did my semi-regular FHA.  Haven't heard of the Full Hip Adjustment? well that's probably because I just made it up, hehe.  The FHA is enormously complicated, requiring one to grade out from the waist to a larger size at the hips.

Inner workings: my fabric has three main characteristics; A. it is quite thick and stiff, B. it frays  and C. it was very expensive.  Taking these into consideration, I decided to HongKong finish all the raw edges inside.  This can be a time consuming finish, only visible to and appreciated by one person; you, the wearer.   However imo it is a really beautiful inner finish, and I'm always secretly thrilled with the sight of it, even thought it's only for my own private benefit.  I used pale yellow cotton voile for the HongKong bias strips and raw silk for the neckline/armhole facings.

Details:
Dress; Burda 8511, upholstery linen
Sandals; Zomp, from Zomp shoes

Watson lingerie set in sand cotton jersey

$
0
0
I just could not resist buying Watson, the new lingerie pattern designed by Amy of Cloth Habit.  Yes, I have a few lingerie patterns now, but a few points of difference with this one allowed me to talk myself into buying a new one.  Quite easily, as a matter of fact!  I've always admired Amy's beautiful creations and so adding her new pattern to my collection was always going to happen  :)
I used a sand-coloured cotton jersey, (the Morrison remnant sale), lining the bra cups and cradle with soft, sand-coloured rayon stretch (Fabulous Fabrics), pretty scalloped-edge lingerie elastic (Fabulous Fabrics) and plush elastic for the bra straps (Homecraft Textiles).
The pattern is for a simple, soft cup bra, in either longline or regular length, with no provision for underwires, and a bikini brief.  Obviously I had to make both! and made my usual two pairs of matching knickers to go with my bra.
So, I have several thoughts about the Watson pattern...
Firstly and most importantly, I really love my new bra! I very much like the clean and modern line, the simplicity of the cut.  It looks really cute on and for my size the fitting and drafting is spot on.  I chose to make the longer line option, and am very pleased with it.  Usually I go for a padded, underwire bra, but it's nice to have different options in the undies drawer.
I chose to line both my bra band and cups for two reasons; firstly because I prefer the cups to be a slightly thick and padded anyway; and secondly; because the way the bra is constructed inevitably means all the seam allowances on the inside are exposed.  That's unavoidable in having a pieced cup in a single layer of fabric.  However I usually like for my insides to be just as pretty as the outsides, and so I cut cup linings and worked out a way to construct it so that all the seam allowances are tucked neatly out of sight between the outer and lining layers.
1. Do not baste the lining to cradle as the first step; instead sew the side seam so that the back band is sandwiched between the cradle and its lining.
2. Sew all pairs of outer and upper cup pieces together, also for cup linings.  Baste the cups to their corresponding lining cups all around, wrong sides together.
3.  Turn the cradle inside out, so you can sew the cups to the cradle, sandwiching the cups, right sides together, between the cradle and its lining piece.  This means that all seam allowances will be inside the cradle.
4.  Sew the lingerie elastic to the top and lower edges as normal.
5. hey presto! all the seam allowances are nicely tucked away!
The white scalloped lingerie elastic from Fabulous Fabrics is very pretty and makes a really lovely edging; however, I thought it a little flimsy to use along the lower edge of the bra, which is a more "demanding" edge and requires a slightly thicker, heavier duty elastic.  So I used my regular Birch's lingerie elastic just for the lower edge of the bra.

A small complaint about the pattern: I had to do a bit of detective work to determine the lengths of elastic required because unfortunately they do not seem to be included in the pattern.  I searched and searched and could find absolutely no clue in the instructions as to how long I was to cut my elastic pieces!  Nor the straps!  Strange.  So I dug out my KwikSew 3300 bra pattern to measure the strap piece, and also checked out the tables in it for a guide as to how long I should cut the lingerie elastic for the Watson bra edges.  Luckily, the KwikSew pattern has terrifically helpful tables outlining exactly how long you should cut your elastic, for each size.  Thank goodness for that!
Same story for the undies; I had to get out my McCalls 2772 bikini pattern and measured the waist and leg elastic guide pieces and used these same lengths for these knickers too.
I've now jotted down on my Watson instructions all these elastic lengths I need so I don't have to go looking for them again.  Because I'm sure there will be more Watsons in my life.  :)
Ok I only have one more complaint, and that is that metric measurements are missing from the instructions.  Yes, I can convert them myself, and I have, for future reference, and noted them down directly onto my copy.  But it would have been helpful to have them included in the pattern.  Along with those elastic lengths.
The bikini brief undies are plain and simple little things, definitely my style.  I only realised upon viewing the pattern pieces that there is a horizontal joining seam right across the front of the crotch, with open seam allowances on the inside.   I wanted mine without a seam, so I spliced my front and crotch pattern pieces together and cut the front as one piece, and then cut one separate crotch lining piece from white cotton jersey.  This is sandwiched between the back and front pieces when joining together, so that all seams allowances are nicely tucked away inside.  This is the same method I learnt from my regular McCalls 2772 bikini pattern, and so I know it gives a nice comfortable result.  And no unsightly seam!
I'm very happy with the new set!  It is so comfortable, also the colour alone means I'm guaranteed to wear these a tonne.  I was actually pretty desperate for this set... yes, sounds needlessly dramatic, but I have tonnes of white dresses and shirts.  Which I favour.  Meaning my white/colourless lingerie gets more wear and tear than the colourful stuff and as the lingerie drawer gets weeded out it's looking a bit too colourful in there lately.  Clearly I have been extremely bad at planning and keeping up with lingerie requirements.
But now, I'm on it!  Stay tuned for another exciting episode of Watson, coming soon to this station.  Featuring some luvverly lace, mmmmm  :)

travel wardrobe; Melbourne

$
0
0
Aah, I've been away! on a short but most delightfully fun girlie jaunt to Melbourne with my mother and my daughter.
I have about a zillion photos of mind-blowingly beautiful clothing, some of which I will share here very soon  :)  And a bunch of Grease songs recycling on auto repeat in my head.  And um, an extra 5kg of weight to my suitcase on the way home.  Obviously, we had to visit the Fabric Store and Tessuti.  Don't worry, some of it is actually for other people!  *gasp* So unselfish of me!   Note use of heavy sarcasm font, there.
Anyhow, now my inner analyst is bossily commanding me to reflect upon, dissect and assess my travel wardrobe.  My selection was boring and - warning, buzzword approaching; minimal.  Primary motive; to create as empty a suitcase as possible, with a view to the aforementioned Christmas fabric shopping spree, ahem.

Time away:
5 days
Where to:
Melbourne
Season:
Early summer; cool and pleasant.  Daytime temps were pretty consistent, from 14C lows to 22-24C highs, with a sprinkling of rain on one day.
Expected activities:
All girly stuff.  Days involved chatting, walking, exhibition-viewing, browsing and ultimately spending! Evenings included still more chatting, tapas-ing, bubbly-sipping, spa-ing, and going to the theatre.
Colour scheme:
rather colourless! mostly black and creamy-white/ivories, with only some caramel brown and gold in my accessories to relieve the unrelenting nothingness.
What I packed:
from left to right, top to bottom; each garment is linked to its original construction post

forest green cardigan
loose black blouse
lightweight draped white top
loose, very pale pink blouse
black velvet dress with black satin petticoat
pale yellow scarf (never worn), black belt, pale yellow handbag
wide cream skirt
burnt brown bootleg jeans
straight ivory skirt
bathers and white thongs, travel umbrella, caramel leather sandals, black suede shoes (for evening)
not pictured, my nightie, toiletries bag and a selection of underthingies

My daily outfits:
I did use my phone to take daily selfies in our hotel mirror for my daily outfit blog but they were totally awful! So, some re-enactments...
Thoughts:
Well, just one cardigan, one pair of jeans, one evening dress and heels, one pair of day sandals.  Three tops, of varying weights and silhouettes, and two skirts, again with different silhouettes.  Only one pair of flat leather sandals for day wear plus the ever useful thongs.  I always toss in the thongs and my bathers too, just in case.  They don't take up much room so why not!  And as it turned out the hotel had a spa/hot tub which we used on three occasions *blissful sigh* so we were super glad we all had our bathers.
And I had tonnes of fabulous space in my suitcase leftover!  Win.

Did the clothing selection work? well yes, up to a point.  I could have kept going on those pieces for two or three days more and still not doubled up on outfits, the boredom factor notwithstanding.  I think two ivory skirts was a tad much even for me, the dedicated pale/ivory lover.  Wished I had a grey or black summer weight skirt.  Need to rectify that, sometime.
Note to self: grey or black summer-weight skirt.
The dress, well I LOVE my velvet dress! so much!  It's doubly great, because the velvet is luxurious enough to look tres chic at evening events; but also being black and not eye-catchingly flashy it can work equally well as a day dress in a pinch.  Not that a pinch ever cropped up during this short trip, but well, so the possibility is there.
We went to the theatre twice, and I took my distinctly homely and casual cardigan stuffed in my bag each time, and surreptitiously slipped it on in the dark once the lights went down and the need to look elegant subsided.  I find theatres are damn cold, nearly always air-conditioned to the MAX!  Like, practically arctic!  What's with that??  I did have one lightweight scarf, but it didn't go with my evening dress.  Actually, I didn't need it during the pleasant days either so I didn't even wear it at all.  So; taking a light, evening-y type of cardigan or stole would have been a much better idea.
Note to self; if you know you'll be going to the theatre, take an evening stole!!
I'm always shocked at how cold aeroplanes are too.  Brrr!  But that could be just me: I noticed plenty of people on the plane are in shorts and short sleeves, little skirts and dresses and appear to be perfectly comfortable, while I'm rugged up in my jeans and thick woolly cardigan, teeth chattering, asking for a blanket.
I took the drapey top in case of an unexpectedly warm day, which didn't come.  It was ok with the cardigan on over it though and I wore it twice.   Actually everything I did take was perfectly fine and nit-picking aside, I felt nicely dressed enough each day  :)    

So, now we're all back home, everything is washed and put away and all is back to normal and back into the nitty gritty of real life.  Sad face, but only for a second; since the party season is upon us in an intensely full swing and we have tonnes of fun party-ing and socialising ahead of us for the next few weeks! Aaaugh! love this crazy time of year but how am I going to get all my Christmas sewing and cooking done? goodness only knows.  I'm going to have to get cracking on that Christmas fabric pile ... and fast!

fun with gingerbread

$
0
0
*sings* Have yourself a very gingerbread-y Christmas...

Gingerbread!  Gingerbread madness  :)
I love the stuff but I pretty much never make it.  Until I do and then it seems like I become temporarily obsessed and will make a lot, maybe to compensate for not having made it in, like, ten years or so.  Madness.  
See, I decided I would make gingerbread men to give for Christmas gifts this year, and so made a big batch.  See above.
Then I thought it would also be nice to make a gingerbread house for Christmas Day too.  So drew plans and made a few more batches of gingerbread.  Can I just say; designing gingerbread houses is a lot of fun!  A lot more fun than actually putting them together, haha.
Mine is a pretty wonky little house but hey! shrug.  My family politely admired it!  And I've learnt a few tricks, from my mistakes.
For example; if, like me,  you're a gingerbread house newbie, don't try to make it symmetrical and perfect.  There lies inevitable failure and grief at your own ineptitude.  Just aim for charming wonkiness and asymmetry right from the get-go! and then you may happily bask in the success of your ploy, mwahaha.
Also, roll and cut out the house pieces straight on the baking sheet.  Picking up and tranferring the pieces can skew them a tiny bit.  Ergo, wonkiness.
Make the walls thicker than the roof pieces, to stably hold that thing up.
Also, pipe any fiddly decorative curlicues on the flat, before construction.  Seriously, that bizz is freaking difficult enough already, no need to make it more so.

 Then at some point I looked my first set of gingerbread men and judged them to be a bit big and not very cute at all; really a totally unacceptable gift!  I decided that only cute, mini gingerbread men would do.  Went out and bought a new, mini gingerbread man cutter, and made stacks of baby ones.  Was satisfied with these.

 I've kept the rejected big ones with green buttons for my family, and the silver- and pink-buttoned ones are the good ones, that I gave away.  Yes, my poor family have no choice but to eat big, non-cute gingerbread men, awwww!  I'm such a bad mum  :)

I used a recipe from my mother's Scandinavian cookbook, that she has had since the 70's.  I doubt it is in print anymore so I've reproduced the ingredients here:

Gingerbread

100g butter
225g dark brown soft sugar
1tblsp each of ground ginger and cinnamon
265g treacle
900g flour
1tblsp bicarb of soda
approx 235mL milk

Melt and mix the butter, sugar and treacle, then add the dry ingredients all at once and mix in thoroughly.  Stir in the milk, then knead to a consistent dough-y texture.
Roll out to desired shapes.  These quantities make quite a lot of dough, enough for a small house.
Bake at 175C, for approx 12-15 minutes, depending upon the size and thickness of the pieces.

Join the house pieces with toffee, made by dissolving and gently boiling plain white sugar until it reaches the hard crack stage.

Icing: beat 1 egg white until stiff, mix in 500g icing sugar.  Note; not"icing mix" which will not set properly.  Add in a coupla squeezes of lemon juice to get a good piping consistency.

Merry Christmas everyone!

a bevy of beauties

$
0
0
I can now share the fruits of my Christmas shirt-making bendah!!  Old news? oh well...
I made four shirts recently.  Yes, four! *phew* all since I returned home from Melbourne.  I know.  Sheer insanity.  I has it.
Actually I did have different Christmas pressie plans, firm intentions to do something else for them all this year.   And then couldn't find the specific fabric I needed.  And then the Fabric Store in Melbourne had such a gorgeous quality linens in stock...
resistance was futile.  Shirts it was.  My other plans will keep for next year  ;)
All are made using Burda 7767, all with short sleeves, all felled seams, with those tricky curved armscye seams felled using this tip.  The linen had no right or wrong side, enabling me to fold the buttonhole bands out, rather than under.  This makes a rather nice distinct buttonhole band, which can be further emphasised with piping like I did here, or a coupla double rows of top-stitching, or both.  This is my favourite way of doing the buttonhole band.
Burda 7767 has three collar variations; the button-down, the Kent and the shark.  I've used all of them at one time or another in my 30-odd versions of this pattern, but haven't ever pointed out the differences specifically when blogging about them.  So this time, I shall do so  :)
Shirts 1 and 2, above and below: Tim's and Sam's pale blue shirts both feature the "shark" collar, more traditionally known as the cutaway collar.  It was a collar designed to accommodate a large or widely knotted tie, but I think it makes a nice collar for a casual shirt, worn open with the top few buttons undone.  Which, lets face it, is how my boys wear their shirts, like 99.99% of the time.
Tim's shirt
They are both of sky blue linen, with piping inserted in under the buttonhole band, the pocket and sleeve hems.  Tim's piping is pale blue and Sam's is creamy pale yellow; these fabrics harvested from two of Craig's old business shirts.  I cut both the boys' shirts a little slimmer in the body and a little shorter of sleeve than I've done in the past, because I've noticed the fashion in young mens' shirts is for a slightly shrunken look at the moment.
btw, Cassie made Sam's shorts in the top picture; I think she did a brilliant job and they look gorgeous!  The fabric is Batman cotton from Spotlight, and she drew up the pattern herself using some of Sam's shorts to guide her.  They have two welt pockets on the back as well as two inseam side pockets, and an elastic waistband.
Shirt 3; Craig's blue linen shirt has a Kent collar, considered the classic collar.  I originally made the sleeves on this shirt a little shorter like the boys...  However! upon first try-on my conservative husband immediately requested a lengthening, ahem.  *sigh*  I complied and added a long cuff, with a decorative metal button sewn on the top edge.
This shirt has a longer back than front, and split side seams felled with a long bar tack at the top.  The other three shirts all have a regular, shaped hemline. 

Shirt number 4; Craig's emerald green shirt has the rather difficult to execute button-down collar.  
To my mind the button-down collar has the most formal appearance of the bunch, but actually this is considered the "sporty"option in collars.
So there you go! a short compilation of collars. 
Haha, bevy of beauties, compilation of collars, I'm so alliterative this morning.  Sheer poetry, wot.
All buttons were harvested from off of some of Craig's old business shirts.  RTW mens' shirts nearly always have great buttons, good colours, good quality and in a difficult to find small size.  Only the Craig's blue linen shirt has new metal buttons, from Spotlight.

Cassie's Christmas ensemble

$
0
0
So, this year I asked Cassie what she would like for Christmas and she replied without hesitation, a long, white skirt.
Alrighty then!
I bought both fabrics at my local Spotlight; I considered buying Melbourne fabric like I did for the boys but reasoned that I could probably find nice enough white fabric at home.  So fortunate then that I did!  I was particularly thrilled with these finds.  The overlayer is a sheer cotton muslin and the lining/underlayer is a cotton voile; both light and airy and quite beautifully soft.  I really like how the layers of sheers and seams give a kind of "striped" effect to the outfit.
Honestly, Spotlight really can be such a hit or miss affair, so thank goodness for a hit.  A very palpable hit!  Random pop quiz; Can you name that quote...?
I used Butterick 3134; a very useful basic multi-gored skirt pattern and selected the six-gore option.  I cut it longer and flared out the lower edge a little more, for a nice swish.  I cut the lining/underlayer skirt using the spliced together pieces of Vogue 1247, lengthened, and put an invisible zip in the left side seam.  All French seams throughout, including that zip seam.  
Incidentally, I took a few pictures of doing the zip French seam in a sheer fabric, and can write a tut for anyone who is interested?  
I had enough fabric leftover to cut out a little blouse/top for her also, so she has a complete ensemble.  The little cropped blouse is a cut down version of NewLook 6483 with the sleeves lengthened.
Only the bodice of the top is lined and also French seams everywhere with only the armscye seams of the little top finished on the overlocker.  I've found that I'm really enjoying finishing my seams using more traditional methods lately and resorting to using the overlocker less and less.
Phew!  I have to confess I started making this outfit at the crack of dawn on Christmas Eve and finished it at about 6.30pm that evening.  It was a frantic race to the finish!  But it was worth it to see Cassie looking so lovely and summery and fresh and pretty in her outfit on Christmas Day.


Details:
Top; NewLook 6483 modified by cropping bodice and lengthening sleeves, white muslin and voile
Skirt; Butterick 3134, lengthened and lined with spliced-together Vogue 1247 lining, white muslin and voile
Sandals; 2 baia vista, from Zomp shoes

2014; a retrospective

$
0
0
So, on the last day of the year I like to look back upon some of my favourite sewing creations/outfits/pictures for the year, one for each month...
January

February


Some stats:
Number of garments made; 73 items, counting each set of 1 bra + 2 undies as one item.  This includes 11 items that I made for family.
Knitted garments; 5
Garments re-fashioned from old clothes; 8
The same number of items that entered my wardrobe also exited my wardrobe, so I'm holding steady on numbers there.  I ruthlessly got rid of a few things that didn't get worn at all this year, and I'm getting better at letting go of really old things that are past their best, yay! There's still room for improvement there, though  :)

Also, this year I took a picture of my ootd every day and totted up the totals.  Why? because stats are very dear to my analytical little heart  :)  This year 95.6% of the clothing I wore was made by me. This includes all my underwear, socks and hosiery.  Woot!
The remainder comprises scarves given to me by family, and my old MetalicusTshirts and Country Road cardigans that I still love and cannot bear to part with.  
I have eschewed buying RTW for 5 years now.  Yay!

Favourites: top place just has to go to my Alabama Chanin ensemble.  I'm HUGELY proud of this outfit, and feel very sort of high-end and couture-y when I'm wearing it.  Funny I know, since the fabrics are quite humble and ordinary in themselves and it is not extraordinarily eye-catching upon a casual glance.  I don't think I'll ever tire of it  :)  I also really adore both my Swedish dress and my blue ray dress.
Probably the biggest thing for me this year has been that I made for myself shoes! two pairs of rudimentary shoes, or maybe three counting my slippers?  OK then, just two  ;)  They're certainly not the most wonderful shoes in the world but I feel pretty proud of them and want to make a few more pairs sometime.
Just for the record though, I'm definitely not giving up buying RTW shoes.  Gotta leave myself something!

Fails... haha, well there were a few less than fantabulous moments in there, ahem. Some honourable mentions:
My pale coffee jeans, which sadly turned out to be beige slacks after all.  The fabric felt weirdly stiff and crackly and plasticky against my skin, and there was a slight camel toe issue that I worked on a couple of times but which remained stubbornly unfixable.  Binned.
My leatherette baseball skirt; it's the second leatherette skirt I've made that never felt right.  I think maybe leatherette skirts are not very me.  Fortunately, Cassie took a shine to it and it now lives in her wardrobe.  She's worn it several times too, so yay!  Handballed.
My raspberry Alabama Chanin tank dress.  I already covered the problems in the blog post.  It's in the process of being hopefully improved upon and fabulous-ifed as we speak.  Working on it.

I enjoyed keeping my daily outfit blog and I think I may still continue doing it again next year.  The photos are not super high quality, definitely of the no frills variety; but I'm OK with that since it's just like a quick visual thing for me to see how my outfit actually looks from an outside eye.  That's a very helpful thing sometimes.  Some days I find an ensemble especially pleasing to me, which is good.  Other times I've realised that the outfit I've been wearing all day is actually pretty meh, if not downright awful. *sigh*

So that's it for another year!  I'd like to send out a huge mushy thank you to everyone who reads my blog and who takes the time to comment, thank you!  It's not so long ago when sewing my own clothes felt like a very lonely hobby.  So I'm hugely grateful to have "met' so many lovely and inspiring like-minded creatives... and yay! for the internets for enabling us to connect and support and cheer each other on.
See you all in 2015!

Setting an invisible zip in a French seam

$
0
0
... as promised, and thank you to everyone who showed an interest  :)
And, just saying; I am a believer that there is no necessarily right or wrong way to do anything in sewing, but whatever works and is neat and tidy is pretty much going to be a "right" way, no matter how you got there!  This is merely just showing a way that I chose to do it :)
Step 1; sew the zip into the open seam.  Also, when inserting a zip into a very lightweight sheer fabric like this I always stabilise the seam with strips of the selvedge as described here, the ends of these can be seen at right protruding out either side from underneath the seam.  I used the selvedge of the thicker lining fabric here.
On the inside, pinch the seam allowances together, aligning the raw edges, right sides together. Snip 6mm (2/8") into the seam allowances, underneath the zip tape, about 1cm away from the stitching.
Turn raw edges to the outside, wrong sides together, align and pin.  Stitch a narrow 6mm (2/8") seam starting from the "snip" and continuing down to the bottom edge of the seam.  Note, this seam is on the outside of the garment.
Press the stitching.  Open the seam and press open.  
Close it again and press closed.
Trim the seam allowance to half its width.
Open the newly skinny seam and press open.
Turn to the inside, folding as accurately as possible along the line of stitching with wrong sides together.  Press the fold firmly in place.
Underneath the zip, pin the stabilising selvedge strips in place over the seam. 
Baste a 6mm (2/8") seam, commencing a few inches below the lower end of the zip and going up to as close to the zip stitching as possible.   Turn it out and check for straightness and neatness. 
Note; this is the most difficult part of the whole thing! below at right is pictured my first, not particularly straight, line of basting stitches :P
If it isn't neat, unpick and re-baste.  When you're satisfied with it, stitch over the basting stitches.
Stitch the remainder of the French seam, from the previous stitching down to the bottom edge of the seam in a 6mm (2/8") seam allowance.
Press the French seam to one side, and catch the lower ends of the zip tape by hand to secure it.
And that's it!  I also lined this skirt, and in a sheer fabric like this it's best to French seam the lining too.  I trimmed the zip opening seam allowances of the lining skirt before turing under and hand-stitching them invisibly to the zip tape.

2015 plans

$
0
0
Hello!
I've been thinking about my 2015 wardrobe requirements and sewing plans for this year.  To be honest I was kinda shocked at the sheer number of things I sewed last year, and not in a good way!  It wasn't lost on me that my favourite projects for last year were also the ones upon which I lavished the most time and thought.  So I'm thinking that to slow down, take my time, be more mindful; would be both a rewarding and sensible thing to do.   I mean, I have clothes.  Quite enough really.  But I still want to sew.  So it makes sense to concentrate on making fewer, but more individually labour intensive things, with an eye to provenance, longevity and quality of finish.
You know that word of the year thing?  I haven't had one before but it's a fun concept, yes?  Anyway I'm giving it a burl.  This year I wish to be more thoughtful in my sewing.
My on-going pledge to abstain from RTW will continue, so there may be a certain amount of maintaining-my-basic-wardrobe kind of sewing happening too, but I still would like to stretch myself with a few new patterns and skills.  It would be cool to make a few more Pattern Magic things.  And shoes!  And Alabama Chanin sewing, which is definitely an exercise in slow thoughtful sewing! is on the cards.


Also, and in the same vein, last year Nicki of this is moonlight contacted me about participating in her one Year one Outfit project.  You can read all about it on her blog; essentially the project involves making for yourself an outfit using all materials sourced and produced locally.  Obviously this does not mean simply visiting the local Spotlight store! but at a much more grass roots level.  So for me, finding Western Australian farmers and sustainable producers of their own yarns and/or fabrics, and making a high quality outfit using only these.  This also pertains to all dyes and finishing touches!  The only thing I think maybe we can give ourselves a pass on is thread, since I think the only threads we can get here are Gutermann's.  I'm pretty excited about this project and my brain is already buzzing with opportunities.  This one should be quite a challenge!
I'll just give one clue as to just one of my ideas, contained in an instagram I posted late last year from my friend J's farm in Cunderdin... ;)

Also;
I was quite inspired by Lauriana and Sue's vintage pattern journeys of last year.  The vintage sewing pattern pledge is conceived and hosted by Marie of A Stitching Odyssey, and I only wish I'd thought of joining in last year!  Whatevs, this year I'm IN.


During 2015, I hope to sew up at least five of my vintage sewing patterns. 

So, I shall see how I go!  Some of these things might overlap.
Oh, and also this year, I will join in with Anne of Pretty GrievancesJungle January for the first time; it's in its third year so what took me so long?! and hopefully Zoe's Me-Made May, as per usual.
wrt the former; my Jungle January fabric is flapping on the line, drying, as we speak! um, should that be type? read?  anyway all I shall reveal for now is that it is totally different from the expected, mwahaha. ;)
To be appearing here, very soon...

"poison dart frog" lingerie set

$
0
0
Sounds like a weird inspiration  for a lingerie set?  Well this is my thing for prttynpnk's Jungle January  :)
I really wanted to do something a bit different, something other than big-catty.  I googled jungle animals and was immediately drawn to the splendiferous group of amphibians that are the poison dart frogs; there is a huge variety of incredibly hued, jungle- and rainforest-dwelling frogs, in the most amazing array of beautiful, vibrant colours!  The one that really leapt, or hopped? out to me was this little guy.  Meet Oophaga silvatica, a native of Colombia.  This colour morph is called "Koi".  
I loved its pale blue/red colouring and immediately envisioned some sort of lace overlay to mimic the markings.
I did a certain amount of agonising over "what" to make, I was a little tempted to make a dressy cocktail number, but practicality won.  Keeping my new resolution to sew thoughtfully firmly in mind!
The pale aqua blue bamboo knit and red stretch lace are from Fabulous Fabrics, the baby blue shoulder strap elastic from Homecraft Textiles.  The bra pattern is my current favourite; MakeBra 2610, an underwired bra with a pieced foam cup lining.  I'm very comfortable with this style so I am super happy to have another one in my collection.  
I made two pairs of matching knickers using two different patterns; the boy leg hipsters above are a pattern sent to me by katherine h and the bikini brief below are from my tried and true McCalls 2772.  This is the second time I've made the MakeBra pattern, the second time I've used katherine h's pattern and about the millionth time I've used the McCalls... well, it feels like it sometimes anyway!  The McCalls bikini brief pattern is hands-down my comfiest and easiest to wear, but I do still like making a different one occasionally, just for some variety.
I sewed the lace on the undies by machine but thought it ended up looking a little too... machine-y? so for the bra I sewed the lace on to the cups by hand, using invisible fell-stitching with the stitches hidden within the foam lining.  This does look much nicer, no surprises there.
I couldn't find any blue or red lingerie elastic to match in nicely, so instead used regular 6mm braided elastic and enclosed it inside a once turned-under hem, topstitched on the outside in zig-zag stitch.  It doesn't look quite as well finished on the inside as lingerie elastic would, but doesn't look terrible.  And it works just fine  :)
Those very long-tailed, decorative bows on all 3 pieces: I've seen several rtw lingerie sets decorated with much longer tailed bows than usual and liked how it looks, so I decided to cut my tails quite long too.  Hmmm, not quite sure now!  They do look quite romantic and pretty, but I'm starting to wonder how practical they'll be in situ.  So these are currently on trial and may or may not get cut shorter.
Thoughts; ok I love this colour combination in theory, in practice it does feel a tiny bit on the flashy side for lingerie.  For me, I mean.  My usual style tends to run to the colourless and slightly boring, and this set is anything but! so I'm stepping outside of my comfort zone here.  But I kind of still love it anyway.  It's not the obvious thing anyone would think when imagining "frog-inspired" but I'm totally going to think of frogs every time I look at it.  
*ribbit* 

Details:
Bra; MakeBra 2610, in aqua bamboo knit and red stretch lace, my review of this pattern here
Undies;  (L) McCalls 2772, and (R) a pattern from katherine h

#hoodie

$
0
0
I love hoodies.  And I love dark browns, crinkly linen and loose relaxed-fit comfy loungewear.  Despite all those loves, it's taken me a ridiculously long time to finish this hoodie.  I started it before I left for Melbourne last year! woops!
I used Burda 09/2014-115, a tunic/hoodie pattern; and this lovely deep, deep, burnt chocolate linen, that I bought from Tessuti's in Melbourne on our previous, 2013 trip there... extra woops!  Sometimes I hoard lovely fabrics for forever and feel guilty about it, but really it's only because I can't think of the Perfect Project which it would like to become.  Some fabrics tell you straight away, whilst others sit there and taunt you with their loveliness while never giving any hint of what they want to be.
Anyway, finally I made something.
To be honest, this is version two.  
The pattern is actually for a tunic a good 6" longer than this, and that is how I made it.  I had visions of those lovely chic European lagenlook-y ladies wearing long and loose flowing clothes in earthy neutral shades.  I started out with high hopes, made the hoodie/tunic.  Felt really good about it, all went together smoothly, happy with my decision, almost finished it; perfectly hand narrow-hemmed shirt-hem and all.  It was easily long enough to be a dress.
Tried it on, and was immediately struck by the fact that I had made myself a Friar Tuck robe.  Yes, in its long version I looked exactly like Friar Tuck. Do I want to look like Friar Tuck?  Emphatically, no.  Disastrous.  Dejectedly shoved it aside for, um; a few months.  Hmmm, how time flies!  
Anyway, I really did want it to work, and so just recently I drastically shortened that hem and rolled the sleeves up.  Massive improvement. I left off the waist tie channel and tie.  I reckon that as a boxy, shorter tunic, with rolled up sleeves, it still had that relaxed, fairly oversized, comfy vibe that I was after... stylishly chic, I hope!
The dress has pockets and so I kept those, cutting and re-hemming it to just below that level.  The button placket is invisibly sewn closed, because all buttons just seemed either the wrong size or colour, or just plain wrong against the fabric.
For some reason that now escapes me, I felt allergic to the idea of self-fabric bands to hold up the rolled sleeves.  At the time I felt they would look unutterably boring and/or too match-y.  So I made some sleeve holder-up thingies from skinny metallic belts.  It felt like a good idea at the time, and luckily I'm still quite pleased with them, feel like they bring something interesting to the table, on what is otherwise a quite plain and featureless hoodie.  I've tried wearing the hoodie with a few other of my clothes and it's interesting that that little bit of silver-y, pewter-y metallic on the sleeves really helps the hoodie to "go" with a lot of my other clothes far better than it would without.
The neckline/hood seam is hidden underneath a band, cut from the leftovers from this dress.  It felt quite fortuitous that the brown stripes were wide enough that I could do this, with barely a hint of cream pin-stripe to be seen!

Details:
Hoodie; Burdastyle 09/2014, 115 shortened, of burnt chocolate-brown crinkly linen
Shorts; Burda 7723, grey/cream pinstripe linen, details here and my review of this pattern here
Disclaimer; this pattern was given to me by Burdastyle; however I chose it myself from the large range of patterns on offer because I liked it.  All opinions are most definitely my own.  There are no affiliate links on my blog and never will be...  I'm in it because I love sewing  :) 

red gingham

$
0
0
... new dress!
I feel like I've been wearing the same little summer dresses over and over and over.  Not that there's anything wrong with that! because I like them all   :)  but a few of my standbys are getting on their last legs and the wardrobe needed new blood.  And there's still a lot of summer to go.
I've been eyeing off dress E from the Stylish Dress book by Yoshiko Tsukiori ever since I got the book, in fact it was my Sew Bossy dress of choice for Reana Louise!  I loved hers and alway wanted to make one for myself too... one day.  The book is chokka with patterns for cute and practical little summer dresses that are absolutely perfect for our hot Australian summers, and this pattern is yet another goodie although I ended up making quite a few little changes.  Some due to my fabric;  a red/cream cotton gingham with a very slightly crinkly, seersucker-y texture, from Spotlight.
The front of dress F has five box pleats in the bodice and I was determined for the gingham pattern to match perfectly on the front.
Please excuse and/or feel free to skip the following; where I boast obnoxiously about my perfect pattern matching.  Yes, there are five box pleats up there *insert smug self back-patting*
There's only one way to pattern match to that degree, and that's to pin the flippin' heck out of it.  I pinned at each and every check intersection, basted each pleat and inspected for flaws obsessively before the final sew.  I'm pretty pleased, even to my eyes I can't see the joins at all.  And I'm pretty fussy  :P
Matching the pleats into the gingham weave like that necessitated cutting the front piece to a different width from the pattern piece.
It's not hard to work out how to do this, the only criteria is that the front fits onto the front facing piece once pleated.  A little quality time with the tape measure and some mental calculations to exercise the ol' brain cells a bit.  Each box pleat is 6 checks wide, with 4 checks in between each one and it turned out that the overall width of my front piece is slightly narrower than the pattern piece.
Other changes:  gathering looked terrible in this bouncily textured fabric, so I cut the back skirt straight, eliminating gathering into the bodice.  The sides were slimmed down considerably, tapering out to 10cm off each side at the hem, I added in-seam side pockets instead of patch pockets.  I did put the little cap sleeves in to start with but they just felt a bit too "busy" in gingham, so I unpicked them off and finished the armholes with a bias-cut strip inside instead.  The pattern is quite short so I lengthened my dress by 10cm, with a little tuck at the original hemline, just for fun  :)
So yeah, I have nothing much more to say!
I've made a cool and breezy, simple and uncomplicated little summer dress.  I love it already  :)
this one made me laugh... hmm; terrific maternity dress! 

Oh, and Gabrielle and I are twinsies today!  I had nearly finished this dress and was amazed when Gabrielle posted a picture of her red gingham dress on instagram!  great minds thinking alike, of course  :)  check out Gabrielle's gorgeous gingham dress here

Dress; dress E from the Stylish Dress book by Yoshiki Tsukiori, red cotton gingham
Thongs; Havaianas

Carolyn pyjamas

$
0
0
I was supremely flattered when Heather of Closet Case patterns contacted me to ask if it was ok to name her latest pattern after me… wow, seriously?!
!!!!!  
*deeply flattered moment*
So the Carolyn pattern is for pyjamas, hehe.  Yep, I inspired pyjamas!  Honestly I'm not sure why I find that borderline hilarious, but there it is!
I have to say though; it’s amazing that Heather totally has her finger on the pulse of what everyone is currently needing to wear and sew.  
Loungewear.
Very astute.  I mean, I love Vogue patterns for their smart little fitted designer dresses, and have often thought that the working woman can do no wrong by sewing up nothing but little Vogue dresses for her office/working wardrobe… so smart and stylish and absolutely perfect for a businesswoman's life.  but here’s the thing, the number of people working from home has increased significantly over the last few years and comfortable loungewear is definitely a thing that work-from-home peeps are stocking up on for their working life, not just for their after hours life.  A few years ago, who’d have thought it? But now totally this is a real trend.  I mean, I work from home myself. And although I need and want to dress up smartly for many things in my life, my real wardrobe workhorses lean towards the easy-to-wear and casual.
Enter stage right; stylish and smart loungewear.
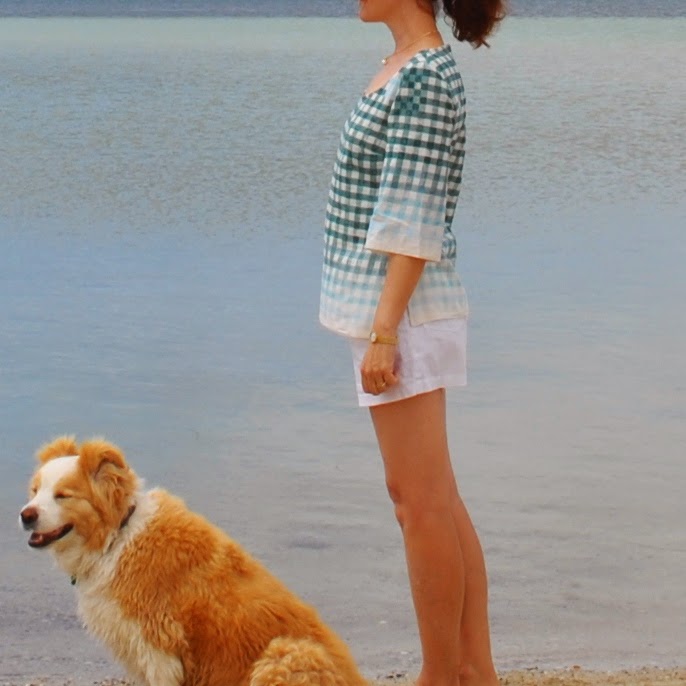
The things one would actually wear to bed are generally loose-fitting to enable minimum chance of ripping or restraint while one is unconsciously flailing about, but Heather’s new Carolyn (pinch me!) pyjamas have a slightly sleek and tailored air to them; a body skimming rather than blouse-y line, that in the right fabrics one could happily wear outside the house if one so wished.  Without looking like one is wearing pyjamas!
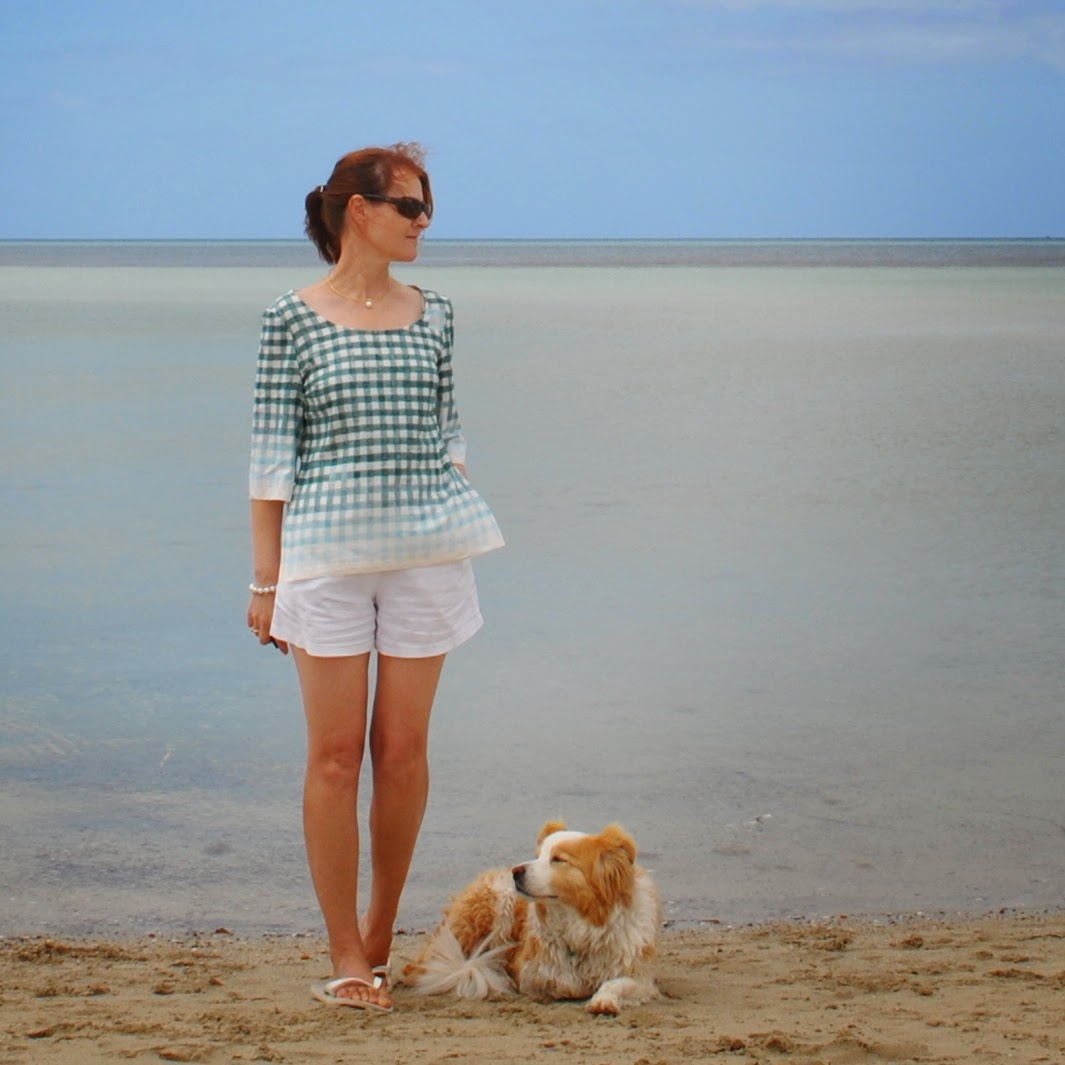
With that in mind, I chose to make my test pair in luxe-ish, not-bedwear but daywearlike fabrics; namely silk hessian for the body of the top, poly organza for the sleeves and a silk/cotton for the collar and cuffs.  The little shorts are in a soft, lightweight polycotton.  These were all from the remnant table at Fabulous Fabrics.
I chose to make view C with long sleeves on the top and leaving off any piping.  I love piping as much as the next person... however I felt piping in this shirt/shorts style IS going totally “pyjama” and I'm serious about wanting to wear my outfit out and about.  In the streets even!
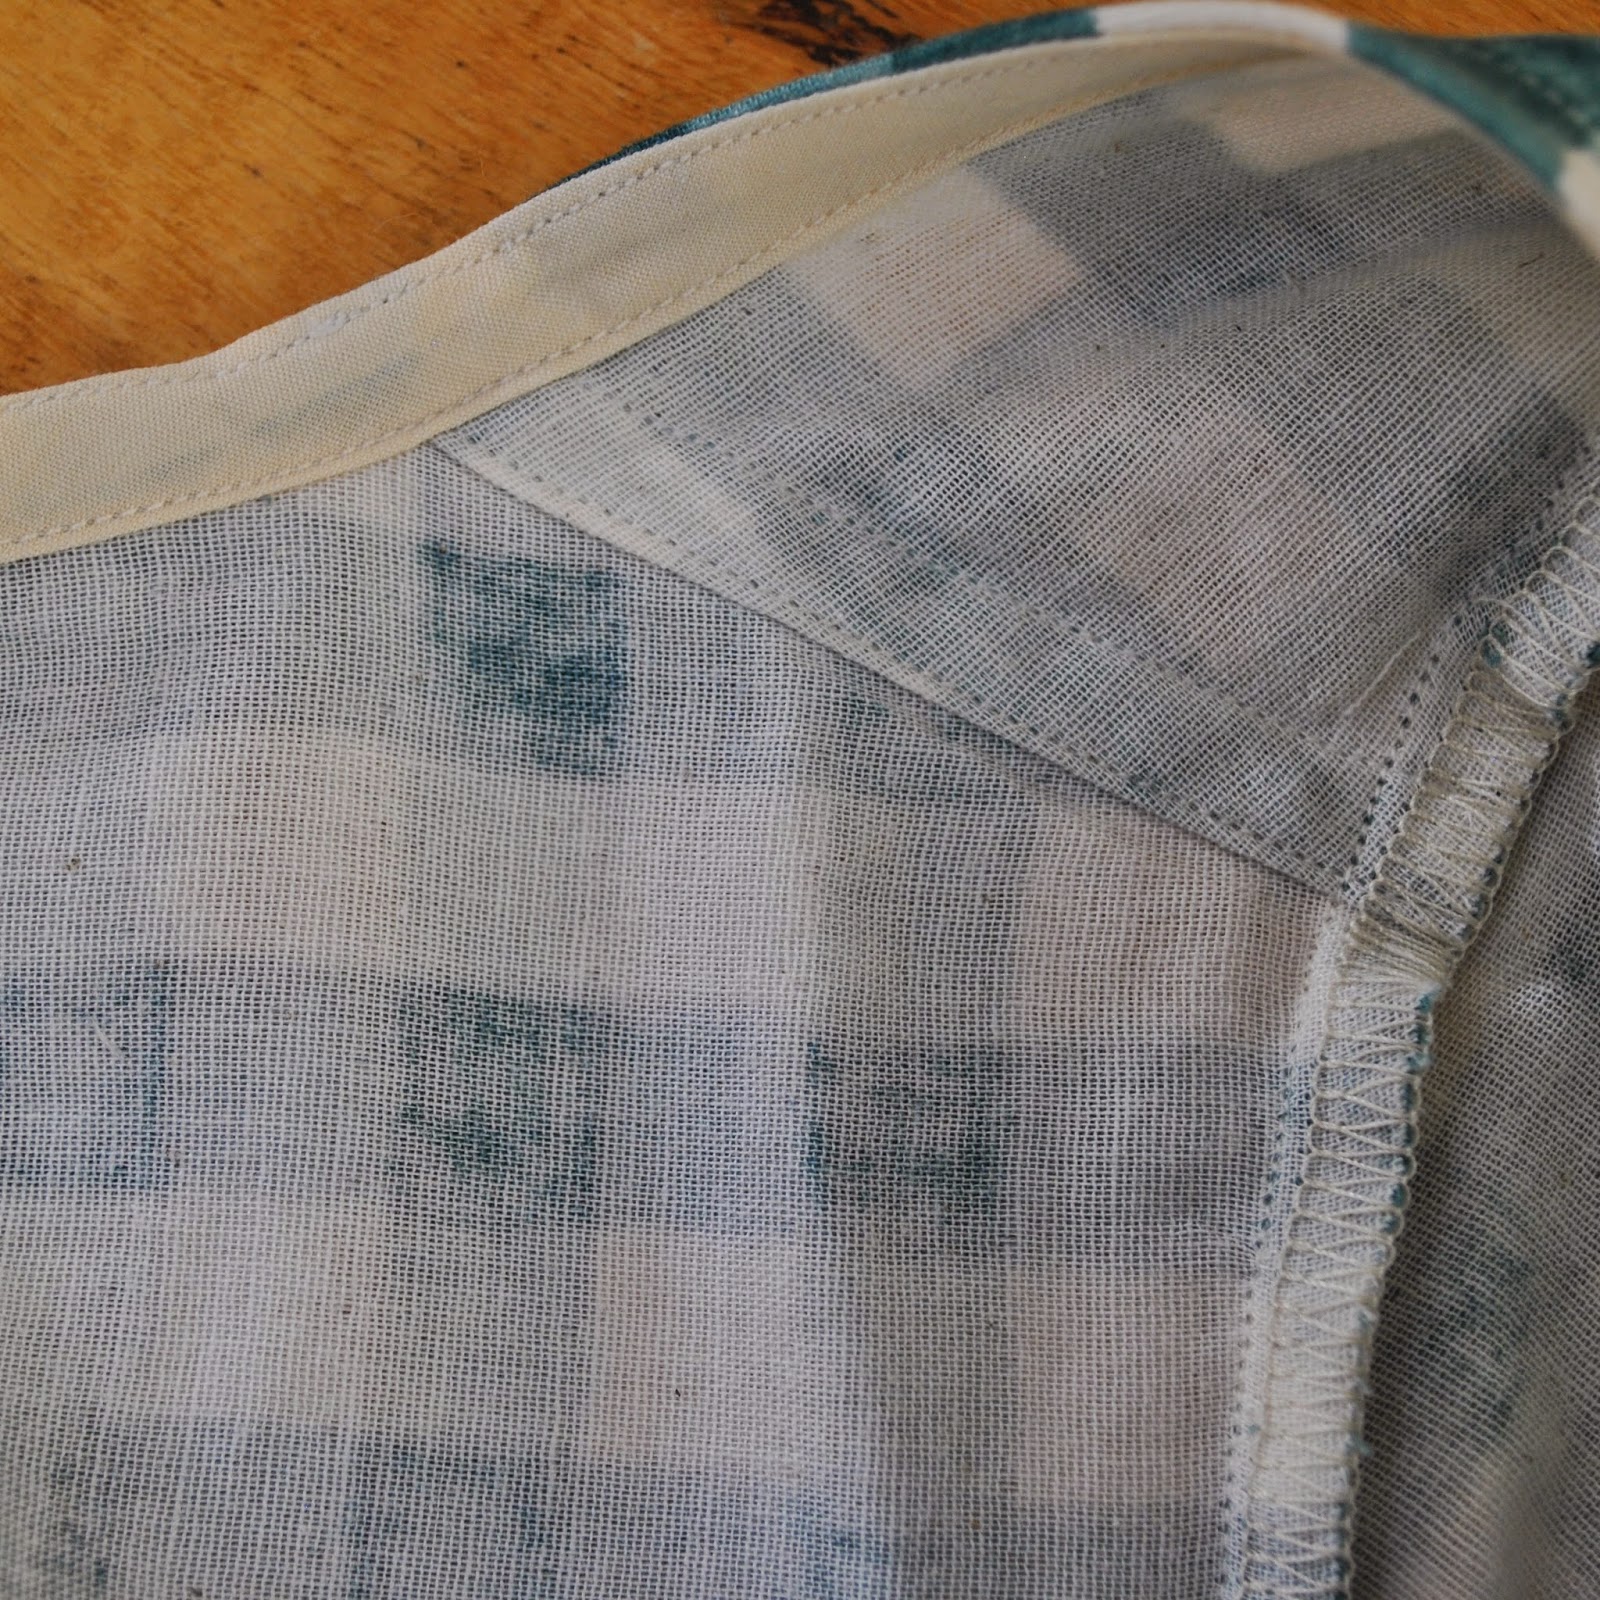
The shirt is a classic, sleek, unfitted style, with notched collar and a gently curved hemline.  I felled the seams in the body of the top and French seamed those sheer sleeve seams.  The armscye seams were overlocked before stitching down to the shirt body to finish; faux felling, if you like!
The shorts are super quick and easy things to whip up, with satisfying huge pockets.  The pockets are the same fold-back design that Heather used in her Ginger jeans, which was the very first time I had come across pockets like this in my 40+ yrs of sewing .  Yes, really!  I’m starting to think of them as her signature pockets.
I made my shorts with the cuff as per the pattern, but sans piping and with the cuff invisibly stitched in place from inside the fold, so it appears to be a folded-up cuff.  I like this cuffed look on the bottom of shorty shorts like these  :)

So... do I love the Carolyn pattern, well heck yes!  The shirt especially is an easy classic shape and tres chic, in my opinion.  I will definitely be making both pieces again, maybe even as actual pyjamas!
As for my fabric choices for my test sample here... well, I was using all remnants and my favourite part is the sheer and floaty, leaf organza sleeves, and I also love the strength of the black accent collar and cuff details.  However while the roughly textured, stone silk hessian seemed like a good idea at the time, now I'm not so sure if it's letting down the rest of the ensemble.  Hmmmmm.  I'm gonna wear it for a while and sleep on it - by that I mean figuratively not literally, of course!   but don't be surprised if a dye job or small subsitutory type of refashion happens on this bit in the near future!

Details:
Set; the Carolyn (eek!) pyjamas by Closet Case patterns, shirt in silk hessian, poly organza, silk cotton; shorts in polycotton

dress of plastic splattered linen

$
0
0
I've made a summery little dress for myself.
This is dress F from the Japanese pattern book Stylish Dress Book, by Yoshiko Tsukiori.   I've made this pattern up once before here, and that polka dot dress is still in my wardrobe and remains one of my perennial favourites.  I don't know if this new one is going to topple its big sister from my favourites list, but anyway, it'll still be a goodie and bound to get worn a lot in this long, loooong, very hot summer we're having!
I made a couple of teeny changes, adding inseam side pockets and also leaving off the sleeve ties.  Instead the sleeve opening has a button sewn on to close.  Still looks quite cute and meant I didn't have to try to sew and turn out those skinny-binny sleeve ties in this lovely but rather challenging fabric.
I know... it doesn't look particularly challenging in my pictures; it appears from a distance to be a quite ordinary duck-egg blue, handkerchief linen.  Only closer inspection reveals random dots of what appears to be clear plastic, splattered all over it.  This has the happy side effect that in the sunlight it appears to sparkle like diamonds, *squeals, oooh pretty!* and the less than happy side effect that it was quite difficult to actually sew the splatters and they don't fold well at all; also it, how shall I say this? presents an Ironing Challenge, to say the very least.
 See, obviously linen requires the hottest setting on your iron but the plastic splatters turn into soft and sticky, glue-y spots that stick to your iron and everything else when they're subjected to heat.  I've pondered it for four years; four! since I bought this lovely stuff from the Fabric Store in Melbourne! wondering what I could make with it that would do it justice, finally hit upon this.  Also, reflected all over again upon how super silly it is to leave lovely fabric languishing in le stash when I bought it for the fun of making it up and wearing it, what the heck.
Happily, I think it did work out!  :)
sleeves finished with buttons in lieu of the ties; and pockets
I finished the neckline with a bias-cut strip, but it was nearly impossible to attain neat looking top stitching over the splatters! so I ended up unpicking all attempts and just hand-stitched it down with invisible fell stitches along both fronts.  I kept the double row of machine stitching on the back neckline, where it miraculously turned out kinda neat-looking.
During construction I pressed either using my ironing cloth or on the wrong side of the fabric, and had to peel it off the cloth or the ironing board each time! and wondered if the splatter dot situation, while a cool concept and I visually I loved it! was in practice going to be a massive pain to iron.
Well I've washed and ironed it once now and fortunately I don't think the dots are going to be a problem.  I ironed the dress inside out and even though it does stick together it's no biggie to just peel the layers apart while turning it right side out again.  And the plastic does cool and dry hard again pretty quickly. Thank goodness.
The hem line has a tuck around the bottom.  This is actually a crafty fix of a cutting booboo.  You see, when I made my first dress F I had screenprinted my own fabric and I forgot to note that I had actually lengthened the pattern pieces to fit my print.  Actually I find it good practice to add by default like, at least 10cm in length to any dress from a Japanese pattern book.  Anyway, this time I carefreely cut out the pattern as is... result; scandalously short dress.  Darnit.
Fortunately I had enough fabric to cut extra lengthening bits and sewed them on to the bottom, hiding the joining seam up inside this tuck.  You can't see the join on the inside because I turned up the hem long enough to enclose everything.  The hem is hand-stitched using invisible fell-stitching, and I caught the upper fold of the tuck in the same stitching to secure all the layers together.
Problem solved!
In fact, I have to say that this is a very simple dress which belies its unexpected difficulty-factors! but I am so pleased that it all came together quite happily and satisfactorily in the end.  :)

Details:
Dress; dress F from the Stylish Dress book, by Yoshiko Tsukiori, plastic splattered linen
Hat; Vogue 8844, ivory corduroy, details and my review of this pattern here

Red dress; 6 different ways

$
0
0
It's been a while since I did one of these!  I don't really have deliberate dress-up sessions to test out my clothes' versatility any more, but it's still interesting for me to look back and get a general overview of just how well my self-made wardrobe mixes and matches and whether everything works together.  This red cotton dress has been an absolute beaut!  it's been worn a tonne and proved itself to be quite a versatile year-rounder too.  I made it late 2013, using an adaption of dress pattern M from the Stylish Dress Book by Yoshiko Tsukiori.
I think its usefulness has lain in several factors: firstly the cheerful tomato-red colour is supposed to be one of "my" colours, as well as a shade equally at home in both hot and cold weather, and also the style of the dress is quite plain and simple, lending itself very well to mixing and matching with a bunch of other clothing pieces and stylistically not fighting with anything.
Some of the highlights in its life:
At left, its raison d'être was for me to have something for Wildcats games ... I wore it to just about every single one and fitted in fine with everyone else!  At right, during a long hot summer it was fabulous to wear just all on its own, sans any adornment.
At left; the colour looked good with just about every colour cardigan and scarf that I own; and at right, I'm wearing it here inside out! for Fashion Revolution Day.  I chose it for that day mostly because it had patch pockets and not inseam bag pockets, making this the least weird-looking inside-out option in my wardrobe.   Hehe and yes, I was brought up that the insides of a piece should look presentable enough for them to be worn inside out without embarrassment, but not that I purposefully make things with the actual intention of wearing them that way very often!
Speaking of that; the mission statement of Fashion Revolution is a comfortable fit for those of us who sew... after all; the question is "Who made my clothes?" If you can give an answer, and by that I don't think they mean just "Brand x" then you are making a difference.  Albeit a small one, but still.  If your answer is "me", then that can only be a very good thing!  I am planning to do the inside out challenge again this year on 24th April, please join me!
At left; on cooler days I liked wearing my red dress with my paprika tights because they were such a good colour match, note to self; having matching tights and dresses/skirts is actually an excellent wardrobe idea, I must plan for this more!  At right, I really liked this winter outfit a lot too.  I know summer dresses can be kind of a weird choice for winter, but if the style is loose enough to enable wearing with lots of layers under and over for warmth then I think it can be done very successfully.  I was perfectly warm in this wintery ensemble.  Wintery for Perth, that is.
Sadly, at its last wearing I decided that this red dress was now just a bit past its best *sob*.  It's faded soooo much and has developed a very noticeable seat in the bottom-al region so out it's gone to the rag/"potential refashion" bag.  Leaving a giant red-dress-shaped hole in my wardrobe :( but I'm hoping my recent red gingham dress is going to step in to fill that.
We shall see, we shall see....
Viewing all 820 articles
Browse latest View live